LC Workshop Manual [PDF]
LC Workshop Manual GEELY INTERNATIONAL CORPORATION Feburary 2009 Foreword Geely LC series sedans (HQ7131, HQ7101B1, H
60 0 37MB
Papiere empfehlen


![LC Workshop Manual [PDF]](https://vdoc.tips/img/200x200/lc-workshop-manual.jpg)
- Author / Uploaded
- Adrian Macaya
Datei wird geladen, bitte warten...
Zitiervorschau
LC Workshop Manual
GEELY INTERNATIONAL CORPORATION Feburary 2009
Foreword Geely LC series sedans (HQ7131, HQ7101B1, HQ7101) are brand new superior models developed by Geely Group who has fully proprietary intellectual property rights. These sedans reach international leading level in model design, power, comfort, safety and manufacturing technology while featured in beautiful appearance, economy, environment protection and safety. With respect to the power, Geely LC series sedans are equipped with 1.3L and 1.0L EFI engines developed and manufactured by Geely itself, and has reached “National IV” emission standard. This manual contains a detailed description of the structures and principles, servicing and adjustment, removal, assembling technology and matching clearance of the parts of the Geely LC sedans with torque information of the bolts and nuts as well as schematic diagram for special tool operation. This manual also introduces vehicle electric circuits and elaborates ABS system, SRS, MT20U2 electronic control fuel injection and ignition system, sound and air conditioning system. You can refer to this manual for the information about the regular maintenance, servicing, adjustment, troubleshooting, removal and installation procedure, specific operations of the LC sedans This manual covers the matching relation among the engine assembly, transmission assembly and the vehicle, but does not have the further description of the structures and principles of the engine and transmission assemblies and their servicing process. You can refer to the service manuals solely prepared for engine assembly and transmission assembly for the information. All information in this manual is based on the latest products released at the time of publication of this manual. However, the specifications and procedures may need to be modified, and the subsequent change will be revealed in later versions. This manual is prepared by Geely Automobile Research Institute under the assistance of technical staff from Zhejiang Haoqing Automobile Co., Ltd and Geely International Corporation. Readers discovering during the use of this manual the errors and careless omissions due to limited skills of the preparers and tight schedule are encouraged and pled to contact Technical Department of Geely International Corporation in time for our timely correction of the mistakes.
Geely International Corporation Feb.2009
1
Contents Chapter 1 Outline .......................................................................................... 7 Chapter 2 Engine ........................................................................................ 15 Part 1 Engine Assembly.....................................................................................................15 I. II. III.
Engine Inspection .................................................................................................................15 Removal of the Engine Assembly from the Vehicle ..............................................................20 Drive Belt Replacement ........................................................................................................22
Part 2 Engine Mechanical ..................................................................................................24 I. II. II. III. IV. V. VI.
Engine Components (3G10 engine) .....................................................................................24 Engine Component Assembly (3G10) ..................................................................................25 Engine Component Assembly (3G10) ..................................................................................26 Engine Component (MR479Q) .............................................................................................27 Valve Clearance ...................................................................................................................28 Air intake system ..................................................................................................................30 Exhaust system ....................................................................................................................33
Part 3 Engine Control System (1.0L) .................................................................................35 I. II.
M7.9.7 EFI System ...............................................................................................................35 Throttle Body Assembly........................................................................................................38
Part 4 Engine Control System (1.3L Delphi MT20U2) .......................................................39 I. II. III. IV. V. VI.
System Components ............................................................................................................39 On-Board Diagnostic (EOBD)...............................................................................................51 Typical trouble and troubleshooting ......................................................................................68 Typical datastream of DELPHI electronic fuel injection system ............................................77 Gear information learning procedure of EOBD system.........................................................82 Circuit Schematic Diagram for MT20U2 System ..................................................................83
Part 5 Cooling System .......................................................................................................84 Part 6 Fuel System ............................................................................................................87 I. II. III. IV. V. VI.
Check Fuel System Pressure ...............................................................................................87 Fuel Pump Inspection...........................................................................................................88 Fuel Pump Replacement ......................................................................................................89 Fuel tank replacement ..........................................................................................................90 Fuel Emission Control System..............................................................................................92 Carbon Canister Replacement .............................................................................................94
Chapter 3 Chassis....................................................................................... 96 Part 1 Transmission Control...............................................................................................96 I. II. III.
Introduction of Transmission Control ....................................................................................96 Flexible Shaft for Shifting Gear.............................................................................................98 Manual Transmission Shift Assembly .................................................................................100
2
Part 2 Accelerator Pedal Device ......................................................................................102 I.
Introduction of Accelerator Pedal........................................................................................102
Part 3 Clutch Assembly....................................................................................................104 I. II. III.
Introduction of Clutch Control System ................................................................................104 Clutch Components and Common Failure..........................................................................105 Clutch Pedal .......................................................................................................................108
Part 4 Manual Transmission Assembly (1.0L).................................................................. 117 I. II. III. IV. V. VI. VII. VIII.
Removal and Installation of Transmission .......................................................................... 118 Removal and Installation of Transmission Assembly .......................................................... 119 Disassembly of Gear Shift Guide Shaft Sub-assembly.......................................................121 Disassembly of Differential Sub-assembly..........................................................................122 Disassembly of Input Shaft Sub-assembly .........................................................................123 Assembly of Input Shaft Sub-assembly ..............................................................................125 Assembly of clutch housing accessories and clutch release mechanism ...........................130 Installation of Transmission Assembly ................................................................................131
Part 5 Manual Transmission Assembly (1.3L)..................................................................134 I. II.
Assembly Disassembling....................................................................................................134 Assembly Assembling.........................................................................................................151
Part 6 Drive shaft/Driveshaft ............................................................................................152 I. II.
Drive shaft, Driveshaft and Transaxle .................................................................................152 Front Constant-velocity Drive Shaft ....................................................................................154
Part 7 Brake System ........................................................................................................163 I. II. III. IV. V. VI. VII. VIII. IX. X. XI.
Introduction to Brake System..............................................................................................163 Brake Fluid .........................................................................................................................165 Brake Pedal ........................................................................................................................166 Brake Master Pump............................................................................................................169 Vacuum Booster .................................................................................................................175 Front Brake.........................................................................................................................178 Front Wheel Hub and Bearing Assembly............................................................................183 Rear Brake Drum................................................................................................................189 Rear Wheel Hub and Bearing Assembly ............................................................................194 Parking Brake System ........................................................................................................196 ABS system ........................................................................................................................200
Part 8 Wheel ....................................................................................................................209 I.
Tire Inspection and Wheel Replacement ............................................................................209
Part 9 Power Steering System .........................................................................................210 I. II. III. IV.
Power Steering System ......................................................................................................210 Steering Drive Mechanism..................................................................................................212 Mechanical Steering Gear Fixing Device............................................................................218 Power Assisted Steering System ........................................................................................223
Part 10 Front Suspension System ...................................................................................234 I.
Front Suspension System ..................................................................................................234
3
II. III. IV. V. VI.
Front Suspension ...............................................................................................................236 Front Wheel Alignment .......................................................................................................239 Front shock absorber and coil spring..................................................................................241 Front suspension lower swinging arm assembly ................................................................244 Front Stabilizer and Linkage Assembly...............................................................................245
Part 11 Rear Suspension System ....................................................................................249 I. II. III. IV. V.
Introduction to Rear Suspension System ...........................................................................249 Rear Wheel Alignment........................................................................................................252 Left and Right Suspension Coil Spring ...............................................................................253 Rear Shock Absorber Installation Assembly .......................................................................254 Rear Shaft Member ............................................................................................................255
Chapter 4 Electric System & Accessory ................................................. 258 Part 1 Starting and Charging System...............................................................................258 I. II.
Starting System (3G10. 479Q)............................................................................................258 Charging system.................................................................................................................260
Part 2 Wiper and Washer System....................................................................................264 I. II.
Wiper and Washer System Inspection................................................................................264 Replacement and Adjustment.............................................................................................267
Part 3 Combination Instrument System ...........................................................................269 I. Schematic circuit diagram of combination instrument and distribution of multi-pin plug-in unit terminal .........................................................................................................................................269 II. Malfunction Symptom Table and Troubleshooting ..............................................................271
Part 4 Audio System ........................................................................................................281 I. II. III. IV.
Introduction to Audio System ..............................................................................................281 Audio System Connector Terminal Layout..........................................................................283 Audio System Inspection ....................................................................................................284 Audio System Replacement ...............................................................................................289
Part 5 Centralized Controller............................................................................................291 I.
Centralized Controller System ............................................................................................291
Part 6 Safety airbag system.............................................................................................299 I. II. III.
Maintenance guidance .......................................................................................................299 Maintenance Procedures and Trouble Classification..........................................................312 Rejection of safety airbag ...................................................................................................340
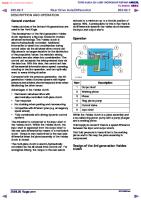
Part 7 Air Conditioning System ........................................................................................346 I. II. III. IV. V. VI. VII. VIII.
General Information............................................................................................................346 Symptom table....................................................................................................................348 Refrigerant inspection.........................................................................................................353 Discharge and Fill-up of Refrigerant ...................................................................................359 Air Conditioning Operating Mechanism ..............................................................................360 Blower Assembly ................................................................................................................363 Air Filter Assembly..............................................................................................................364 Air Conditioning Assembly..................................................................................................365 4
IX. X. XI.
Compressor Fixing .............................................................................................................369 Condenser Fan Motor and Condenser Assembly ...............................................................372 Pipe System Assembly .......................................................................................................373
Part 8 Reversing Radar System ......................................................................................374 Part 9 Light System .........................................................................................................377 I. II. III. IV. V. VI. VII. VIII.
Introduction to light system .................................................................................................377 Light System Malfunction Inspection ..................................................................................379 Front HeadLamp Replacement...........................................................................................382 Front Fog Lamp Replacement ............................................................................................383 Rear Combination Lamp Replacement...............................................................................384 High mount brake lamp replacement..................................................................................384 Room roof Lamp Replacement...........................................................................................385 License Plate Lamp Replacement ......................................................................................385
Part 10 Switch System.....................................................................................................386
Chapter 5 Interior & Exterior Trim and Accessories.............................. 398 I. II. III. IV. V. VI. VII. VIII. IX. X. XI. XII. XIII. XIV. XV. XVI. XVII. XVIII. XIX. XX. XXI.
Instrument Panel and Dashboard .......................................................................................398 Auxiliary Dashboard Assembly ...........................................................................................402 Vent Cover Plate.................................................................................................................404 Front Bumper......................................................................................................................406 Rear Bumper ......................................................................................................................408 Fender ................................................................................................................................400 Front Door Interior Trim ......................................................................................................412 Rear Door Interior Trim.......................................................................................................414 Side Wall Interior Trim ........................................................................................................416 Front Seat Assembly ..........................................................................................................419 Rear Seat Assembly ...........................................................................................................421 Safety Belt ..........................................................................................................................423 Front Windscreen ...............................................................................................................432 Backdoor Windscreen Assembly ........................................................................................435 Outside Rearview Mirror .....................................................................................................438 Interior Rearview Mirror ......................................................................................................439 Roof Trim Components.......................................................................................................440 Carpet and Heat Insulating Carpet .....................................................................................442 Fuel Filler Cap Opening Device..........................................................................................443 Engine Hood Lock Opening Cable Assembly .....................................................................444 Plug List..............................................................................................................................445
Chapter 6 Body ......................................................................................... 446 Part 1 Summarize ............................................................................................................446 I.
Body Structure ....................................................................................................................446
Part 2 Body Repair ..........................................................................................................455 I. II. III. IV. V. VIII.
Body Damage Forms and requirements For Repair ...........................................................455 Typical Technique of Body Panel Repair ............................................................................463 Repair after Body Damage .................................................................................................464 Features and Composition of Automobile Body..................................................................473 Painting Techniques After Body Repair...............................................................................485 Service Data for Body.........................................................................................................486
5
Appendix1 :Body Key Dimension ............................................................ 489 I. II. III. IV.
Engine Compartment..........................................................................................................489 Body left/right side wall .......................................................................................................490 Opening part of the body (view from back) .........................................................................491 Body bottom .......................................................................................................................492
Appendix2 :Harness diagram of LC model electronics ...................................... 493 Appendix3 :Principle diagram of LC model electronics...................................... 509
6
Outline
Chapter 1 Outline Table of Basic Parameters No.
Item
unit
HQ7101,HQ7101B1
Length Dimensions
1
3598
Width Height
Dimensional parameters
Wheel span
1630 mm
1465
Front wheel
1420
Rear wheel
1410
Wheel base
2340
Front suspension
mm
718
Rear suspension 2
Drive type
3
Number of occupants
540 Front-Engine front-drive (FF) Person
Gross Vehicle Weight (kg)
4
Weight parameters
Gross Vehicle Weight (kg)
5
Passability
5 937
985
Front Axle
560
605
Rear axle
377
380
1312
1360
669
710
Max. curb mass Max. curb mass (kg)
(kg)
kg
Front Axle Rear axle
643
650
Min. turning diameter
m
≤9.5
Min. ground clearance
mm
≥121
Approach angle
≥19°
Departure angle
7
8
9
Wheel alignment
Reliability
Dynamic performance
Economy
≥35°
Left inward/outward
°
37.28°/36.92°/32°~40.92°
Right inner/outer
°
31°/39°
Camber
°
-0°47′±45′
Kingpin inclination
°
9°33′±30′
Front wheel steering angle 6
HQ7131
Kingpin Caster
°
2°47′±45′
Front wheel toe-in
mm
1.1±2
Rear wheel toe-in
mm
3±3
Mileage of first malfunction
km
≥8000
Average mileage of malfunction
km
Max. speed
km/h
≥5000 ≥155
≥155
(0~100)km/h acceleration time
s
≤15
≤14
Min. stable speed at Gear 4
km/h
≤25
≤25
Max. grade abilitity
%
≥20
≥20
Fuel consumption at constant speed (60 km/h)
L/100km
≤4.2
≤5.6
Fuel consumption at constant speed (90 km/h)
L/100km
≤5
≤6.85
Sliding distance(full load, initial speed 50km/h)
m
≥550
≥550
7
Outline
Table 2 Models and technical data of major systems No.
Item
1
Drive type
2
3
Unit
Transmission
Type and Parameter
Model
JL3G10
MR479Q
Type
12-valve, 3-cylinder, in-line, DOHC electronic injection
16-valve, 4-cylinder, inline, DOHC electronic injection
Cylinder bore
mm
71.5
78.7
Stroke
mm
83.5
69
Displacement
L
1.006
1.342
10.3
9.3
Max. power
(Kw/r/min)
52/6000
63/6000
Max. torque
(N.m/r/min)
91/3600
110/5200
Stable idle speed
r/min
830±30
800±50
Ignition sequence
1—2—3
1—3—4—2
Model
JL-5LE136
JL-S160G
1st gear
3.545
3.182
2nd gear
1.895
1.895
3rd gear
1.310
1.250
4th gear
0.972
0.909
5th gear
0.800
0.703
Reverse gear
3.142
3.083
Final gear ratio
3.933
4.267 Single-disc, dry type
4
Clutch Type
Single-disc, dry type
5
Assisted type
Gear and rack type
6
7
8
Braking System
Suspension
Tire
HQ7131
Front-Engine front-drive (FF)
Compression ratio
Engine
HQ7101/HQ7101B1
Electrical
power assisted
Type
Dual-pipe, front vented disc type, rear drum type
Power assisted type
Vacuum booster, hydraulic braking type with ABS/proportional valve
Type of front suspension
McPherson independent suspension (with sub-frame)
Type of rear suspension
Twist beam, coil spring half independent suspension
Spec.
165/60R14
Pressure (F/R)
kPa
Wheel rim 9
Rated capacity of fuel tank
10
Body
Body Structure
L
230/210 5J
15X6J(or 14X5 1/2JJ)
35
35
Integral body
8
Outline
Vehicle Maintenance A Road Conditions 1. drive on rough, muddy or skiddy roads 2. drive on dusty roads B. Driving Conditions 1. Repeat driving within 8km a few times, or when the outdoor temperature is below 0℃; 2. Idle the car drive at a low speed for a long time, such as police car, taxi, or door to door delivery vehicles; 3. Continuously drive the car at high speed for more than 2 hours (80% of the max speed or above). Regular Inspection 1. Weekly Inspection ● inspect engine oil level and cleanness; ● inspect engine coolant level; ● inspect brake fluid level; ● inspect windshield washer fluid level; 2. Monthly Inspection ● inspect water pump belt; ● inspect tire air pressure and wear; ● inspect steering wheel; ● inspect brake; ● inspect acceleration pedal. 3. Inspection when driving (low speed) ● Check the speedometer and the water temperature gauge; ● check steering wheel power and if vehicle has deviation; ● check if the front wheels break away or wobble; ● inspect if brake works normally or if the vehicle has deviation when vehicle brakes. 4. Other Inspection Items Eliminate problems immediately when there is anything abnormal. Regular replacing parts table Parts
Braking System
No.
Regularly Replacing Parts
Interval
1
Brake master cylinder cup valve and dust cover
Every 2 years(or as required)
2
Brake master cylinder cup
Every 2 years(or as required)
3
Brake hose
Every 2 years(or as required)
4
Wheel-braking cylinder valve
Every 4 years(or as required)
5
Brake booster rubber
Every 2 years(or as required)
6
Brake booster vacuum hose
Every 2 years(or as required)
7
Brake fluid
Yearly (or as required)
9
Outline Parts Braking System
No.
Regularly Replacing Parts
8
Manual transmission oil
9
Auto transmission oil
10
Element of air filter
11
Engine
Engine lubricating oil
Interval Every two years or 40,000km(or as required) Initially after 2,500km, afterwards 40,000km(or as required)
every
2
years
or
Every 15,000~20,000km(or as required)
(API)SG grade or above
Every 1,500~2,500km or within 2 months, afterwards every 7,500km or 6 months(or as required) Every 1,500~2,500km or within 2 months, afterwards every 7,500km (or as required)
12
Oil filter
13
Fuel filter
14
Coolant
15
All hoses
Every 2 years(or as required)
16
Canister
Every 60,000km(or as required)
17
Timing belt
Every 120,000km(or as required)
18
Wedge belt(including belts of AC air compressor and generator)
Every 30,000km(or as required)
19
PCV system
20
Spark plug
Every 20,000km(or as required) Yearly (or as required)
Every 20,000km or 12 months(or as required) Every 20,000km(or as required)
Maintenance Schedule The user should performance the maintenance of at least 10,000km in light of mileage and time whichever comes first. Inspection and maintenance may be advanced based on actual situation in the case of influence of particular environmental conditions. 〇 ......Inspect, adjust or replace when necessary ●......Replace Location
Inspection item
Braking system Braking
Parking braking
X1000km
7.5
15
22.5
30
37.5
45
52.5
60
67.5
75
Year
0.5
1
1.5
2
2.5
3
3.5
4
4.5
5
Abnormal sound at connection of steering knuckle and steering linkage
〇
〇
Free stroke and reserve working stroke
〇
〇
〇
〇
〇
〇
〇
〇
〇
〇
Efficiency
〇
〇
〇
〇
〇
〇
〇
〇
〇
〇
Working stroke
〇
〇
〇
〇
〇
〇
〇
〇
〇
〇
Efficiency
〇
〇
Parking brake cable fastening, abnormal noise and damage
Brake booster
Reservoir level
Brake master cylinder, wheel cylinder, brake caliper
Fluid leakage
〇
〇
〇
〇
Function
Function, wear and damage
〇
〇
〇
〇
〇
〇
〇 〇
〇
〇 〇
〇
〇
〇
〇
〇
〇 〇
〇
〇
〇
10
Outline
Location
Inspection item
X1000km
7.5
15
22.5
30
37.5
45
52.5
60
67.5
75
Year
0.5
1
1.5
2
2.5
3
3.5
4
4.5
5
Clearance between brake drum and frictional plate Brake drum and brake shoe
Brake disc and linings
Steering wheel Steering gear
Steering system
Steering linkage and joint
Steering knuckle
Running system
Wheel
〇
Damage to and wear of brake drum
〇
〇
〇
〇
〇
Wear of brake shoe sliding part and frictional plate
〇
〇
〇
〇
〇
Wear of frictional plate
〇
〇
●
〇
●
Wear and damage of brake disc
〇
〇
Free stroke, fastening and abnormal noise
〇
〇
〇
〇
〇
Motion
〇
〇
〇
〇
〇
Fastening
〇
〇
Fastening, abnormal sound or damage
〇
〇
〇
〇
〇
Crack or damage of steering linkage ball end, steering rack joint, dust boot
〇
〇
〇
〇
〇
Abnormal sound at joint
〇
〇
〇
〇
〇
〇
〇
〇
Wheel adjustment Front wheel
〇
〇
Turning angles of left and right wheels Tire pressure
〇
〇
〇
〇
〇
〇
〇
〇
〇
〇
Tire crack and damage
〇
〇
〇
〇
〇
〇
〇
〇
〇
〇
Tire pattern and uneven wear
〇
〇
〇
〇
〇
〇
〇
〇
〇
〇
Metal scraps, little stones or other foreign matters
〇
〇
〇
〇
〇
〇
〇
〇
〇
〇
Looseness of hub nuts and bolts Abnormal sound of front axle
〇
〇
〇
〇
〇
〇
〇
11
Outline
Location
Inspection item
X1000km
7.5
15
22.5
30
37.5
45
52.5
60
67.5
75
Year
0.5
1
1.5
2
2.5
3
3.5
4
4.5
5
〇
〇
Abnormal sound of rear axle Clutch Manual transmission
Auto t transmission Transmission system
Driver
Spring
Fixing and connection part Suspension system
Suspension arm
Shock absorber
Eclectic system
Igniter
Free stroke
〇 〇
〇
〇
〇
〇 〇
〇
〇
〇
Motion
〇
〇
〇
〇
〇
Oil leak and oil level
〇
〇
〇
〇
〇
Abnormal sound at control mechanism
〇
〇
Oil leak and oil level
〇
〇
〇
〇
〇
Fastening of joints
〇
〇
〇
〇
〇
Crack and damage of universal joint, dust boot
〇
〇
〇
〇
〇
Abnormal sound at spline
〇
〇
Abnormal sound at universal joint
〇
〇
Damage
〇
〇
fastening and damage of fixing part
〇
〇
Abnormal sound at connections
〇
〇
Sound at connections and arm damage
〇
〇
Oil leak and damage
〇
〇
Abnormal sound at fixing points
〇
〇
Working condition of spark plug
〇
〇
〇
〇
〇
〇
〇
〇
〇
〇
Ignition time
〇
〇
〇
〇
〇
Battery
Status of joints
〇
〇
〇
〇
〇
Wire harness and clamp
Fastening and damage of connecting parts
All lights
Function
Combination instrument
Function
〇
〇
〇 〇
〇
〇 〇
〇
〇
〇 〇
〇
〇 〇
〇
〇 〇
12
Outline
Location
Engine
Inspection item
X1000km
7.5
15
22.5
30
37.5
45
52.5
60
67.5
75
Year
0.5
1
1.5
2
2.5
3
3.5
4
4.5
5
Washer, horn, wiper
Function
〇
〇
〇
〇
〇
Defroster, power door lock
Function
〇
〇
〇
〇
〇
Starting, abnormal sound, idle speed and acceleration
〇
〇
〇
〇
〇
General condition of engine
Valve clearance Oil leak of engine
Body and accessories
Door, luggage compartment door, engine hood Seats
Other
〇 〇
〇
〇
〇 〇
〇
Function of door lock
〇
〇
Fastening, abnormal sound and damage
〇
〇
Condition of seats and safety belts
〇
〇
Lubrication of body parts
〇
〇
〇
〇
〇
〇
——Additional Maintenance Schedule Vehicles run in special circumstances require higher frequency of maintenance as listed below. A-1. driving on bumpy, muddy or melted snow road
Check the brake friction lining and brake drum
Every 5,000km or 6 months
Check the friction plate and brake disc
Every 5,000km or 3 months
Check the brake line and hose
Initially after 1,000km, 5,000km or 6 months
Check the tie rod end, joint and dust cap
Every 5,000km or 6 months
Check the dust boot of drive shaft
Every 10,000km or 12 months
Check the steering wheel, linkage and steering gearbox oil
Check front and rear suspension devices
Fasten the bolts and nuts of chassis and vehicle body
afterwards
every
Every 5,000km or 6 months Every 5,000km or 6 months Every 5,000km or 6 months
A-2. driving on dusty road
Replacement of the engine oil
Every 5,000km or 3 months
Replacement of engine oil filter
Every 5,000km or 3 months
Inspection and replacement of air filter
Every 2,500km or 3 months
Inspection of the brake friction lining and braking drum
Every 5,000km or 3 months
13
Outline
Check the friction frictional plate and brake disc
Every 5,000km or 3 months
Replace the AC air filter
Every 10,000km
B-1. repeated short-distance driving and at outer air temperature 0℃ within 8km (kilometer);
Replacement of the engine oil
Every 2,500km or 3 months
Replace the engine oil filter.
Every 2,500km or 3 months
B-2. Idle run for a long time and/or run long distance at low speed, such as police car, taxi and door-to-door cars
Inspection of the brake friction lining and braking drum
Check the frictional plate and brake disc
Every 10,000km or 3 months Every 5,000km or 3 months
R-3. Run at high speed continually for more than 2 hours (at 80% of max. speed or above)
Replacement the fluid of manual transaxle
Every 40,000km or 24 months
Check or replace the fluid of automatic transaxle
Every 40,000km or 24 months
14
Engine—Engine Assembly—Engine Inspection
Chapter 2 Engine Part 1 Engine Assembly Information about engine parts in LC Maintenance Manual deals with only that concerned with complete vehicle. Please refer to Maintenance Manual for information about the engine body. Engines concerned are JL-3G10 and MR479Q. I.
Engine Inspection
1. Check the engine oil (1) Check the oil level. (2) Start the engine and operate it for 20 min at low speed, and reach warm-up temperature. (3) Shut the engine down, wait for 2-3min, and check the oil level. (4) Check whether the oil level is in within the range marked by the scale; if it is lower than the limit (mark L), fill oil to mark “F”. (5) Keep the oil clean without any coolant or petrol mixed in and with appropriate viscosity 2. Replace oil. (1) Start the engine. When normal temperature is reached, shut down the engine. (2) Screw off the oil filler cap and oil drain plug, drain the engine oil; (3) Remove and replace oil filter. (4) Tighten oil drain plug to specificated torque 54N.m. (5) Fill fresh engine oil into the crankcase. For JL-3G10 engine: filling volume with filter unreplaced: 2.7L ; Filling volume with filter replaced: 2.9L; for MR479Q engine: filling volume with filter unreplaced: 2.8L, filling volume with filter replaced: 3.0L; add to 3.5L if empty. (6) Screw on the oil filling cap. (7) Start the engine. (8) Shut down the engine and check the oil quantity, and fill oil to the mark F on the oil scale if necessary. 3. Replace the oil filter. (1) Remove the oil filter. (2) Before mounting the oil filter, apply a small quantity of engine oil to the O-ring of the new oil filter. (3) Tight the oil filter to a specified torque (12.7N.m). (4) Start the engine, and check whether there is any leakage (5) Shut down the engine, check the oil quantity and fill as required. 4. Oil selection Oil over API SG grade is preferred.
15
Engine—Engine Assembly—Engine Inspection
SAE 10W-30 or SAE 15W-40 is preferred, and ASE5W-30 is used in cold region in the winter. Note: For the best effect and the greatest safety, it is advisable to use the following lubrication oil. a. Meet the requirements of API level. b. Select proper SAE viscosity rating within expected ambient temperature. It is forbidden to use the lubrication oil that can not meet the requirements of SAE viscosity and API lavel. 5. Check the coolant. (1) After the engine is cooled down, remove the radiator cap. (2) Make sure that the coolant level is above the neck of the radiator. (3) Screw on the radiator cap and pressurize to 2.0Mpa, and keep the pressure for 1minute unless the coolant leaks. (Mount a tester on the radiator cap, start the engine, and then shut down under a pressure 2.0Mpa). (4) Check whether the coolant quantity in the expansion vessel (expansion kettle) is between the mark "L" and "F". (5) Check whether the radiator cap is clean; test whether the opening pressure of the main valve is 107.8KPa with a radiator cap tester. The minimum opening pressure is 58.5KPa. 6. Check the battery. (1) Relative density of battery electrolyte: standard value 1.25~1.29 at 20℃. The battery should be charged if the density is less than specified value. (2)The terminal voltage of the battery is 12.5-12.9V at 20°C, and charge when the voltage value is less than the specified value. Check whether the fuses are loose, corrosive or continuity. 7. Check the air filter. (1) Whether the cover, the case or the element of the filter is distorted, corroded or damaged. (2) Whether the air hose is damaged. (3) Whether the gas chamber is distorted or damaged. (4) Check the element for pollutant obstruction and damage, and if element is blocked slightly, top blow the element on the top and remove the pollutant; and check if the filter carrier has any pollutant or gets polluted. 8. Check the spark plug. (1) Spark generating check a. Disconnect the coupler of the injector. b. Remove the high tension cable from the spark plug. c. Remove the spark plug. d. Connect the spark plug to the high tension cable. e. Ground the spark plug.
16
Engine—Engine Assembly—Engine Inspection
f. Start the engine, and check whether spark is generated. Tip: The starting time is not more than 1-2s. (2) Clean the spark plug: The air pressure is not greater than 588kp and the time is not more than 20s. (3) Check whether the thread and the insulator of the spark plug are damaged. Replace if necessary. (4) Check the clearance and electrode gap of spark plug: 1.1mm±0.1mm for 3G10 engine, 0.8mm±0.1mm ofr MR479Q engine 9. Check the drive belt Belt distortion (see Table 1): Belt pressure: 98N Table 1 Model
Type of belt
New belt mm
Old belt mm
3G10
Drive belt
6~8
9~11
Generator belt
7~9
11.5~13.5
A/C compressor belt
6.5~7
8~9
Power steering belt
5~6
6~8
MR479Q
MR479机 MR479 engine
3G10 机 3G10 engine
Generator belt 发电机皮带
Drive belt
A/C belt
空调皮带
Power 动力转 steering belt
向皮带
Fig.1-1
Note: Check the belt distortion at the specified point (see Figure 1-1). When mounting a new belt, set the tensioning force to specified value After the belt has been operated more than 5 minutes, check and ensure the distortion not exceeding specified After the belt is re-mounted and operates more than 5 minutes, check the distortion based on old belt distortion. Check the tensioning force and the distortion of the V-belt after the crankshaft of the engine has rotated 2 turns. 10. Check the ignition timing. (1)Start the engine to warm up; (2) Use the diagnosis tester:
17
Engine—Engine Assembly—Engine Inspection
① Connect the tester the diagnosis socket; ② Observe the engine water temperature to be above 80℃; ③ Select the ignition timing activation order; ④ Use the timing lamp to check the ignition timing Ignition timing: BTDC at idle speed, for 3G10: 10°±20′ MR479Q: 10°±20′ Tips: Refer to the User’s Manual for Diagnosis Tester when using. Notes: Check the ignition timing with the transmission placed at neutral position. Check when the engine runs at idle speed. 11. Check the engine idle speed (1) The engine warms up. (2) Check the idle speed: 3G10: 830±30 r/min;479Q:800±50r/min。 Note: Check idle speed when the cooling fan motor is disconnected. Switch off all the electric accessories and air conditioners. 12. Check the compression pressure (see Figure 1-2). (1) Warm up and switch off the engine. (2) Remove the high tension cable. (3) Remove the spark plug. (4) Check the compression pressure in the cylinder. a. Insert the pressure gauge into the spark plug hole. Fig.1-2
b. Throttle widely opens.
c. Rotate the engine crankshaft and measure the compressing pressure (see Table 2). Table 2 Cylinder compressing pressure (KPa)
3G10
MR479Q
1250
1250
Pressure difference range of each cylinder of this model (KPa)
100
Minimum compressing pressure (KPa)
980
Note: The electric quantity in the battery should be always enough, and the engine speed should be not less than 250r/min. Check the compression pressure in other cylinders in the same way. Measure as soon as possible. 18
Engine—Engine Assembly—Engine Inspection
Tip: If the compression pressure is improved after the oil is filled, the piston ring or the cylinder may be worn or damaged. If the pressure is still low, the valve may be jammed or sealed badly, or the gasket may be leaked. 13. Check CO/HC. (1) Start the engine. (2) Keep the engine running at a speed of 2500 r/min for about 180s. (3) At idle speed, insert the test bar of CO/HC instrument into exhaust pipe at least 40cm; (4) Check the concentration of emission of CO/HC at idle speed and at a speed of 2500 r/min respectively. Tip: Measure within 3 minutes. Test the concentration of emission andλof CO/HC at idle speed and at a speed of 2500 r/min respectively according to GB18352.3-2005 standard. (5) If the concentration of CO/HC is not up to standard, carry out diagnosis by following the steps below. a. Check oxygen sensor. b. Refer to Table 3 to find possible causes, check and repair
19
Engine—Engine Assembly— Removal of the Engine Assembly from the Vehicle
II.
Removal of the Engine Assembly from the Vehicle
1. Avoid gasoline overflowing (Disconnect from the fuel tank and burn the fuel up). 2. Turn on the radiator drain plug and receive the coolant with a container. 3. Disconnect the engine inlet and outlet water pipes and discharge the coolant. 4. Remove the air filter assembly with hose (see Figure 1-3 for MR479Q) (1) Detach the vent pipe from the hose of air filter; (2) Loose the clamp bolts on throttle body and disconnect the air filter hose; (3) Remove 3 bolts and the air filter assemblies。 5 Remove the battery connectors and battery assembly.
Fig. 1-3
6. Remove the battery support. 7. Remove fuel pipes 8. Disconnect A/C high pressure pipe and low pressure pipe from A/C compressor. 9. Disconnect the inlet and outlet water pipes from heater. 10. Unscrew the nut and remove the throttle control cable. 11. Remove left and right front wheels. 12. Detach the harness connectors connecting to the vehicle body. 13. Remove the front exhaust pipe assembly 14. Remove the nuts of front wheel hub(same method for other side). 15. Detach the front wheel speed sensor(with ABS). 16. Separate the steering tie rod ball end assembly 17. Separate the front suspension arm subassembly. 18. Separate the front drive shaft assembly (see Fig. 1-4). 19. Separate the front drive shaft from the hub using a plastic hammer 20. Detach the transmission shift cable, transposition cable. 21. Detach the clutch cable
Fig. 1-4
22. Loosen the engine rear mounting bolts connecting with subframe. 23. Remove the subframe assembly. 24. Remove the engine assembly together with the drive axle. (1) Use a hoist to suspend the engine slightly; (2) Remove 3 bolts from the right engine support (see Fig. 1-5); (2 bolts at top and 1 at bottom) (3) Remove 3 bolts from the left engine support (see Fig. 1-6); (4) Remove the engine together with the drive axle and lay them on the ground. 20
Engine—Engine Assembly— Removal of the Engine Assembly from the Vehicle
(5) Lift the vehicle body.
Engine left bracket Engine right bracket
Fig. 1-5
Fig.1-6
21
Engine—Engine Assembly—Drive Belt Replacement
III. Drive Belt Replacement 1. Remove the drive belt from 3G10 engine (see Fig. 1-7) (1) Loosen the fixing bolt B of tensioning wheel
A
(2) Unscrew the bolt A of tension regulator to get tension ing wheel loose. B
(3) Remove the drive belt. 2. Install the drive belt of 3G10 engine (see Fig. 1-7) (1) Loosen the bolt A of tensioning regulator to a less-tight state and set the belts in order. (2) Slowly tighten the regulator bolt A till the belt tension accords with requirement.
Fig. 1-7
(3) Fasten the fixing nut of tensioning wheel Torque: 58N·m. 3. Remove the generator belt of MR479Q engine (see Fig. 1-8) (1) Loosen the fixing bolt A of tensioning wheel and fixing bolt B of generator. (2) Unscrew the bolt C of tensioning regulator to get tensioning wheel loose. (3) Remove the drive belt.
Fig.1-8
Fig.1-9
Fig.1-10
8. Remove A/C belt of MR479Q engine (see Fig. 1-9) (1) Loosen the fixing bolt A of tensioning wheel. (2) Unscrew the bolt B of tensioning regulator to get tensioning wheel loose. (3) Remove the drive belt. 9. Remove the power steering pump belt of MR479Q engine (see Fig. 1-10) (1) Loosen the fixing bolt A of steering pump. (2) Unscrew the bracket adjusting bolt B to loosen the belt pulley. (3) Remove the drive belt. 10. Install the generator belt of MR479Q engine (see Fig. 1-8) (1) Loosen the fixing bolts of tensioning wheel and generator to a less-tight state and set up the belt
22
Engine—Engine Assembly—Drive Belt Replacement
(2) Slowly tighten the regulator bolt C till the belt tension accord with requirement. (3) Fasten the fixing bolts of generator and tensioning regulator. Torque: 58N·m. 11. Install A/C belt of MR479Q engine (see Fig. 1-9) (1) Unscrew the fixing bolt of tensioning wheel and regulator bolt to loosen the tensioning wheel to a less-tight state and set up the belt. (2) Slowly tighten the regulator bolt B till the belt tension accords with requirement. (3) Fasten the fixing bolt of tensioning wheel and regulator bolt. Torque: 58N·m 12. Install the power steering pump belt of MR479Q engine (see Fig. 1-10) (1) Loosen the fixing bolt of steering pump and the bracket adjusting bolt to get the fixing bracket loose, and set up the belt. (2) Slowly move the steering pump and its bracket till the belt tension accords with requirement. (3) Fasten the fixing bolt of steering pump and the bracket adjusting bolt. Torque 58N.m
23
Engine—Engine Mechanical—Engine Components(3G10)
Part 2 Engine Mechanical I.
Engine Components (3G10 engine)
Component I
3G10 Air filter assy.
3G10空滤器总成
Battery
Filter 滤芯 element.
Expansion tank
膨胀箱
Battery mounting bracket
Radiator assembly 散热器总成
Water inlet pipe
进水管
Water Outlet pipe出水管 Cooling fan assembly 冷却风扇总成
紧耦合三元催化器 Coupling 3-way catalystic convertor
Rear muffler assembly 后消声器总成
24
Engine—Engine Mechanical—Engine Components(3G10)
Engine Components (3G10 engine)
Engine 发动机右悬置 right mounting
Engine rear mounting 发动机后悬置
Engine left mounting 发动机左悬置
发动机驱动皮带及调节装置 Engine drive belt and adjuster
Engine with transmission assy 发动机带变速器总成
Left /right drive shaft
左、右驱动轴 Drive shaft, L & R Subframe assy
副车架总成 Subframe assy.
25
Engine—Engine Mechanical—Engine Components(3G10)
II.
Engine Component Assembly (3G10)
Fuel injector assembly 喷油器总成
Cylinder head 气缸盖
Cylinder head cover 气缸盖罩
Front cover and 前端盖及安装支架 mounting bracket Combination of cylinder block, 缸体、缸盖及凸轮轴等组合 head and camshaft
Cylinder block Oil pan
Starting motor
26
Engine—Engine Mechanical—Engine Component (MR479Q)
III. Engine Component (MR479Q)
Fuel pipe subassembly Fuel pipe clamp Vent pipe
No 1 Fuel injector fastener
High tension wire
O-ring Fuel injector O-ring
Gasket Air intake manifold
Throttle body assy.
Distributor assy.
Gasket
With power steering strut 1 With power steering vane pump assy.
O-ring Bypass water pipe
With power steering pump bracket Knock sensor
Water inlet pipe housing
Water temp. gauge sensor Rear end cap Crankshaft sensor
position Water outlet pipe Exhaust manifold insulating panel 1 Engine oil filter assy. Gasket Exhaust manifold Fan belt adjuster
Generator assy.
No.1 bracket
Exhaust bracket
manifold
compressor
A/C compressor
27
Engine—Engine Mechanical—Valve Clearance
IV. Valve Clearance Valve Clearance (cold state)
3G10
MR479Q
Air intake Valve (mm)
0.20±0.04
0.20±0.04
Exhaust valve(mm)
0.30±0.04
0.30±0.04
Adjust the valve clearance (see Figure 2-1). Calculate the thickness of new washer to allow the clearance of the inlet valve to reach a specified value.
Cam top
Up
N=T+ (A-0.2mm) Note: N -- Thickness of new washer T -- Thickness of the removed washer
Vehicle front Notch Fig. 2-1
A -- Measured valve clearance Calculation formula of the exhaust valve is: N= T+ (A-0.3mm). (1) Remove the adjusting washer. a. Rotate the crankshaft until the top of the cam is upwards. b. The notch of the valve tappet faces toward the front. c. Press the valve tappet down with a special tool, and place the tool between the camshaft and the valve tappet (see Figure 2-2). Tips: Place one end, with a mark "9", of the special tool to the position shown in Figure 2-2 a bit aslant. If the special tool (B) is put into a deep position too much, it will be clipped by the washer. In order to avoid the special tool (B) being too hard to take out, put it into slowly by decreasing the inclination angle from the air intake side. It is difficult for the special tool (B) to insert due to the shape of the cam when inserting it from the air intake side to the back side of No.3 cylinder (see Figure 2-2). When adjusting the washer, therefore, it is advisable to insert from the exhaust side. d. Press the valve tappet down alternately with the special tool (A) and (B) to check the valve clearance.
28
Engine—Engine Mechanical—Valve Clearance
Back side of the No.3 cylinder
Notch Fig.2-2
Notch Fig.2-3
(2) Re-mount the adjusting washer. a. Mount a new adjusting washer on the valve tappet. b. Press the valve tappet down with the special tool (A), and remove the special tool (B). c. Re-check the valve clearance to meet the requirement
29
Engine—Engine Mechanical—Air intake system
V.
Air intake system
I. Air intake System Inspection 1. Check the air intake pipe, upper & lower housings and element of air filter for distortion, corrosion and damage 2. Check the engine air intake hose and crankcase exhaust discharge hose for damage 3. Check if air filter element is blocked and contaminated (if slightly blocked, blow the element to remove the dir from topt; if heavily blocked or contaminated, replace the element) 4. Check the bracket of air filter for pollutants and contamination. II. MR479Q engine (see the figure below) 1. Clean and replace the filter element Open two clips to separate upper housing of air filter and remove the element for cleaning or replacement 2. Remove the air intake device (1) Remove the bolts in front of air filter air intake pipe and remove air filter air intake pipe. (2) Remove resonance chamber. (3) Loosen the elastic ring clamp of steel band and disconnect the exhaust hose of crankcase from the engine. (4) Loosen the screw-driven hose clamp on throttle body and disconnect the engine intake hose (5) Pull open two clips to separate upper housing of air filter and remove the element. (6) Screw off 3 bolts fixing the lower housing of air filter and the vehicle body, and remove the bracket of air filter.
30
Engine—Engine Mechanical—Air intake system
Torque Specification No.
Item
Spec.
Qty.
Torque/N.m
Remark
1
Hexagon head bolt, spring washer and plain washer assembly
M6
3
8
Air filter lower housing and vehicle body
2
Worm-driven hose ring clamp
2
6
To fix the engine air intake hose
3
Hexagon head bolt and plain washer assembly
1
8
Air filter air intake pipe and vehicle body
M6
III. JL-3G10 Engine (air intake system and air filter connecting with the engine together, See the figure below)
1. Clean and replace the filter element Open 4 clips on the housing to separate upper housing of air filter and remove the element for cleaning or replacement 2. Remove the air filter (1) Pull open 4 clips to separate upper housing of air filter and take out the element. 31
Engine—Engine Mechanical—Air intake system
(2) Screw off three connecting bolts fixing lower housing of air filter and the vehicle body, and remove lower housing
Torque Specification No.
Item
Spec.
Qty.
Torque/N.m
Remark
1
Hexagon head bolt, spring washer and plain washer assembly
M6
3
8
Air filter lower housing and engine
32
Engine—Engine Mechanical—Exhaust system
VI. Exhaust system
Components For JL3G10 配JL3G10
6 7
2
11
9
10
1
8 3
5
4
配MR479Q For MR479Q 6 2
4
7 5
10
11
9
1 8 3
1.Front exhaust pipe assy. 2. Exhaust pipe gasket 3. Front rubber support 4. Spring 5.Hexagon flange bolt with shoulder 6. Front muffler heat insulating plate 7. Full metal hex flange lock nut 8. Rear muffler assy. 9. Exhaust pipe rubber pad 10. Hexagon head bolt, spring washer and plain washer assembly 11. Rubber hanger Replace 1. Remove the front exhaust pipe assembly. Unscrew off 2 hexagon flange bolts with shoulder and 2 hexagon head bolt, spring washer and plain washer assemblies, remove front exhaust pipe assembly, exhaust pipe gasket and packing. 2. Remove the rear muffler assembly. Remove rear muffler assembly from left and right rubber hangers. 3. Install the front exhaust pipe assembly. Measure free length of the spring with vernier calipers Free length: 42mm Mount the front exhaust pipe onto exhaust manifold with new exhaust pipe gasket and packing, assemble the rear muffler assembly and screw up the bolts. Note: Do not reuse the removed gaskets. 4. Install the front exhaust pipe assembly. Torque: 43N·m
Exhaust manifold side
5. Install the rear muffler assembly Mount rear muffler assy. onto the front exhaust pipe assy. with a
Exhaust manifold cushion
33
Engine—Engine Mechanical—Exhaust system
new gasket (see the right illustration). Torque: 43N·m 6. Check the exhaust gas leak. Typical Troubles and Troubleshooting of Exhaust System 1. If the exhaust pipe leaks, the rub-a-dub could be heard in engine acceleration 2. If exhaust system is blocked, the sound of backfire explosion could be heard in engine acceleration. For trouble 1: Check if the packing of exhaust pipe is damaged. If so, timely replace the seal; if No, check if exhaust pipe leaks due to corrosion, and timely replace the damaged pipe For trouble 2: Timely replace the exhaust system.
34
Engine—Engine Control System—EFI System
Part 3 Engine Control System (1.0L) I.
M7.9.7 EFI System
On board Inspection 1. Check the step motor (1) With the engine running at idle speed, unplug the step motor connection wire and the engine RPM should change, indicating that the motor works normally. (2) Unplug the step motor connection wire, measure the current of its terminal with a multimeter and when the engine runs, this terminal should have the impulse current output, indicating that ECU and step motor control system work normally; if idle speed is unstable and differs from specified value significantly, the step motor should be replaced. In case of no pulse current output, test again after turning on air conditioner and if unavailable again, it indicates that ECU and the step motor control system lines have failed. (3) Use a diagnosis tester to examine the trouble of step motor lines. Inspection 1. VVT solenoid control valve assembly (1) Resistance check (a) Measure the resistance between terminals using an ohmmeter. Resistance value: 7.2±0.5Ω at 20°C. (2) Action check Connect the positive (+) conductor with the battery to Terminal 1 and negative(-)conductor with Terminal 2, and check the valve action. Note: confirm that the valve is not jammed Tips: Poor valve return due to entry of impurities will cause minor pressure rise toward the advance. 2. Components of throttle body Check the throttle body (1) Throttle spindle shall not sway; (2) Each pass shall not be blocked; (3) Throttle plate shall rotate freely and act smoothly; (4) With the throttle closed, there shall be no clearance between the throttle catch bolt and throttle lever. Note: Do not adjust the throttle catch bolt. 3. Throttle position sensor Resistance check (1) Remove the wire connector of throttle position sensor
35
Engine—Engine Control System—EFI System
(2) Use an ohmmeter to measure the resistance between Pin 1 and Pin 2, resistance: 1.6~2.4kΩ.
(3) Attach two ohmmeter probes to the sensor positive power pin and signal pin respectively, rotate the throttle and its resistance value should increase linearly and gradually without abrupt fluctuation, while this is contrary for Pin 2 and 3. Note: Observe if the resistance value skips obviously when looking into the replace of resistance value. 4. Knock sensor
1. Vibration block 2. Housing 3. Piezoelectric ceramic body 4. Contact 5. Electric joint
Measurement: (remove the joint) set the digital multimeter to ohm gear and attach two probes to Pin 1 and 2 of the sensor respectively, and when at normal temperature its resistance value should be greater than 1 MΩ. Set the multimeter at mV gear, gently knock near the knock sensor using a small hammer and there should have the voltage signal output. 5. Water temperature sensor Within this sensor is encompassed the NTC thermistor and its resistance value varies with ambient temperature, thus even minor change of outside temperature can be measured accurately and timely. The temperature of contact medium can be shown according to its output resistance. Where, Terminal A and C output the signal to ECU, Terminal B and earth terminal output the signal to the gauge. Working Principle (see Fig. I): Note: A, B and C represent three pins of the sensor; see the pin foot for their marks. Test with a multimeter: temperature sensor resistance – temperature characteristic Range of temperature(℃)
Resistance of Terminal A & C( KΩ)
-20±0.1
13.71—16.49
25±0.1
1.825—2.155
80±0.1
0.303—0.326
110±0.1
0.138—0.145
Instrum ent
Terminal B resistance(Ω) 50±0.2
176—280
80±0.2
63.4—81.4
110±0.2
24.6—30.6
Fig. 1
6. Air intake temperature sensor
36
Engine—Engine Control System—EFI System
Temperature Air intake temperature sensor NTC resistor characteristic curve
The air intake temperature sensor is a resistance with negative temperature coefficient (NTC), and the resistance changes with temperature. This sensor will deliver to the controller a voltage showing change of air intake temperature. Simple measurement:(remove the joint) set the digital multimeter to the ohm gear and attach two probes to Pin 1 and 2 of the sensor respectively; at 20℃, the rated resistance is 2.5KΩ±5%, other corresponding resistance values may be determined from the characteristic curve above. Simulation method may also be used; specifically, blow the air to the sensor with a electric fan (not to close) and observe the change of sensor resistance, here the resistance should drop. 7. Step motor
Idle speed actuator step motor
Schematic and Pins
Pins: Pin A to ECU Pin 22 Pin B to ECU Pin 21 Pin C to ECU Pin 35
Electric circuit of idle speed actuator step motor
Pin D to ECU Pin 36
Idle speed actuator step motor
Service notices: 1. Never attempt to axially apply force to press in or pull out the shaft; 2. Before the idle speed regulator of step motor installed into the throttle body, its shaft must be at fully-retracted position; 3. Clean and maintain the bypass air passage; 4. After removal of battery or ECU, timely cause the step motor to learn itself. M7 system self-learning method: turn on the ignition switch but do not start the engine instantly, wait 5 seconds and start the engine. Here, if the engine idling is detected poor, repeat the steps described above. ●
Simple measurement: (remove the joint) set the digital multimeter to the ohm gear and attach two probes to Pin AD and Pin BC of the regulator; at 25℃, the rated resistance is 53±5.3Ω
37
Engine—Engine Control System—Throttle Body Assembly
II.
Throttle Body Assembly
Removal, Installation and Dismantlement, Assembly 1. Drain the coolant 2. Remove the air filter hose assembly. 3. Remove the components of engine plastic hood 4. Remove the throttle cable assembly. 5. Remove the throttle body assembly. (1) Remove the throttle position sensor connector and the step motor connector; (2) Take apart the vent hose (3) Remove 2 bolts and throttle control cable support; (4) Remove 2 throttle preheater inlet and outlet water pipes; (5) Remove 2 bolts and 2 nuts, remove the throttle body from air intake manifold. 6. Remove the step motor of throttle body. Remove 3 screws and the step motor. 7. Install the step motor of throttle body Install the step motor. 8. Install the throttle body assembly (1) Set the new sealing gasket onto the air intake manifold. (2) Mount 2 bots and 2 nuts of the throttle body Torque: 25±5N.m 9. Add the coolant. 10. Check the coolant for leakage.
38
Engine—Electric Injection—System Components
Part 4 Engine Control System (1.3L Delphi MT20U2) I.
System Components
Engine management system hardware works under the control of engine control module(ECM) and consists of such subsystems as the control & signal acquisition, fuel supply, ignition, air intake control, exhaust control, trouble diagnosis and communication. Engine Management
System 发动机管理系统 (EMS)
Control Signal Acquisition 控制信号采集系统 System
Ignition 点火系统 System
Fuel Supply 供油系统 System
Air Intake Control 进气控制系统 System
Exhaust Control 排放控制系统 System
Fault Diagnosis and 故障诊断及通讯系统 Communication System
Control & Signal Acquisition 控制及信号采集系统 System
Engine Control Unit 发动机控制单元 (ECM) (ECM)
EMS Control Harness 发动机管理系统
控制线束
Air Intake Manifold Crankshaft Speed & 曲轴转速及位置 进气歧管压力 Pressure Sensor Position Sensor 传感器 传感器
Coolant 冷却液温度 Temperature 传感器 Sensor
Exhaust Oxygen 排气氧含量 sensor 传感器
Throttle Position 节气门位置 Sensor 传感器
Air Intake 进气温度 Temperature Sensor 传感器
Vehicle 车速 Speed Sensor 传感器
Fuel Supply System
供油系统
Fuel Pump Assy. 油泵总成
Fuel 油泵 Pump
Fuel Rail Assy. 油轨总成
Pipeline 管路
Oil rail Oil pressure Inlet Pipe 油轨 油压调节器 进油管 Regulator
Oil inlet Pipe Filter Oil inlet Pipe Oil level Sensor 进油管 滤清器 进油管 油位传感器
Air Intake Control System 进气控制系统 (Throttle Valve Body) (节流阀体)
点火系统
Ignition System
Spark Plug Lead Ignition Coil 点火线圈 火花塞引线
Spark Plug 火花塞
Valve Body
阀体
Exhaust Control System 排放控制系统
Exhaust Gas Control 尾气排放控制
Oxygen sensor 氧传感器
3-way Catalyst 三元催化器 Convertor
Evaporative exhaust 蒸发排放控制 Control
Canister Solenoid 碳罐电磁阀
Throttle Sensor Idle Control Valve 节气门传感器 怠速控制阀
Fault Diagnosis/Communication and Anti-theft 故障诊断/通讯及防盗系统 System
Fault 故障诊断及通讯 Diagnosis/Communication
System Communication 系统通讯接口 Interface
Anti-theft Alarm 防盗器控制 Control
Engine Fault Indicator Anti-theft Controller 发动机故障指示灯 防盗控制器
Password Emitter 密码发射器
39
Engine—Electric Injection—System Components
List of Basic Function Parts and Components of Delphi MT20U2 EMS No.
Part name
Qty.
1
Engine module(ECM)
control
2
Crankshaft position sensor
1
3
Air intake manifold pressure
1
4
Air intake temperature
1
5
Air intake manifold pressure/temperature
1
6
Coolant temperature sensor
1
7
Oxygen sensor
2
8
Camshaft position sensor
1
9
Knock sensor
1
10
Vehicle speed sensor(provided by vehicle manufacturer)
11
A/C evaporator temperature sensor
manifold
No.
1
Part name
Qty.
Fuel rail assy
1
Fuel injector
4
Fuel pressure regulator
1
13
Gasoline pump assy
1
14
Ignition coil assy.
1
12
Throttle assembly 15
valve
body
Idle speed control valve
1 1
Throttle position sensor
1
16
Canister control solenoid valve
1
1
17
3-way catalyst convertor
1
1
18
G sensor or ABS wheel speed sensor(option)
1
1. Engine control module(ECM) (1) CPU parameters: 16-bit core chip 32M clock frequency 256K FLASH memory 12K RAM memory 4K EEPROM memory (2) Working parameters (a) Range of working voltage Range of normal working voltage: 9.0V~16V Overvoltage and reverse polarity protection: +24V/-12V<60 sec. (b) Installation MT20U2 ECM is designed to be installed within the engine compartment (but not on the engine body), however should be placed for easy service.
40
Engine—Electric Injection—System Components
ECM housing and fixing bolts must be electrically insulated from the chassis. (C) Temperature Storage temperature: -40~125℃ Working temperature: -40~105℃
5V sensor reference supply earth 5V传感器参考电源接地 Ignition module点火模块驱动器接地 driver earth Main power supply relay control 主电源继电器控制
Ignition 点火系统 system control 控制
Intake manifold pressure (MAP) sensor 进气歧管压力传感器(MAP)
Ignition coil A/B(Cylinder 2/3) 点火线圈C/D(2/3缸) Ignition coil点火线圈 Ignition coil点火线圈 Injector A (Cylinder 1)
喷油器A(1缸)
Fuel injection nozzle control 喷油嘴控制
5V sensor reference supply 5V传感器参考电源
点火线圈A/B(1/4缸)
系统电源控制
12V power supply earth wire 12V电源地线
power
12V ignition power 12V点火电源 supply
Ignition coil A/B(Cylinder 1/4)
System control
12V battery power 12V电瓶电源 supply
supply
Function MT20U2发动机控制模块功能图 chart of MT20U2 Engine Control Module
Injector B (Cylinder 3)
喷油器B(3缸)
Injector (Cylinder 4) 喷油器(4缸) Injector (Cylinder 2) 喷油器(2缸)
Throttle position sensor (TPS) 节气门位置传感器(TPS)
Knock sensor
车速传感器 Vehicle speed sensor Front-mounted A/C evaporator temperature 前置空调蒸发器温度传感器 sensor Rear-mounted A/C evaporator temperature 后置空调蒸发器温度传感器 sensor
空调请求开关
A/C request switch Blower switch Headlight switch
鼓风机开关 大灯开关
P/N position switch P/N档位开关 助力转向开关 Power-assisted steering switch
Electronic电子防盗器 anti-theft alarm KW2000 communication KW2000通讯 CAN bus CAN总线通讯 communication
基本功能 Basic function
电源控制
模拟信号输入
Idle valve 怠速阀控制 control
Fuel pump relay 燃油泵继电器 Front oxygen sensor heating 前氧传感器加热 Rear oxygen sensor heating 后氧传感器加热 Canister solenoid valve 碳罐电磁阀 LEGR废气再循环阀(LEGR) valve A/C clutch relay 空调离合器继电器 A/C rear evaporator shutoff valve 空调后蒸发器切断阀 A/C 空调冷凝器风扇继电器 condenser fan relay Radiator low-speed fan relay 散热器低速风扇继电器 Radiator high-speed fan relay 散热器高速风扇继电器 Engine revolution speed 发动机转速 Coolant temperature 冷却液温度 Oil level signal 油量信号 System系统故障指示灯 fault indicator lamp Other其他系统故障指示灯 system fault indicator lamp
信号
爆震传感器
Idle speed valve control coil B(LO) 怠速阀控制线圈B(LO)
System components 系统部件 power supply control
凸轮轴位置传感器
Camshaft position sensor
怠速阀控制线圈A(LO)
Idle speed valve control coil B(HI) 怠速阀控制线圈B(HI)
Accessories power supply 附件电源控制 control
position sensor
怠速阀控制线圈A(HI)
Idle speed valve control coil A(LO)
Instrument signal 仪表信号
58X engine58X发动机转速及曲轴位置传感器 revolution speed and crankshaft
MT20U2 Engine Control 发 Module (ECM) 动 机 控 制 模 块 (ECM)
Anti-theft , 防盗 diagnosi 诊断 s signal
废气再循环反馈信号(LEGR) Linear exhaust gas recirculation (LEGR) signal
附件控制信号输入
加速度传感器(G) Acceleration sensor (G)
Analog signal input
Tank fuel level sensor 油箱油位传感器
Frequency signal input
后氧传感器(R-02) Rear oxygen sensor(R-02)
频率信号输入
前氧传感器(F-02) Front oxygen sensor (F-02)
Accessories control signal input
Coolant temperature sensor (CTS) 冷却液温度传感器(CTS)
Idle speed valve control coil A(HI)
Anti-theft 防盗 and及 commun 通讯 ication
Air intake temperature (IAT) sensor 进气温度传感器(IAT)
Electronic anti-theft signal
电子防盗器信号
Fault diagnosis request signal 故障诊断请求信号
Optional选装功能 function
2. Crankshaft position sensor (1) Performance
41
Engine—Electric Injection—System Components
No need of power supply; Temperature range: -40~150℃ Output voltage: increasing with revolution speed (400mV@60RPM) Clearance with 58×ring gear: 0.3~1.5mm; Coil resistance: 560Ω±10%@25±5℃; Coil inductance: 240mH±15%@1KHz (2) Mounting position The sensor is mounted in a place vertical to the crankshaft and works with 58× ring gear installed on the crankshaft. (3) Connectors Terminals: Tailed terminals: A - signal +, B - signal -, C- shielded layer; Tailless terminals: A – signal +, B – signal -. 3. Air intake temperature sensor (1) Performance Working voltage: 5V DC Working temperature: -40~135℃ Dissipation constant: 9Mw/℃ Thermal response time: <15sec.; Air Intake Temperature Sensor Temperature Characteristic Table: Temp. Resistance
Reference Accuracy
Temp. Resistance
Unloaded
Reference Accuracy
Resistance
Temp. Resistance
Reference Accuracy
-
Temp. Resistance
Reference Accuracy
(2)Mechanical properties Hexagon nut: 18.90mm Thread size: M12×1.5 Effective seal pressure: 145KPa 42
Engine—Electric Injection—System Components
Mounting torque: 60Nm (3) Mounting position: Generally, the air intake temperature sensor is mounted on the intake pipe before throttle body or the engine air cleaner. (4) Connectors: Terminals: A – signal ground, B – temperature signal. 4. Air intake manifold absolute pressure sensor (1) Performance Pressure range: 15~102kpa Working temperature: -40~105℃ Working voltage: 5.0±0.1V Working current: 12mA(max.) Output impedance: <10Ω DC load: 30kΩ(min.) 51kΩ(recommendation) Output function: Eo=Er(0.01059P-0.10941)(P unit is kpa). (2) Mounting position: Generally, it is mounted on the stabilized pressure chamber of intake manifold; While the use of manifold pressure for cylinder detection requires it be mounted on Cylinder 1 or 4 air passage of intake manifold (3) Connectors: Terminals: A – signal ground, B – pressure signal, C - +5V. 5. Air intake manifold pressure/temperature sensor (1) Working parameters (a) Manifold pressure sensor: Pressure range: 10~110kpa Working temperature: -40~125℃ Working voltage: 5.0±0.1V Working current: 12mA(max.) Output voltage: -100~100mV Output impedance: <10Ω; DC load: 30kΩ(min.), 51kΩ(recommended); Pressure sensor output function: Eo=Er(0.01059P-0.10941) P unit is kpa; the reference values are listed below(only for reference): 43
Engine—Electric Injection— System Components
Pressure(kpa)
15
40
94
102
Output voltage(V)
0.12~0.38
1.52~1.68
4.44~4.60
4.86~5.04
(b) Air intake temperature sensor: Air Intake Temperature Sensor Unloaded Resistance - Temperature Characteristic Table: Temp.
Resistance
Reference Accuracy
Temp.
Resistance
Reference Accuracy
Temp. Resistance
Reference Accuracy
Temp.
Resistance
Reference Accuracy
Typical working voltage: 5V DC; Working temperature: -40~135℃; Dissipation constant: 9mW/℃; Thermal response time: <15 sec.; (2) Mounting position: For the model using the manifold pressure for cylinder identification, this sensor is mounted on the pipe of engine’s cylinder 4 intake manifold. For the model using the camshaft position sensor for cylinder identification, this sensor is mounted on the stabilized pressure chamber of the engine. (3) Connector: Terminals: A- pressure signal, B - +5V, C – temperature signal, D – signal ground. (4) Instructions for operation and maintenance: This sensor should be mounted at an angle less than 30°with vertical direction to avoid the condensate on terminals retaining in the sensor. Any installation against these instructions will directly affect the sensor reliability and durability. When necessary, the sensor may be cleaned with isopropyl alcohol and air dried. Immersion time with isopropyl alcohol shall not be longer than 1min and during the cleaning, prevent the washing solution from entering the sensor 6. Coolant temperature sensor (1) Performance Typical working voltage: 5V DC; Working temperature: -40~135℃; Dissipation constant: 25mW/℃;
44
Engine—Electric Injection—System Components
Thermal response time: 17~27 sec. (2)Mechanical properties Hexagon nut: 18.90mm Thread size: M12×1.5; Effective seal pressure: 145KPa; Mounting torque: 20Nm. (3) Mounting position: The coolant temperature sensor is usually mounted on main water passage of the engine. (4) Connectors: terminals: A – signal ground, B – temperature signal 7. Camshaft position sensor (1) Performance Working temperature: -40~150℃ Working voltage: 4.5~13V; Working clearance:0.3~2mm (2) Mounting position: It is mounted near the camshaft. (3) Connectors: terminals: A – signal, B – signal ground, C - +5V 8. Knock sensor (1) Performance Output signal: Frequency 5kHz
17~37mV/g
8 kHz
+15% at 5kHz
13 kHz
+30% at 5kHz
18 kHz
Double at 13kHz
Output signal
In any case >17 mV/g Frequency response range: 3~18 kHz Capacitance:1480~2220pf@25℃@1000Hz Resistance:>1M@25℃ Working temperature: -40~150℃ (2) Mounting position: This sensor is mounted at the location sensitive to engine knock. Due to relatively weaker sensor signal, the sensor's lead is the shielded wire. 45
Engine—Electric Injection—System Components
(3) Connectors: terminals: A – signal, B – earthing through the shield. 9. Oxygen sensor (1) Features: waterproof; No need of air penetration and filtration device; Resistance to high temperature, backpressure and thermal impact; Ultra-low temperature property; Ultra-strong antipoisoning ability; Low energy consumption heater; This sensor uses teflon insulated wire and stainless steel elements. (2) Performance Performance parameters Temperature
260℃
450℃
595℃
Rich output voltage(mV)
>800
>800
>750
Thin output voltage(mV)
<200
<200
<150
Thin to rich response time(ms)
<75
<75
<50
Rich to thin response time(ms)
<150
<125
<90
Internal resistance (Ω)
<100K
Max. working temperature(continuous): exhaust temperature:<930℃ Temperature at the mounting support:<600℃ Temperature at 6 corners of outer housing: <500℃ Temperature at wire and sleeve: <275℃ Temperature at wire gasket: <250℃ Temperature at connector: <125℃ Storage temperature: -40~100℃ Recommended working condition: exhaust temperature: 200~850℃ Allowed content of fuel impurities: lead – below 0.005g/L phosphor – below 0.0002g/L sulfur – below 0.04%(weight ratio) silicon – below 4ppm MMT – below 0.0085g/L Engine oil consumption is not above 0.02L/hr. 46
Engine—Electric Injection—System Components
Mounting position: this sensor is mounted between the exhaust valve and 3-way catalyst. Connectors: A –low signal, B –high signal; C -heating power -, D – heater power +. 10. Fuel rail (1) Working parameters Working temperature: -30~115℃; It is mounted on the air intake manifold. 11.Fuel injector (1) Features: Working temperature: -40~130℃ Min. working voltage: 4.5V Coil resistance:12±0.4Ω (2) Mounting position: It is fixed to the air intake manifold through the fuel rail. (3) Connectors: A - +12V, B – ECM 12. Fuel pressure regulator (1) Working parameters Pressure invariableness: oil return type: 300kpa±2%(static); Non-fuel-return type: 350kpa±2% Flow limit of pressure regulation: 3~60g/s Working temperature: -40~120℃ Min. explosion pressure: 2000MPa. (2) Mounting position: For model of fuel-return design, the regulator is mounted at the end of fuel rail. For model of non-fuel-return design, the regulator is mounted on the fuel pump assy. 13. Fuel pump assembly (1) Features: Fuel pump: Output pressure: >350kpa; Output flow: >10g/s; Safety pressure relleased: <900kpa; Pressure holding: 24 kpa; Working voltage: 8~16V; Overpressure protection: -13.5~26V(<60 sec.);
47
Engine —Electric Injection —System Components
Operation without fuel: <60sec. Fuel level sensor: resistance <130Ω; Max. working current: <150mA. (2) Mounting position: The assembly is integrally built in the fuel tank. (3) Connectors: 1×4 type: A- relay, B – instrument, C- instrument, D – ground; 2×2 type: A- instrument, B – relay, C- ground, D –instrument; 3-wire connector: A – system ground, B – fuel pump +, C – fuel level sensor +. 14.Ignition coil (1) Features: Primary resistance: 0.5±0.05Ω; Secondary resistance: 9840±980Ω; Primary inductance: 2.75±0.25mH Secondary inductance: 17.5±1.2H; Voltage range:6~16V; Interruption current peak: 9.5A; Secondary output voltage: 34KV; Shortest duration of ignition: 0.8ms. (2) Mounting position: Ignition coil may be in the engine compartment or on the engine (3) Connectors: terminals: A – Cylinder1-4 drive, B - +12V, C – Cylinder 2-3 drive. 15. Throttle body (1) Features: Diameter of valve hole: depending on the engine displacement; (2) Mounting position: It is mounted before the air intake manifold.
48
Engine—Electric Injection—System Components
16. Throttle position sensor (1) Features: Range: 7%~93% opening; Working voltage: 5.0±0.1V; Close throttle: 12% of reference voltage; Fully opened throttle: 83%~93% of reference voltage; AB impedance: 3k~12kΩ; Working temperature: -40~150℃ (2) Mounting position: This throttle position sensor is mounted on the throttle body assembly and shares the shaft with accelerator rod and throttle valve plate. (3) Connectors: Terminals: A - +5V, B – signal ground, C – throttle position signal. 17. Idle speed control valve (1) Features: Coil resistance: 53Ω±10%; Coil inductance:33mH±20%; Working voltage: 7.5~12V; Limiting voltage: 3.5~14V. (2) Mounting position: In this model, this valve is mounted on the throttle body (3) Connectors: Terminals: A – coil B-, B – coil B+, C – coil A-, D – coil A+. 18. Canister control solenoid valve (1) Features: Rated overvoltage: +12V Range of working voltage: 8~16V; Limiting voltage: 25V(<60s) Working temperature: -40~120℃; Coil resistance:19~20Ω Coil inductance: 12~15mH.
49
Engine—Electric Injection—System Components
(2) Mounting position: This valve is mounted between fuel vapor canister and air intake manifold and the engine compartment (3) Connectors: Terminals: A – ECM, B - +12V.
50
Engine—Electric Injection—On-Board Diagnostic (EOBD)
II.
On-Board Diagnostic (EOBD)
1. Description of EOBD After the system begains to work and the engine runs, ECM controls the operation of all system components and detects those connected with it. When one or several components work abnormally, the system will automatically alarm, every malfunction state is assigned with an exclusive code, and so long as malfunction occurs, the system will send this code (i.e. trouble code) via the diagnostic interface and simultaneously activate the "engine malfunction indicator” to inform the driver for timely service. A trouble code indicates the possible location of malfunction In the event of malfunction, the system may also use the temporary emergency plan to control the engine operation to ensure that the user may drive to the service station instead of breaking down on the way. 2. Description of malfunction indicator (MI) MI is an indicator connected with on-board diagnostic (OBD) system to inform the driver when any emission related component or OBD system develops a trouble, as shown by the right schematic 3. Criteria of MI action MI must be activated at the required moment when the malfunction of a component or system causes the vehicle emission to exceed regulatory requirements. Based on the effects of trouble affecting the emission, MI is activated as per the followings: Code of trouble affecting emission: Class A: MI lights up and trouble code is recorded for a single occurrence; Class B: MI lights up and trouble code is recorded for occurrence once in two continuous strokes Class E: MI lights up and trouble code is recorded for an occurrence in three continuous strokes each; Code of trouble not affecting emission: Class C: trouble code is recorded with MI off, the manufacturer may turn on SVS lamp based on needs. Class D: trouble code is recorded with no MI on. Turnoff of MI: In three continuous strokes, if detection system for MI activation fails to detect a trouble or does not detect other malfunction which may separately activate MI, then MI turns off. Elimination of trouble code: if one malfunction does not occur in over 40 engine warm-up cycles again, OBD system will clear this trouble code and the mileage at the time of its occurrence and freeze the data information. Note: A stroke refers to a drive cycle where all OBD tests could be completed and it may take the testing procedure (Part I and Part II) of National III Emission Standard as standard.
51
Engine—Electric Injection—On-Board Diagnostic (EOBD)
4. Detailed explanation of diagnostic trouble code (DTC) DTC List of DELPHI MT20U2 Engine Management System Trouble code P0106 P0107 P0108 P0112 P0113 P0117 P0118 P0122 P0123 P0131 P0132 P0133 P0134 P0135 P1167 P1171 P0137 P0138 P0140 P0141 P0171 P0172 P0201 P0202 P0203 P0204 P0230 P0300
Description
Class
MAP/TPS signal rationality Manifold pressure sensor circuit voltage too low Manifold pressure sensor circuit voltage too high Intake air temperature sensor circuit voltage too low Air intake temperature sensor circuit voltage too high Coolant temperature sensor circuit voltage too low Coolant temperature sensor circuit voltage too high Throttle position sensor circuit voltage too low Throttle position sensor circuit voltage too high Front oxygen sensor circuit voltage too low Front oxygen sensor circuit voltage too high Front oxygen sensor response slow Front oxygen sensor activity inadequate or open circuit Front oxygen sensor heater circuit can’t work Front oxygen sensor AFR high in DFCO mode Front oxygen sensor AFR low in PE mode Rear oxygen sensor circuit voltage too low Rear oxygen sensor circuit voltage too high Rear oxygen sensor activity inadequate or open circuit Rear oxygen sensor heater circuit can’t work Fuel correction too thin Fuel correction too rich Cylinder 1 injector circuit failure Cylinder 3 injector circuit fault Cylinder 4 injector circuit fault Cylinder 2 injector circuit fault Fuel pump relay fault Misfire
E A A E E A A A A E E E A A E E E E E A E E A A A A C B/A
Trouble code P1392 P1393 P0325 P0327 P0336 P0337 P1336 P0342 P0351 P0352 P0420 P0443 P0462 P0463 P0480 P0481 P0482 P0483 P0502 P0506 P0507 P0562 P0563 P0532 P0533 P1545 P2001 P0615
Description Sensor G voltage too low Sensor G voltage too high Knock control system fault Knock sensor circuit fault Crankshaft position sensor circuit performance problem Crankshaft position sensor circuit fault Crankshaft position gear information unlearned Camshaft position sensor circuit no signal Ignition circuit 1 fault Ignition circuit 2 fault Catalyst efficiency below threshold Canister purge circuit failure Fuel level sensor circuit input too low Fuel level sensor circuit input too high Fan 1 fault Fan 2 fault Fan 3 fault PWM fan fault No vehicle speed signal Idle speed control system fault – revolution speed too low Idle speed control system fault – revolution speed too high System voltage high System voltage low A/C pressure circuit voltage too high A/C pressure circuit voltage too low or open A/C clutch output circuit fault Rear A/C evaporator sensor fault TCM fault
Class C C C C E A A A A A A E C C C C C C E E E C C C C C C A
DTC P0106: unreasonable correspondence between manifold absolytely pressure sensor signal and throttle position sensor signal. Test condition: no DTC relevant to manifold absolute pressure sensor, throttle position sensor and coolant temperature sensor. Malfunction judgement: altitude compensating intake pressure value exceeds the limits set by the control system based on the engine RPM and throttle opening Emergency control plan: disable the fuel correction pulse width Do not update self-learning value anymore Prohibit adjusting the target idle speed Do not update atmospheric pressure anymore Possible causes: MAP sensor trouble Sensor pick-up hole blocked The circuit between MAP sensor and ECM damaged Poor connection DTC P0107: MAP sensor circuit voltage too low Test condition: no malfunction of throttle position sensor Battery voltage higher than 11.45V Engine speed lower than/equal to 1000RPM and throttle opening above 0%, or the engine speed higher than 1000RPM and throttle opening above 5%. Malfunction judgement: ECM detects that manifold pressure is 12kpa Emergency control plan: disable the fuel trim pulse width
52
Engine—Electric Injection—On-Board Diagnostic (EOBD)
Do not update self-learning value anymore Prohibit adjusting the target idle speed Do not update atmospheric pressure anymore Take MAP value as the default Possible causes: between MAP sensor and ECM develops a short circuit to ground or open circuit MAP sensor trouble Poor connection Engine air intake system abnormal DTC P0108: MAP sensor circuit voltage too high Test condition: no malfunction of the throttle position sensor Engine running time longer than 2 sec The engine speed lower than/equal to 2400RPM and throttle opening below 2.7%, or the engine speed higher than 2400RPM and throttle opening above 10% Malfunction judgement: ECM detects that manifold pressure value is greater than 103kpa Emergency control plan: disable the fuel trim pulse width Do not update self-learning value anymore Prohibit adjusting the target idle speed Do not update atmospheric pressure anymore Take MAP value as the default Possible causes: between MAP sensor and ECM develops a short circuit to ground or open circuit MAP sensor trouble Poor connection Engine air intake system abnormal DTC P0112: IAT sensor circuit voltage too low Test condition: no malfunction of the vehicle speed sensor Vehicle speed greater than 50km/h Engine running time longer than 60 sec. Malfunction judgement: ECM detects that IAT sensor signal voltage is less than 0.1V Emergency control plan: use the system default air intake temperature value. Possible causes: between IAT sensor and ECM develops a short circuit to ground. Sensor trouble Poor connection DTC P0113: IAT sensor circuit voltage too high
53
Engine—Electric Injection—On-Board Diagnostic (EOBD)
Test condition: no malfunction of vehicle speed sensor and coolant temperature sensor Vehicle speed lower than 25km/h Coolant temperature greater than 70℃ Engine running time longer than 60 sec Malfunction judgement: ECM detects that IAT sensor signal voltage is higher than 4.9V Emergency control plan: use the system default air intake temperature value Possible causes: between IAT sensor and ECM develops a short circuit to power supply or open circuit Poor connection Ground wire open circuit DTC P0117: coolant temperature sensor (CTS) circuit voltage too low Test condition: the engine running time longer than 60 sec Malfunction judgement: ECM detects that CTS signal voltage is too low and indicated temperature is higher than 149℃ Emergency control plan: Control system estimates the maximum temperature not exceeding 90.75℃ as per the default formula based on the engine running time and air intake temperature After trouble code setup, high-speed fan starts working after 0.5sec. Possible causes: between CTS and ECM develops a short circuit to ground. Poor connection CTS trouble DTC P0118:
coolant temperature sensor (CTS) circuit voltage too high
Test condition: the engine running time longer than 60 sec. Malfunction judgement: ECM detects that CTS signal voltage is too high and indicated temperature is below -38℃. Emergency control plan: Control system estimates the maximum temperature not exceeding 90.75℃ as per the default formula based on the engine running time and air intake temperature. After trouble code setup, high-speed fan starts working after 0.5sec. Possible causes: between CTS and ECM develops a short circuit to power supply or open circuit Ground wire open circuit Poor connection CTS sensor trouble DTC P0122: throttle position sensor (TPS) circuit voltage too low Test condition: the engine in operation Malfunction judgement: ECM detects that TPS signal value is less than 2.8% Emergency control plan: estimate the throttle opening based on engine RPM
54
Engine—Electric Injection—On-Board Diagnostic (EOBD)
Possible causes: between TPS and ECM develops a short circuit to power supply or open circuit Poor connection TPS trouble DTC P0123: throttle position sensor (TPS) circuit voltage too high Test condition: the engine in operation Malfunction judgement: ECM detects that TPS signal value is greater than 98% Emergency control plan: estimate the throttle opening based on engine RPM Possible causes: between TPS and ECM develops a short circuit to power supply or open circuit Poor connection TPS trouble DTC P0131: front oxygen sensor (O2A) circuit voltage too low Test condition: no trouble code like P0106, P0171 and P0172, no trouble code relating to MAP sensor, CTS, TPS, fuel injector, misfire, crankshaft position sensor, ignition system, idle speed control system and canister cleaning circuit. Coolant temperature higher than 70℃ System voltage higher than 10V Malfunction judgement: ECM detects that oxygen sensor signal value is less than 0.03 V Emergency control plan: stop the closed loop fuel control Possible causes: between oxygen sensor and ECM develops a short circuit to ground Insufficient fuel injection due to blockage of fuel pump, fuel supply pipeline or fuel injector Fuel pressure regulator damaged Poor grounding from ECM to the engine block Air intake vacuum leak Exhaust pipeline leaking Fuel contamination DTC P0132: front oxygen sensor (O2A) circuit voltage too high Test condition: no trouble code like P0106, P0171 and P0172, no trouble code relating to MAP sensor, CTS, TPS, fuel injector, misfire, crankshaft position sensor, ignition system, idle speed control system and canister cleaning circuit. Coolant temperature higher than 70℃ System voltage higher than 10V Malfunction judgement: ECM detects that oxygen sensor signal voltage is higher than 3.8V Emergency control plan: stop the closed loop fuel control Possible causes: between oxygen sensor and ECM develops a short circuit to ground.
55
Engine—Electric Injection—On-Board Diagnostic (EOBD)
Fuel pressure too high Fuel injection leaking Fuel pressure regulator damaged DTC P0133: front oxygen sensor (O2A) response slowly Test condition: no trouble code like P0106, P0171 and P0172, no trouble code relating to MAP sensor, CTS, TPS, fuel injector, misfire, crankshaft position sensor, ignition system, idle speed control system and canister cleaning circuit. Coolant temperature higher than 70℃ System voltage higher than 10V 1600RPM<engine revolution speed<3000RPM Malfunction judgement: the time of oxygen sensor response to the change of oxygen concentration in exhaust gas exceeds the limit set by the system Emergency control plan: stop the closed loop fuel control Possible causes: heavy metal poisoning or phosphorus/sulfur poisoning of oxygen sensor due to fuel contamination Carbon poisoning of oxygen sensor due to large engine oil consumption DTC P0134: insufficient activity or open circuit of front oxygen sensor Test condition: no trouble code like P0106, P0171 and P0172, no trouble code relating to MAP sensor, CTS, TPS, fuel injector, misfire, crankshaft position sensor, ignition system, idle speed control system and canister cleaning circuit. Coolant temperature higher than 70℃ System voltage higher than 10V Malfunction judgement: ECM detects that oxygen sensor signal voltage is higher than 1.3V but lower than 3.8V Emergency control plan: stop the closed loop fuel control Possible causes: poor circuit contact or damaged circuit between oxygen sensor and ECM Trouble of oxygen sensor heater circuit or the heater Exhaust gas leaking Fuel contamination Excessive engine oil consumption DTC P0135: front oxygen sensor (O2A) heater does not work Test condition: the engine running time longer than the setting Malfunction judgement: ECM detects that voltage of heater circuit is continuously too high or low Emergency control plan: stop the closed loop fuel control Possible causes: between the heater and ECM develops a short circuit to power supply, a short circuit to
56
Engine—Electric Injection—On-Board Diagnostic (EOBD)
ground or open circuit Poor connection Heater damaged DTC P1167: In DFCO mode, front oxygen sensor (O2A) indicates a rich air fuel ratio. Test condition: no trouble code like P0106, P0171 and P0172, no trouble code relating to MAP sensor, CTS, TPS, fuel injector, misfire, crankshaft position sensor, ignition system, idle speed control system and canister cleaning circuit. Engine gets into the deceleration fuel cutoff (DFCO) mode Malfunction judgement: ECM detects that oxygen sensor signal voltage is higher than 0.55V Emergency control plan: stop the closed loop fuel control Possible causes: between oxygen sensor and ECM develops a short circuit to power supply Fuel pressure too high Fuel injector leaking Fuel pressure regulator damaged DTC P1171: In PE mode, front oxygen sensor (O2A) indicates a lean air fuel ratio. Test condition: no trouble code like P0106, P0171 and P0172, no trouble code relating to MAP sensor, CTS, TPS, fuel injector, misfire, crankshaft position sensor, ignition system, idle speed control system and canister cleaning circuit. Engine gets into the power enrichment (PE) mode Malfunction judgement: oxygen sensor signal voltage is lower than 0.35V Emergency control plan: stop the closed loop fuel control Possible cause: between oxygen sensor and ECM develops a short circuit to ground Insufficient fuel injection due to blockage of fuel pump, fuel supply pipeline or fuel injector Fuel pressure regulator damaged Poor grounding from ECM to the engine block Intake vacuum leaking Exhaust pipeline leaking Fuel contamination DTC P0137: rear oxygen sensor (O2B) circuit voltage too low Test condition: no trouble code like P0106, P0171 and P0172, no trouble code relating to MAP sensor, CTS, TPS, fuel injector, misfire, crankshaft position sensor, ignition system, idle speed control system and canister cleaning circuit. Coolant temperature higher than 70℃ Malfunction judgement: ECM detects that rear oxygen sensor signal voltage is lower than 0.03V Emergency control plan: disable the rear oxygen sensor signal 57
Engine—Electric Injection—On-Board Diagnostic (EOBD)
Possible causes: between oxygen sensor and ECM develops a short circuit to ground. Poor connection DTC P0138: rear oxygen sensor (O2B) circuit voltage too high Test condition: no trouble code like P0106, P0171 and P0172, no trouble code relating to MAP sensor, CTS, TPS, fuel injector, misfire, crankshaft position sensor, ignition system, idle speed control system and canister cleaning circuit. Coolant temperature higher than 70℃ Malfunction judgement: ECM detects that rear oxygen sensor signal voltage is higher than 3.8V Emergency control plan: disable the rear oxygen sensor signal Possible causes: between oxygen sensor and ECM develops a short circuit to ground. Poor connection Sensor trouble DTC P0140: rear oxygen sensor activity inadequate or open circuit Test condition: no trouble code like P0106, P0171 and P0172, no trouble code relating to MAP sensor, CTS, TPS, fuel injector, misfire, crankshaft position sensor, ignition system, idle speed control system and canister cleaning circuit. Coolant temperature higher than 70℃ System voltage higher than 10V Malfunction judgement: ECM detects that oxygen sensor signal voltage is higher than 1.3V but lower than 3.8V Emergency control plan: disable the rear oxygen sensor signal Possible causes: poor connection Short circuit to ground between oxygen sensor and ECM Oxygen sensor trouble DTC P0141: the circuit of rear oxygen sensor heater does not work Test condition: the engine in operation System voltage higher than 10V Malfunction judgement: the voltage of rear oxygen sensor heater is too high or low Emergency control plan: disable the rear oxygen sensor signal Possible causes: between the heater of rear oxygen sensor and ECM develops a short circuit to power supply, a short circuit to ground or open circuit. DTC P0171: fuel correction system too lean Test condition: no trouble code like P0106, no trouble code relating to MAP sensor, ITA sensor, CTS, TPS, oxygen sensor, fuel injector, crankshaft position sensor, camshaft position sensor, idle speed control system, misfire and canister cleaning circuit.
58
Engine—Electric Injection—On-Board Diagnostic (EOBD)
Enter the closed loop fuel control mode Engine RPM, coolant temperature, throttle opening and air intake pressure meeting the system default requirements. Malfunction judgement: the fuel self-learning value bigger than the limit set by the system Emergency control plan: None Possible causes: air leaking Fuel pressure inadequate Positive crankcase ventilation valve jammed Fuel injector blocked DTC P0172: fuel correction system too rich Test condition: no trouble code like P0106, no trouble code relating to MAP sensor, ITA sensor, CTS, TPS, oxygen sensor, fuel injector, crankshaft position sensor, camshaft position sensor, idle speed control system, misfire and canister cleaning circuit. Enter the closed loop fuel control mode Engine RPM, coolant temperature, throttle opening and air intake pressure meeting the system default requirements. Malfunction judgement: the fuel self-learning value bigger than the limit set by the system Emergency control plan: None Possible causes: air intake system blocked Fuel injection leaking Fuel pressure too high DTC P0201: Cylinder 1 electric circuit trouble Test condition: system voltage higher than 9.0V Engine speed greater than 700RPM Malfunction judgement: the voltage of fuel injector control circuit too high or too low Emergency control plan: get the fuel into the open-loop control Possible causes: between fuel injector and ECM develops a short circuit to power supply, a short circuit to ground or open circuit DTC P0202: Cylinder 3 injector electric circuit trouble Test condition: system voltage higher than 9.0V Engine speed greater than 700RPM Malfunction judgement: the voltage of fuel injector control circuit too high or too low Emergency control plan: get the fuel into the open-loop control Possible causes: between fuel injector and ECM develops a short circuit to power supply, a short circuit to ground or open circuit 59
Engine—Electric Injection—On-Board Diagnostic (EOBD)
DTC P0203: Cylinder 4 injector electric circuit trouble Test condition: system voltage higher than 9.0V Engine speed greater than 700RPM Malfunction judgement: the voltage of fuel injector control circuit too high or too low Emergency control plan: get the fuel into the open-loop control Possible causes: between fuel injector and ECM develops a short circuit to power supply, a short circuit to ground or open circuit DTC P0230: fuel pump relay trouble Test condition: the ignition switch is at the energized position and the power-on time is greater than the limit set by the system. Malfunction judgement: the voltage of fuel pump relay too high or too low Emergency control plan: None Possible causes: between fuel pump relay and ECM develops a short circuit to power supply, a short circuit to ground or open circuit Relay trouble DTC P0300: misfire Test condition: no trouble code relevant to MAS sensor, CTS, TPS, crankshaft position sensor, camshaft position sensor and vehicle speed sensor. Malfunction judgement: Under normal condition, ECM detects that the fluctuation of crankshaft rotational speed exceeds the limit set by the system. Emergency control plan: if the misfire is not serious, only affecting the emission, there is no such plan, only with DTC recorded, data flow froze and MI turned on. If the misfire is serious, causing the catalystic convertor overheating: Positively enter the open-loop fuel control mode Disable the rear oxygen sensor correction learning When engine speed exceeds 2000RPM or MAP exceeds 50KPA, MI flashes at 1Hz, reminding the driver to reduce the engine RPM and load immediately, and go to the service station for repair as soon as possible. Possible causes: ignition system trouble Air leaking Clearance of crankshaft position sensor incorrect Ignition timing incorrect Fuel injection trouble Fuel pressure incorrect Engine compression ratio incorrect
60
Engine—Electric Injection—On-Board Diagnostic (EOBD)
ECU trouble DTC P1392: G sensor signal voltage too low Test condition: run the engine for a while Malfunction judgement: ECM detects that G sensor output signal value is too small Emergency control plan: determine whether to disable the misfire diagnosis without reference to the signal of G sensor Possible causes: between G sensor and ECM develops a short circuit to ground. Poor connection G sensor trouble DTC P1393: G sensor signal voltage too high Test condition: run the engine for a while Malfunction judgement: ECM detects that G sensor output signal value is too big Emergency control plan: determine whether to disable the misfire diagnosis without reference to the signal of G sensor Possible causes: between G sensor and ECM develops a short circuit to ground. Poor connection G sensor trouble DTC P0325: the knock control system trouble Test condition: the engine revolution speed higher than 1600RPM Coolant temperature higher than 50℃ Malfunction judgement: ECM detects that the mean value of cylinders’ maximum signals of knock sensor is smaller than the threshold limit value set by the system, or the mean value of cylinders’ minimum signals greater than the threshold limit value set by the system. Emergency control plan: take the system default value as the spark advance angle Possible causes: poor connection Open circuit of the line between knock sensor and ECM Knock sensor trouble DTC P0327: trouble of knock sensor circuit Test condition: engine speed above 1600RPM Coolant temperature higher than 50℃ Malfunction judgment: ECM detects that difference among knock signals from various cylinders is lower than the limit value set by the system Emergency control plan: ignition advance angle applies the default value set by the system Possible cause: poor connection
61
Engine—Electric Injection—On-Board Diagnostic (EOBD)
Signal interference Knock sensor trouble DTC P0336: Problem of circuit performance of crank position sensor Test condition: engine running Malfunction judgement: ECM detects that pulse signals of crank position sensor lose too much Emergency control plan: none Possible cause: poor electric connection Noise interference Circuit trouble between crank position sensor and ECM Target wheel trouble ECM trouble DTC P0337: circuit trouble of crank position sensor Test condition: during starting No camshaft indicates main sensor trouble System voltage decreases about by 1V Malfunction judgement: ECM can not receive signals from crank position sensor Emergency control plan: none Possible cause: Circuit trouble between crankshaft position sensor and ECM Air clearance between crankshaft position sensor and ring gear does not conform to the specification Trouble of crankshaft position sensor DTC P1336: gear information of crankshaft position not learnt Test condition: no trouble codes related to coolant temperature sensor, throttle position sensor, crank position sensor, camshaft position sensor, speed sensor, fuel injector, ignition system etc. Malfunction judgement: gear information learning mark is not positioned Emergency control plan: none Possible cause: the vehicle hasn’t executed gear information learning program (refer to Appendix 2 for gear information learning program) DTC P0342: no signal from the circuit of crank position sensor Test condition: engine running Malfunction judgement: ECM does not receive any signal from crank position sensor Emergency control plan: none Possible cause: poor connection Open circuit between crank position sensor and ECM
62
Engine—Electric Injection—On-Board Diagnostic (EOBD)
Crank position sensor is damaged DTC P0351: trouble of ignition circuit 1 Test condition: the engine in operation Power voltage is above 10V Malfunction judgement: ignition circuit of cylinder 1, 4 is open or shorted to power supply or ground Emergency control plan: stop fuel injection of cylinder 1, 4 Disable closed-loop fuel control Possible cause: ignition circuit between ignition coil and ECM is shorted or open Poor contact of ignition coil connector Ignition coil is damaged DTC P0352: trouble of ignition circuit 2 Test condition: the engine in operation Power voltage is above 10V Malfunction judgement: ignition line of cylinder 2, 3 is open or shorted to power supply or ground Emergency control plan: stop fuel injection of cylinder 2, 3 Disable closed-loop fuel control Possible cause: ignition circuit between ignition coil and ECM is shorted or open Poor contact of ignition coil connector Ignition coil is damaged DTC P0420: catalyst efficiency is below the limit Test condition: no trouble codes related to MAP sensor, coolant temperature sensor, TPS sensor, cooling system, oxygen sensor, fuel correction, speed sensor, fuel injector, fire, crankshaft position sensor, camshaft position sensor, ignition system, idle speed control, system voltage Coolant temperature higher than 70℃ With fuel system loop-closed, stop the vehicle and run at idle speed after driving for a certain distance at even speed. Malfunction judgement: the system calculates oxygen storage time of catalytic converter by comparing signals from front and rear oxygen sensor, when weighted oxygen storage time is less then the set limit, the system will report this trouble Emergency control plan: none Possible cause: catalystic convertor performance deterioration DTC P0443: trouble of canister cleaning circuit Test condition: ignition switch is at power-on position System voltage is above 11V
63
Engine—Electric Injection—On-Board Diagnostic (EOBD)
Malfunction judgement: control circuit voltage of canister solenoid valve too high or too low. Emergency control plan: stop canister cleaning function Possible cause: control circuit between canister solenoid valve and ECM is open or shorted to power supply or ground. Canister solenoid valve is damaged DTC P0462: fuel level sensor circuit input is too low Test condition: the engine in operation Power voltage is above 10V Malfunction judgement: sensor signal voltage is higher than 4.3V Emergency control plan: system should apply default fuel level value Disable fire diagnosis Circuit between the sensor and ECM is shorted to the power supply Poor connection DTC P0480: trouble of Fan 1 Test condition: engine in operation Malfunction judgement: ECM detects that the control line is shorted or open to power supply or ground Emergency control plan: when coolant temperature is too high, start high-speed fan Possible cause: control circuit between the fan and ECM is open or shorted to power supply or ground DTC P0481: trouble of Fan 2 Test condition: engine in operation Malfunction judgement: ECM detects that the control line is shorted or open to power supply or ground Emergency control plan: none Possible cause: control circuit between the fan and ECM is open or shorted to power supply or ground DTC P0482: trouble of Fan 3 Test condition: engine in operation Malfunction judgement: ECM detects that the control line is shorted or open to power supply or ground Emergency control plan: none Possible cause: control circuit between the fan and ECM is open or shorted to power supply or ground DTC P0483: trouble of Fan PWM Test condition: engine in operation Malfunction judgement: ECM detects that the control line is shorted or open to power supply or ground Emergency control plan: none Possible cause: control circuit between the fan and ECM is open or shorted to power supply or ground
64
Engine—Electric Injection—On-Board Diagnostic (EOBD)
DTC P0502: no vehicle speed signal Test condition: engine in operation Coolant temperature is higher than 60℃ No trouble codes related to MAP sensor, TPS sensor etc. Malfunction judgement: under acceleration condition, vehicle speed is lower than 10kph; and under deceleration condition, vehicle speed is lower than 5kph Emergency control plan: disable closed-loop control at idle speed Under heavy-load condition, disable air conditioning no more Possible cause: poor connection Circuit between speed sensor and ECM is shorted or open Speed sensor is damaged DTC P0506: trouble of idle-speed control system – rotating speed is too low Test condition: no trouble codes related to MAP sensor, coolant temperature sensor, TPS sensor, cooling system, oxygen sensor, fuel correction, speed sensor, fuel injector, misfire, crankshaft position sensor, camshaft position sensor, ignition system, idle speed control, system voltage Engine in operation Coolant temperature is higher than 60℃ Malfunction judgement: the duration that idle speed is lower than target idle speed 100RPM set by the system is longer than 10s Emergency control plan: disable idle-speed adjustment Possible cause: trouble of idle-speed control circuit Trouble of idle-speed step motor Ignition system trouble DTC P0507: trouble of idle-speed control system – rotating speed is too high Test condition: no trouble codes related to MAP sensor, coolant temperature sensor, TPS sensor, cooling system, oxygen sensor, fuel correction, speed sensor, fuel injector, misfire, crankshaft position sensor, camshaft position sensor, ignition system, idle speed control, system voltage Engine in operation Coolant temperature is higher than 60℃ Malfunction judgement: the duration that idle speed is lower than target idle speed 200RPM set by the system is longer than 10s Emergency control plan: disable idle-speed adjustment Possible cause: circuit trouble between idle-speed control valve and ECM Trouble of idle-speed control valve Ignition system trouble
65
Engine—Electric Injection—On-Board Diagnostic (EOBD)
Vacuum leaking DTC P0562: system voltage is too high Test condition: ignition switch is at power-on position Malfunction judgement: system voltage is higher than 16V Emergency control plan: none Possible cause: charging system trouble Poor connection Internal damage of ECM DTC P0563: system voltage is too low Test condition: ignition switch is at power-on position Malfunction judgement: system voltage is higher than 11V Emergency control plan: none Possible cause: charge system trouble Poor connection Harness is shorted or open to the ground Internal damage of ECM DTC P0532: voltage of air conditioning pressure circuit is too high Test condition: engine in operation Malfunction judgement: ECM detects that air conditioning pressure signal is lower than 0.05V Emergency control plan: cut off air conditioning clutch immediately Ai conditioning pressure signal applies system default value Possible cause: the circuit between air conditioning pressure sensor and ECM is shorted to the power supply Poor connection Trouble of air conditioning pressure sensor DTC P0533: voltage of air conditioning pressure circuit is too low or open Test condition: engine in operation Malfunction judgement: ECM detects that air conditioning pressure signal is lower than 4.95V Emergency control plan: cut off air conditioning clutch immediately Ai conditioning pressure signal applies system default value Possible cause: the circuit between air conditioning pressure sensor and ECM is shorted or open to the power supply Poor connection
66
Engine—Electric Injection—On-Board Diagnostic (EOBD)
Trouble of air conditioning pressure sensor DTC P1545: trouble of output circuit of air conditioning clutch Test condition: ignition switch is at power-on position Malfunction judgement: ECM detects circuit trouble of air conditioning clutch relay Emergency control plan: none Possible cause: the harness between air conditioning clutch relay and ECM is shorted or open to the power supply or to the ground DTC P2001: trouble of rear air conditioning evaporator sensor Test condition: engine in operation Malfunction judgement: ECM detects that the signal from rear evaporator sensor is too high or too low Emergency control plan: none Possible cause: poor connection Harness between evaporator sensor and ECM is shorted or open to the power supply or to the ground Trouble of rear evaporator sensor DTC P0615: TCM trouble Test condition: engine in operation Malfunction judgement: ECM received trouble information transmitted from TCM Emergency control plan: none Possible cause: trouble of transmission control system
67
Engine – Electronic fuel injection part – Typical troubles and troubleshooting
III. Typical trouble and troubleshooting 1. Repair notice (1) Preparation before repair: (a) Do not repair vehicle at petrol station (b) Do not repair fuel system at the place where fire source exists (c) No smoking is allowed during repair operation (2) When removing parts of fuel system (e.g. replacing filter, removing oil pump or oil inlet/outlet pipe of fuel rail) (a) Disconnect battery cathode first to prevent fuel vapor being ignited by discharge spark produced from accidental short circuit. (b) Cover oil pipe connector with cloth, then loose the connector carefully to release oil pressure from the pipe (c) Prevent fuel from splashing onto the engine and high-temperature exhaust pipe; (d) Keep gasoline away from rubber or leather parts (e) Replace fuel inlet/return pipe, pressure resistant fuel pipe against bursting pressure higher than 2MPa shall be used. (3) When removing and repairing parts of electronic control system: (a) Electronic-Controlled Fuel Injection System parts is reliable, when the vehicle or engine works abnormally, check related mechanical parts, system connectors and harness, grounding wire, high pressure line connector of spark plug and vacuum pipe of oil pressure adjustor etc.; perform replacement test repeatedly to check before determining that Electronic-Controlled Fuel Injection parts are damaged; (b) When battery voltage is low or engine fails, do not start the engine with external force for a long period in order to prevent three-way catalystic convertor from being damaged; (c) If repair is essential, cut off ignition switch or disassemble battery cathode first, it is prohibited to assemble or disassemble electronic parts with power switched on; (d) Do not check electric signal of the system in the manner of detecting the harness with probe; (e) When the engine in operation, do not plug out battery connector; (f) When it is required to perform electric welding etc. using tools from external electric system, battery and ECM connector must be disconnected; (g) Do not check that ignition system by plugging out spark plug lead, because the nozzle is still working, gasoline injected but not used will burn in three-way catalystic convertor thus resulting in damage quickly; (h) When checking during ECM replacement, please note whether the vehicle is equipped with computer burglar alarm. If so, cut off the power supply to burglar alarm, and replace a new ECM, or else the new ECM will be locked by the burglar alarm and can not work on other vehicles;
68
Engine – Electronic fuel injection part – Typical troubles and troubleshooting
(i) Prevent parts from violet knocking during assembling and disassembling; (j) Do not open ECM cover; (k) When replacing and removing oxygen sensor, do not let the sensor touch water or other liquid. (l) Fuel pump shall not run for a long period without fuel or run with gasoline in the air (m) Most of electronically-controlled fuel injection parts are unrepairable, after determining that the part is damaged, it is usually replaced; (n) The system shall use anti-interference spark plug and high-pressure wire, non-anti-interference spark plug and high-pressure wire may not only release interference wave, but also may make affect influence on drive module of ignition coil inside the ECM, and it may even damage ECM. (4) End of work: (a) Check that all wire connectors and fuel pipeline are connected and fixed appropriately; (b) If there is any damage on the pipeline, the damage part must be wrapped during repair; (c) High-voltage conductor must be connected appropriately; (d) When connecting battery connector, please note: never connect anode and cathode reversely, and ensure that the lamp on battery connector is connected securely. 2. Detection procedure for off-line vehicle Detection unit for off-line vehicle or after-sales service station can detect vehicle operating condition using computer equipped with PCHUD monitor software or trouble diagnosis tester. Appendix 1: "Typical datastream of DELPHI electronic fuel injection system" lists operating parameters of the vehicle at normal condition and possible causes in abnormal condition. 3. Trouble diagnosis with trouble code and corresponding troubleshooting When trouble lamp illuminates, use the diagnosis tester to read trouble code, and repair according to trouble code description in “On-board diagnosis system”. After finishing troubleshooting at service station, perform trial driving as per the following procedures to ensure that trouble is repaired completely.
69
Vehicle speed
Engine – Electronic fuel injection part – Typical troubles and troubleshooting
90km/h, Gear 5 or D for 5min
70km/h, Gear 5 or D for 5min
50km/h, Gear 3 for 5min
Idle speed
Idle speed
Idle speed
Idle speed
Time (Min)
4. Trouble diagnosis without trouble code and corresponding troubleshooting Trouble 01:
Trouble diagnosis tester can not communicate with the system Possible cause
Troubleshooting for reference
1. Diagnosis wire is not connected securely
1. Reconnect diagnosis wire
2. Functions of diagnosis tester do not conform to the system
2. Use a diagnosis tester conforming to the vehicle model and system
3. Diagnosis tester trouble
3. Eliminate diagnosis tester trouble
4. corresponding relation between diagnosis interface and ECM connector terminal is wrong
4. Repair the harness
5. shorted to the lead relevant to diagnosis port
6. Replace ECM
5. Repair the harness
6. ECM communication trouble
70
Engine – Electronic fuel injection part – Typical troubles and troubleshooting
Trouble 02: Possible cause Trouble lamp: 1. Flashing 1) Anti-theft key error 2) Circuit trouble of anti-theft system 3) Alarm is damaged 2. Off 1) Fuse/fusible line 2) Grounding wire is open 3) ECM connector 4) Lamp and circuit 5) ECM trouble 3. On – check with diagnosis tester 1) With trouble code 2) Without trouble code
System power supply: 1. System voltage when starter is working 1) <8V 2) >8V Signal acquisition system: 1. Without rotating speed datastream 1) Harness of crank position sensor is open 2) Connector terminal of crank position sensor is connected reversely 3) Clearance between sensor and 58× target gear is incorrect 4) Foreign matter is attached with the sensor 5) Sensor magnetic force is degenerated or sensor is damaged 2. With rotating speed datastream 1) Relative position of 58×gear to top dead point is incorrect Fuel supply system: 1. Oil inlet/return pipe is connected reversely 2. Fuel pump open circuit 3. Cylinder is overflowing 4. 5. Oil inlet pipe pressure >250kpa 1) Fuel injection is blocked 6. Oil inlet pipe pressure <250kpa 1) Insufficient fuel in the tank 2) Fuel filter is blocked 3) Oil inlet pipe is leaking 4) Fuel pressure adjuster is damaged 5) Fuel pump pressure is not sufficient 6) Fuel evaporability is proper or not
Start trouble Troubleshooting for reference 1. Whether the key is correct or damaged 1) Re-learn the key 2) Check the line and reconnect the connector 3) Replace alarm, and perform learning steps according to the procedure 2. 1) Replace 2) Check and repair 3) Reconnect 4) Repair harness and lamp 5) Replace ECM 3. Diagnose with trouble diagnosis tester 1) Eliminate the existing trouble 2) Check: system power supply, signal acquisition system, fuel supply system, ignition system, idle-speed control system, engine and whole vehicle mechanical system 1. Diagnose with trouble diagnosis tester 1) Replace battery or charge 2) Check other systems 1. 1) Repair the harness 2) Repair the harness 3) Adjust the clearance: 0.3~1.5mm 4) Clean sensor 5) Replace sensor 2. With rotating speed datastream 1) Check: falling edge of Gear 20 is the top dead point of Cylinder 1-4
1. Connect in correct manner 2. Repair vehicle harness, and reconnect oil pump connector 3. Slight overflowing: Open the throttle fully and start the engine Serious overflowing: remove spark plug and start the engine, recover them after the cylinder and residual oil in the spark plug is dry 4. 1) Replace nozzle 5. 1) Fill oil 2) Replace fuel filter 3) Replace oil inlet pipe 4) Replace fuel pressure adjuster 5) Replace fuel pump
71
Engine – Electronic fuel injection part – Typical troubles and troubleshooting
6) Use fuel with proper evaporability as per season Ignition system: 1. Connector of ignition coil 2. Cylinder sequence is incorrect 3. Spark plug is damaged 4. Ignition coil is damaged Idle speed control system: 1. Unable to start by depressing the throttle slightly 2. Able to start by depressing the throttle slightly 1) Idle valve plug falls off 2) Connector terminal of idle valve does not conform to ECM terminal 3) Idle valve is blocked 4) ECM common power is interrupted 5) Idle valve is damaged 6) ECM trouble Air intake/exhaust system: 1. Air filter is blocked 2. Three-way catalystic convertor is blocked 1) Catalystic convertor is broken 2) Blocked due to foreign matter burning
Trouble 03:
1. Reconnect connector 2. Connect coil and spark plug according to coil tip 3. Replace spark plug 4. Replace ignition coil 1. Check other reasons 2. 1) Reconnect 2) Repair the harness 3) Clean throttle body 4) Repair the harness 5) Replace idle valve 6) Replace ECM
1. Clean up air intake pipeline, and replace filter element 2. 1) Replace three-way catalystic convertor 2) Repair engine and replace three-way catalystic convertor
Engine is ignited but can not start Troubleshooting for reference
Possible cause Fuel supply system: 1. Inlet pipe pressure <250kpa 1) Insufficient fuel in the tank 2) Fuel filter is blocked 3) Inlet pipe is leaking 4) Oil pressure adjuster is damaged 5) Fuel pump pressure is not sufficient 6) Fuel evaporativty is proper or not Idle speed control system: 1. Able to start by depressing the throttle 1) Idle valve plug falls off 2) Connector terminal of idle valve does not conform to ECM terminal 3) Idle valve is blocked 4) ECM common power is interrupted 5) Idle valve is damaged 6) ECM trouble Air intake/exhaust system: 1. Air filter is blocked 2. Three-way catalystic convertor is blocked 1) Catalystic convertor is broken 2) Blocked due to foreign matter burning
1. 1) Fill fuel 2) Replace fuel filter 3) Replace oil inlet pipe 4) Replace fuel pressure adjuster 5) Replace fuel pump 6) Use fuel with proper eveporativity as per season 1. 1) Reconnect 2) Repair the harness 3) Clean throttle body 4) Repair the harness 5) Replace idle valve 6) Replace ECM
1. Clean up air intake pipeline, and replace filter element 2. 1) Replace three-way catalystic convertor 2) Repair engine and replace three-way catalystic convertor
72
Engine – Electronic fuel injection part – Typical troubles and troubleshooting
Trouble 04: Possible cause 1. Whole vehicle is power-off 2. ECM common power is switched off during parking
Trouble 05: Possible cause 1. Idle valve plug falls off 2. Connector terminal of idle valve does not conform to ECM terminal 3. Idle valve hole is blocked 4. Idle valve is damaged 5. Insufficient fuel in the tank 6. Whether the fuel filter is blocked 7. Oil inlet pipe is leaking 8. Three-way catalystic convertor is blocked or not 9. Air intake system is blocked or not 10. Fuel pressure adjuster is damaged 11. Fuel pump pressure is not sufficient 12. ECM trouble
Trouble 06: Possible cause 1. Consistent with target idle speed 1) Reading on coolant temperature sensor is abnormal 2) Reading on coolant temperature sensor is normal 2. Inconsistent with target idle speed 1) Throttle does not return to the home position 2) Step pitch of idle valve < 5 steps – intake pipe leaking; trouble of idle-speed control system 3) 5 steps < step pitch of idle valve <150 steps trouble of idle-speed control system
Idle speed is abnormal Troubleshooting for reference 1. Switch off ignition switch and restart it 10s later 2. Recover ECM common power supply
Idle speed is low Troubleshooting for reference 1. Reconnect 2. Repair the harness 3. Clean throttle body 4. Replace idle valve 5. Fill fuel 6. Replace fuel filter 7. Replace oil inlet pipe 8. Replace catalystic convertor, if necessary, repair the engine 9. Clean up intake pipeline, and replace filter element 10. Replace fuel pressure adjuster 11. Replace fuel pump 12. Replace ECM
Idle speed is high Troubleshooting for reference 1. 1) Replace coolant temperature sensor 2) Normal phenomena 2. 1) Adjust throttle cable 2) Eliminate leaking trouble for intake pipe; refer to “Idle speed is low” for trouble of idle-speed control system
Trouble 07: Idle speed is not stable Possible cause Troubleshooting for reference 1. Poor connection to spark plug lead 1. Reconnect 2. Clearances between spark plugs are not 2. Adjust all of them to 1.0~1.2mm consistent 3. Repair or replace vacuum pipe 3. Vacuum pipe of oil pressure adjuster falls off or 4. Clean or replace trouble fuel injector is damaged 5. Check: falling edge of Gear 20 is the top dead 4. Certain fuel injector is blocked point of Cylinder 1-4 5. 58× ring gear is mis-positioned
Trouble 08: Possible cause
Engine flames out suddenly during normal operation Troubleshooting for reference
73
Engine – Electronic fuel injection part – Typical troubles and troubleshooting
1. Poor connection of electric system 2. Insufficient fuel in the tank 3. Oil inlet pipe is leaking
1. Check all related connectors in anode and cathode circuits of power supply 2. Fill fuel 3. Replace oil inlet pipe
Trouble 09:
Engine flames out during deceleration Possible cause Troubleshooting for reference 1. ECM common power is switched off during 1. Recover ECM common power supply parking 2. Repair the harness 2. Connector terminal of idle valve does not 3. Clean throttle body conform to ECM terminal 4. Replace idle valve 3. Idle valve is blocked 5. Replace ECM 4. Idle valve is damaged 5. ECM trouble
Trouble 10: Powerless/lagging acceleration Possible cause Troubleshooting for reference 1. Air intake system is not smooth 1. Clean up air intake pipeline, and replace filter 2. Pressure sensor hole of air intake manifold is element 2. Clean up detecting hole on the pressure sensor blocked of air intake manifold, if necessary, replace the sensor 3. Throttle can not be opened fully 3. Adjust retaining screws of the throttle to ensure 4. Fuel injector is blocked that it is opened fully 5. Exhaust system is not smooth 4. Clean or replace damaged fuel injector 5. Check exhaust system and three-way catalystic convertor
Trouble 11:
Engine power is insufficient Possible cause Troubleshooting for reference 1. Air intake system is not smooth 1. Clean up air intake pipeline, and replace filter element 2. Throttle can not be opened fully 2. Adjust retaining screws of the throttle to ensure 3. Exhaust system is not smooth 4. Resistance of power transmission system is too that it is opened fully 3. Check exhaust system and three-way catalystic large convertor 5. Engine is overheat 4. Repair parts relevant to power transmission 6. Fuel injector is blocked system 5. Repair engine cooling system 6. Clean or replace damaged fuel injector
Trouble 12:
Idle speed unstable during driving Possible cause Troubleshooting for reference 1. High-pressure circuit leakage of ignition system 1. Reconnect all connectors and replace damaged parts 2. Nozzle is blocked 2. Clean or replace damaged fuel injector
Trouble 13: Possible cause
Vibration during acceleration Troubleshooting for reference 74
Engine – Electronic fuel injection part – Typical troubles and troubleshooting
1. High-pressure circuit leakage of ignition system
Trouble 14: Possible cause 1. Fuel does not conform to the standard 2. Engine is overheat 3. 58× ring gear is mispositioned
1. Reconnect all connectors and replace damaged parts
Knocking Troubleshooting for reference 1. Ensure that fuel with octane number greater than 90 is used 2. Repair engine cooling system 3. Check: falling edge of Gear 20 is the top dead point of Cylinder 1-4
Trouble 15:
After burn (and exhaust temperature is too high) Possible cause Troubleshooting for reference 1. Cylinder shortage of engine ignition system 1. Recover ignition of that cylinder, if it is impossible temporarily, plug out the nozzle control plug of that cylinder to protect the three-way 2. Trouble of engine exhaust valve catalystic convertor 3. 58× ring gear is mis-positioned 2. Repair engine 3. Check: falling edge of Gear 20 is the top dead point of Cylinder 1-4
Trouble 16:
Cycle testing over emission Possible cause Troubleshooting for reference 1. Repair engine 1. Abnormal condition of the engine 2. Control of electronic fuel injection system is 2. Repair electronic fuel injection system according to “Off-line trial driving procedure and detecting abnormal technical conditions for 462/465 series vehicles” 3. Fix relevant bolts, if necessary, replace gasket 3.Connector between cylinder head and three-way 4. Fix oxygen sensor catalystic convertor is air-leaking 5. Repair or replace 4. Screws of oxygen sensor is air-leaking 6. Replace fuel pressure sensor 5. Vacuum pipe of oil pressure adjuster falls off 7. Lifecycle is longer than 80000km under 6. Trouble of fuel pressure adjuster 7. Usage term of three-way catalystic convertor standard condition, if necessary, replace it 8. Replace catalystic convertor and oxygen sensor and oxygen sensor has been exceeded 8. Heavy metal poisoning of three-way catalystic 9. Run it for 10 minutes at 70km/h at 3rd gear convertor and oxygen sensor, or they are damaged 10. Improve position of system grounding wire due to overheating 11. Isolate ECM housing 9. Sulfur poisoning of three-way catalystic 12. Check: falling edge of Gear 20 is the top dead convertor and oxygen sensor point of Cylinder 1-4 10. Poor grounding of ECM or electronic fuel injection system 11. ECM housing is grounded 12. 58× ring gear is mis-positioned
Trouble 19: Possible cause 1. Canister connecting pipe is broken 2. Canister is damaged
Emission of fuel vapor is abnormal Troubleshooting for reference 1. Replace connecting pipe 2. Replace canister
75
Engine – Electronic fuel injection part – Typical troubles and troubleshooting
3. Canister specification is too small 4. Harness of canister solenoid valve trouble 5. Connector is not connected securely 6. Canister solenoid valve is damaged 7. ECM trouble
3. Choose proper canister 4. Repair the harness 5. Reconnect 6. Replace canister solenoid valve 7. Replace ECM
Trouble 20:
Fuel consumption is abnormal Possible cause Troubleshooting for reference 1. Use reliable measurement method 1. Measurement method is not correct 2. Repair the vehicle 2. Whole vehicle condition 3. Repair engine 3. Engine condition 4. Replace thermostat 4. Thermostat is damaged 5. Replace coolant temperature sensor 5. Coolant temperature sensor is damaged 6. Repair electronic fuel injection system according 6. Condition of electronic fuel injection system to “Off-line trial driving procedure and detecting technical conditions for 462/465 series vehicles” 7. Nozzle is oil-leaking 7. Replace damaged nozzle 8. Fuel pressure adjuster is damaged 8. Replace adjuster 9. oxygen sensor is troubley 9) Replace oxygen sensor 10. ECM trouble 10. Replace ECM
The vehicle not equipped with air conditioner displays trouble relevant to air conditioning system Possible cause Troubleshooting for reference 1. Spare plug for air conditioning control of 1. Clean spare plug of air conditioner, provide electronic fuel injection system is contaminated proper dustproof and waterproof protection, cut off power supply to ECM for 10 minutes Trouble 21:
Trouble 22: Possible cause 1. Alarm-related harness trouble 2. Connector is not connected securely 3. Anti-theft key is damaged 4. Unlocking is required 5. Others
ECM is locked by alarm Troubleshooting for reference 1. Repair the harness 2. Reconnect 3. Replace and relearn new anti-theft key 4. ECM sends back DELPHI decoding 5. Contact alarm supplier, and request corresponding services
Trouble 23:
Anti-theft key gets lost or alarm is damaged Possible cause Troubleshooting for reference 1. Anti-theft key gets lost or alarm is damaged 1. Contact alarm supplier, and request corresponding services; Send back ECM to DELPHI for unlocking
Trouble 24:
Trouble lamp is on/off rulelessly during vehicle running Possible cause Troubleshooting for reference 1. Connector is connected poorly 1. Check all connector terminals of electronic fuel injection system, and then reconnect connectors
76
Engine – Electronic fuel injection – Typical datastream of DELPHI electronic fuel injection system
IV. Typical datastream of DELPHI electronic fuel injection system 1. Routine inspection (1) Harness connectors are connected reliably (2) Oil circuit and vacuum pipe are fixed reliably (3) Fix end bolts of oxygen sensor and three-way catalystic convertor interface, ensure seal of interface end; if necessary, check the exhaust system with atmospheric pressure of 1.3, there should be no obvious leakage. 2. System initialization setting (1) Initialization of electronic fuel injection control system: turn the ignition switch to running position, and turn off 3s later, system initialization setting will be finished 10s later. (2) Initialization of fuel supply system: turn the ignition switch to running position, and turn off 3s later, restart it after 1s and repeat it 5 times, then initialization setting of fuel supply system will be finished. 3. Inspection of system and vehicle condition (1) Step 1: cold vehicle, turn the key switch to “ON” position, deactivate the engine (for about 30s) No.
Detection items
1
Display trouble code
No
2
Engine trouble indicator
On
3
Battery voltage
11.5~13V
4
Coolant temperature sensor
Normal temperature
5
Air intake temperature sensor
Ambient temperature
6
Absolute pressure sensor for intake manifold
Ambient atmosphere (about 100kpa)
7
Working range of air intake valve position sensor
0~99.6%
8
Oxygen sensor
1127mV
9
Idle speed control valve
40~159 steps (coolant temperature: high~ low)
(2) Step 2: Key switch turns to “OFF" position Detection items 1
Actual position of idle-speed motor
Remain at 128 steps after about 8s
2
ECM power supply is cut off or not
PCHUD/diagnosis tester stops display
3
Engine trouble checking lamp
OFF
(3) Step 3: Start engine (Note: do not operate any mechanism and throttle on the engine during start)
77
Engine – Electronic fuel injection – Typical datastream of DELPHI electronic fuel injection system
Detection items 1
Start time
<5s
2
Starting speed at normal temperature
<1600RPM
3
Engine trouble checking lamp
OFF
(4) Step 4: Idle speed inspection (after start, warm up engine to normal coolant temperature) (a) Low idle speed Detection items 1
Engine trouble checking lamp
OFF
2
Display trouble code or not
No
3
Coolant temperature
80~94℃ Coolant temperature
4
Cooling fan
92.25
low-speed fan ON
(Single-speed fan is only used for data of low-speed fan)
87.00
low-speed fan OFF
98.25
high-speed fan ON
93 5
Cooling fan condition
Battery voltage
high-speed fan OFF 13.5~14.5V 850±30RPM
6
Rotating speed
900±30RPM (when cooling fan, head lamp and blower are on)
7
Ignition advance angle
5~13°
8
Air intake manifold pressure
35~55kpa
9
Actual position of idle-speed motor
15~30 steps
10
Pulse width of fuel injection
2~4ms
11
Oxygen sensor/jump times within 10s
100~900mV/≥6 times
(b) High idle speed (depress the throttle lightly to accelerate the engine to 2000RPM) Detection items 1
Engine trouble check indicator
OFF
2
Display harness trouble code or not
No
3
Coolant temperature
80~94℃
5
Battery voltage
13.5~14.5V
6
Rotating speed
Actual value (it should be controlled within
78
Engine – Electronic fuel injection – Typical datastream of DELPHI electronic fuel injection system
2000±50RPM) 7
Ignition advance angle
20~30°
8
Pulse width of fuel injection
2~4ms
9
oxygen sensor/jump times within 10s
100~900mV/≥10 times
(5) Step 5: Air conditioning system inspection (a) Normal idle speed, air conditioning system is OFF Detection items 1
Status 3 - A/C system
Appearing
2
Status 5 – front evaporator
Appearing
(b) Start air conditioner, after keep stable for 10s Detection items 1
Engine idle speed
1000±50RPM
2
Status 3 - A/C request signal
Appearing
3
Status 3 - A/C relay
Appearing
4
Status 3 - A/C system
Appearing
5
Status 4 – Fan 1
Appearing
6
Status 5 – Fan 2
Appearing
7
Status 5 – front evaporator
Appearing
(6) Step 6: Driving inspection The following operation must be performed during driving inspection: (a) Throttle opening is larger than 10% and remain above 15s (b) Direct gear, when the speed reaches 80km/h, release the throttle and slip for over 5s Detection items 1
Engine trouble checking lamp
OFF
2
Display harness trouble code or not
No
3
Coolant temperature
80~94℃
4
Battery voltage
13.5~14.5V
5
Absolute pressure sensor for air intake manifold
20kpa~ atmosphere pressure
6
Working range of throttle position sensor
0~99.6%
7
oxygen sensor
50~950mV
4. Description 79
Engine – Electronic fuel injection – Typical datastream of DELPHI electronic fuel injection system
(1). Routine inspection (a) Loose connection of connectors will cause misalignment of signal transmission and control; (b) Oil inlet/return pipes can not be connected reversely, pressure balancing vacuum pipe of the oil pressure adjustor can not be omitted, or it may lead to abnormal exhaust and increase fuel consumption; (c) Canister cleaning pipe should not be connected reversely or omitted, otherwise it may lead to abnormal idle speed; (d) If seal from engine cylinder head to three-way catalystic convertor is poor, outer air will get in during engine operation, which will destroy the balance of air/fuel ratio, thus reduce converting efficiency of three-way catalystic convertor. (2) System initialization setting (a) When the first power supply to ECM is cut off after ECM is installed, ECM will perform initialization setting for the system (b) Every time the key switch is turned on, fuel pump will work for 1.5s. When the vehicle is off line, there is no fuel in fuel pipeline, therefore fuel shall be filled into the pipeline first. (3) Inspection of system and vehicle condition (a) Turn key switch to running position, and leave the engine static. ●
Engine trouble indicator lamp is on, but there should be no trouble code
●
Absolute pressure sensor of air intake manifold should display local atmosphere pressure value at that time
●
Adjust throttle cable and pedal screw, ensure enclosure and full opening of the throttle
●
When warming up the oxygen sensor, its display should decrease from 450mV and keep balance below 200mV after warm-up;
●
The position of idle valve is based on engine temperature, its opening is small when warming up and large when the engine gets cold.
(b) Turn key switch to parking gear ●
After turning off key switch, if idle control valve does not act, ECM power supply should be cut off immediately at the same time, check that ECM common power wire is connected incorrectly to ignition switch; it may cause difficult engine restarting and flame-out during deceleration, as well as affecting exhaust performance.
(c) Idle speed inspection ●
Engine trouble indicator lamp is OFF without trouble code;
●
Battery voltage indicates that whether the generator operates normally
Too high: maybe generator adjustor is troubley Too low: maybe generator wiring is inappropriate or generator trouble; ●
Air intake manifold pressure can indicate leakage of air intake and valve clearance problem. If valve clearance is too small, this value is higher, which will affect engine power performance, in addition, because exhaust valve is open too early and exhaust temperature increases, lifecycles of oxygen sensor and three-way catalystic convertor will be shortened greatly.
80
Engine – Electronic fuel injection – Typical datastream of DELPHI electronic fuel injection system
In addition, blockage of exhaust system (e.g. there is foreign matter in exhaust pipeline or three-way catalystic convertor is broken inside) will cause this value higher too; ●
Actual position value of idle-speed motor is too low, which indicates that intake system is leaking, and too high indicates throttle body and idle control valve are blocked;
●
Changing times of oxygen sensor value is too few, it indicates that oxygen sensor fails.
(d) A/C system inspection When air conditioner starts, target idle speed increases by 100RPM, and when air conditioning fan is turned on, it increases by 50RPM additionally, in general they start at the same time, therefore, after the air conditioner starts, idle speed of the engine should increases by 150RPM on the basis of the original idle speed. (e) Driving inspection Vehicle speed trouble and sensor trouble during this course are diagnosed, meanwhile the alternative control solution will become effective after the trouble is detected.
81
Engine —Electronic fuel injection part — Gear information learning procedure of EOBD system
V.
Gear information learning procedure of EOBD system
Operation 1: Learn target gear teeth error of crank position sensor 1. When the vehicle installed new computer has not learned gear information, trouble lamp will be on after it starts, and diagnosis tester displays trouble of P1336. 2. When water temperature reaches 60℃ after starting, vehicle running time is longer than 10s, and other onboard loading should be closed; 3. Send “Gear information learning” command by diagnosis tester (Command “30 2c 07 ff”) 4. Depress the throttle to the extreme position and remain, ECM should perform gear information learning at this time, engine speed circulates 2-5 cycles within 1300-4500, and finally vibrating at about 4500rpm, learning is completed; (The content above is typical characteristics of engine speed when performing gear information learning, it can be used to determine whether learning is in process or completed) 5. Send “Stop gear information learning” command by diagnosis tester (Command “30 2c 00”) 6. Engine flames out, key-on after about 15s, then eliminate trouble code, key-off; 7. Start the engine after 15s, check that P1336 is qualified by diagnosis tester;
82
电瓶
Battery
58X
D
C
D
C
Front evaporator 前蒸发器温度传感器 temperature sensor
sensor
Coolant temperature 冷却液温度传感器
节气门位置传感器
Throttle position sensor
OSP Rear heated 加热式后 oxygen sensor 氧传感器
sensor
OSP Front 加热式前 heated 氧传感器 oxygen
爆震传感器
Knock sensor
车速传感器
Vehicle speed sensor
Magnetoelectric 磁电式曲轴 crankshaft position sensor 位置传感器
A
B
A
B
1
2
3
B
C
A
C
A
5V source No. 1 1号5V电压源地 ground
Knock signal 爆震信号
Vehicle speed signal 车速信号
58-tooth signal high58齿信号高 58-tooth signal high58齿信号低
System earthing 系统接地
relay
J1-69
J1-03
J1-28
J1-12
J1-73
J1-58
Throttle position signal 节气门位置信号
J1-43
J1-24
5V source No. 1 negative 1号5V电压源地
Front evaporator 前蒸发器温度信号 temperature signal J1-26
5V source No. 1 1号5V电压源负 negative
Coolant temperature 冷却液温度信号 signal To water 去水温表 gauge temperature
5V source No. 1 1号5V电压源地 ground
J1-38
Rear oxygen sensor heating 后氧传感器加热 J1-64
Rear oxygen sensor signal 后氧传感器信号高 high
Front oxygen sensor signal 前氧传感器信号高 high J1-62 Front oxygen sensor 氧传感器信号低 signal low J1-06 Front oxygen sensor heating 前氧传感器加热 J1-61
Single-core 单芯屏蔽线 shielded wire
B
5V source No. 1 positive 1号5V电压源正
Main relay output 主继电器输出
A
B
Main output
主继电器 Main relay o
Earthing point at 接地点选发动机 generator body or 机体或电瓶负极 battery negative pole Dual-core shielded wire双芯屏蔽线
Main relay output 主继电器输出
F6 20A
F22 15A
F12 10A
Intake pressure 进气压力
J1-57
J1-41
J1-39
4
5
7
18
鼓风机高有效
Blower high valid
A/C medium pressure 空调中压开关 switch
Medium pressure signal 中压信号高有效 high valid
A/C request high valid 空调请求高有效
C
D
A
B
A/C request 空调请求开关 switch Blower relay 鼓风机继电 output (+) 器输出(+)
Intake manifold absolute 进气歧管绝对压力 pressure/temperature sensor 温度传感器
诊断接口
Diagnostic interface
A/C high/low pressure switch空调高低压开关
5V power supply No.2 2号5V电压源地 ground air
5V power supply No.2 air positive2号5V电压源正
KW2000 串行数据
Intake 进气温度 J1-27 temperature
J1-42
J1-11
F12 10A
Serial data
5V power supply No.1 1号5V电压源正 positive 5V power supply No.1 1号5V电压源地 ground 5V power supply No.2 2号5V电压源正 positive 2号5V电压源地 5V power supply No.2 ground Ignition coil drive 点火线圈A驱动
A
J1-50
J1-67
J1-46
2
2
1
A
D B C
C
A
转速表
Tachometer
High-speed fan 高速风扇控制 control
Battery 电瓶电源 power
fan S2 20A
Low-speed 低速风扇控制 control
Battery 电瓶电源 power A/C 空调压缩机 compressor
A
30
30
relay
B
1
A/C
A
86
87
RPM
High-speed fan 高速风扇继电器 relay
IG2
Tachom 转速表 eter
A/C
Malfunction 诊断指示灯 indicator
EOBD
B
Fan
风扇
power
Main relay output
M
A
主继电器输出
B
Injection 喷嘴 nozzle
2
Spark plug 火花塞
Instrument 仪表电源 supply
Canister solenoid 碳罐电磁阀 valve B
空调压缩机继电器 A/C compressor
85
86
87
Low-speed fan 低速风扇继电器 relay
85
控制阀
Idle speed air 怠速空气 control valve
2
3
4
1
F22 15A
PCP点火线圈
B
PCP ignition coil
Canister solenoid valve 碳罐电磁阀控制 control
Main relay output 主继电器输出 Fuel relay 油泵继电器控制 control
Cylinder 1缸喷嘴 nozzle 2缸喷嘴 Cylinder 3缸喷嘴 nozzle Cylinder 4缸喷嘴 nozzle
Malfunction 故障指示灯 J1-31 indicator
J1-45
J1-63
J1-47
J1-71
J1-56
J1-70
J1-55
J1-34
J1-53
J1-33
J1-54
Idle speed control A 怠速空气控制A高 high 怠速空气控制B高 Idle speed control B 怠速空气控制A低 high Idle speed control A 怠速空气控制B低 low
Dual-core shielded 双芯屏蔽线 wire Ignition coil B 点火线圈B驱动 J1-52 drive
MT20U2 J1-32
B
4
A/C
A
A/C 空调压缩机 compressor
油泵
A
Fuel pump
3
A/C
ECM battery ECM电瓶电源 power F12 10A 诊断接口 diagnostic interface ECM ignition ECM点火开关电源 F22 15A switch power 点火线圈 ignition supply coil Fuel injector, 喷嘴、 pump, fuel 油泵、 sensor F6 20A oxygen 氧传感器加热、 heating, and 碳罐电磁阀 canister solenoid valve
List of Fuses 保险丝使用表
Schematic of 接插件针脚示意 connection pins
1
Ignition switch 点火开关IG1 IG1
73 16 32 17
73-pin 73针接插件 connector
52 72 33 53
Battery power MT20U2 supply 电瓶电源 J1-17 J1-20 Battery power supply 电瓶电源 J1-18 J1-05 Ignition 点火开关电源 switch power J1-01 supply J1-04 Main relay J1-21 主继电器输出 output
Engine —Electronic fuel injection part — Circuit Schematic Diagram for MT20U2 System
VI. Circuit Schematic Diagram for MT20U2 System
83
Engine—Cooling System
Part 5 Cooling System I. System Inspection 1. Check leakage in the cooling system (see Figure 3-1). (1) Fill coolant in the radiator, and mount the tester at the radiator cover port. (2) Start the engine. (3) Keep the pump pressure at 118KP without drop. If the pressure drops, check whether there is any leakage of the water inlet/outlet radiator 、radiator drain scres and water pump; if not, check the radiator heating core, cylinder block and cylinder head. 2. Check the engine coolant quantity in the expansion tank. The coolant level should be between L and F. (Fig 3-2) Radiator cap tester
Fig. 3-1
Fig. 3-2
3. Check the coolant quality. (1) Remove the radiator cover. Do not remove the radiator cover when the engine and the radiator are still hot in order to avoid scalding since the liquid vapor may inject. (2) Check whether there are excessive deposit and rust or sundries around the radiator cover. The coolant is not allowed to contact with oil. (3) Remount the radiator cover. 4. Thermostat Notes: The temperature indicated on the thermostat is marked as open temperature of the valve (see Figure 3-3). (1) Submerge the thermostat into water and heat gradually. (2) Check the open temperature of the valve. Open temperature of the valve: 80-84°C
Fig. 3-3
(3) Check the lift of the valve (see Figure 3-4 and Figure 3-5) Lift of the valve: 8mm or more at 95°C (4) When the thermostat is at low temperature (lower than 77°C), the valve should close completely
Fig. 3-4 84
Engine—Cooling System
5、Cooling fan assembly (1) At low temperature (lower than 87°C), check the operation of the cooling fan. 8.0mm above
a. The ignition switch is set to ON.
or
b. The cooling fan should stop. c. Disconnect the connector of the water temperature sensor. (see Figure 6-6)
Fig. 3-5
d. Use wire to connect the connector of water temperature sensor and and vehicle body.Connect the ground with a wire. e. Check if the cooling fan rotates. f. Re-connect the connector of the water temperature sensor. (2) At high temperature (more than 92°C), check the operation of the fan a. Start the engine, and enable the coolant temperature higher than 92°C. b. Check whether the cooling fan rotates. If not, replace the water temperature switch (3) Check the cooling fan. a. Disconnect the joint of the cooling fan. b. Connect the battery and the ammeter with the connector. c. The cooling fan should rotate stably and check the current readings. Standard current: (6-8) A. d. Re-connect the connector of the cooling fan. II. Cooling system malfunction maintenance 1. Remove and replace cooling system components (1) Disconnect wiring harness of cooling fan motor. (2) Open the cover of radiator and expansion canister. (3) Open water drain valve to drain coolant. (4) Unfix 4 bolts connecting radiator and condenser.(Fig.3-6) (5) Remove the lower cross member on radiator (fig. 3-7). Note: when disassembling lower crossmember from the radiator, please hold the radiator and the cooling fan to prevent them falling. (6) Remove entire cooling module. (7) Remove both damping washers on/under the radiator. (8) Disconnect the expansion tank overflow pipe and radiator; unfix 3 bolts between expansion tank and cooling fan; remove the expansion tank with overflow pipe assembly. (9) Remove 6 fixing bolts between cooling fan and radiator, to divide the cooling fan and radiator. 85
Engine—Cooling System
(10) Replace the parts and reassemble the the parts according to reverse order; fill the coolant.
Fig. 3-7
Fig. 3-6
2. Fill coolant and the notice (1) Fill full coolant to radiator and expansion canister respectively with volumes of 4.9~5.2L. (2) Start engine (while radiator cup is open). The coolant level will fall, since the air remained in cooling system is exhausted continuously. (3) Supplement coolant, until the level is stable, as well as no more bubbles appear from cooling system. (4) Close radiator and expansion canister cover and survey whether there is any coolant leakage. Filling is not finished, until cooling fan is started normally. Torque table No.
Part name
Specification
Quantity
Torque/N. m
Remark
1
Hex bolt and spring washer assembly
M6
6
7.5
Connecting radiator and cooling fan
2
Cross slotted pan head screw and plain washer assembly
M6
3
9
Connecting expansion canister and cooling fan
3
Hose clip, worm drive, type A
4
6
Water pipe clip
4
Hex bolt, spring washer and plain washer assembly
M6
4
7.5
Connecting radiator and condenser
5
Hex bolt
M6
8
9
Fixing radiator cross beam
lower
86
Engine—Fuel System—Check Fuel System Pressure
Part 6 Fuel System I.
Check Fuel System Pressure
On-board inspection 1. Check the operation of the fuel pump. (1) Connect the positive and the negative of the battery to appropriate connector sockets of the fuel pump (see Figure 4-1). Attention: Do not start the engine. Battery
If there is pressure present, you will hear that the fuel is flowing.
Fig. 4-1
If there is no pressure present, check the fusible link, fuse, EFI open-circuit relay, fuel pump, ECM (Electronic Control Module) and circuit joint. (2) Turn the ignition switch to "OFF" 2. Check the fuel pressure. (1) Check whether the battery voltage is more than 12V. (2) Disconnect the negative wiring cable from the battery.
Clamp T-connector
(3) Mount a pressure gauge on the fuel input pipe (see Figure 4-2). (4) Connect the negative terminal of the battery. (5) Measure the fuel pressure.
(Pipe)
Fuel pressure: 350~400kPa Fuel pipe
If the pressure is low, check the fuel pipe and connection, fuel pump, and fuel filter. If the pressure is too high, replace the regulator.
Fuel pipe connector
(6) Start the engine. Measure the fuel pressure at idle speed. Fuel pressure is 350~400kPa.
Fig. 4-2
If the pressure is unsatisfactory, check the fuel pump, pressure regulator, and injector, and replace if necessary. (7) After shutting down the engine, check the fuel pressure and keep the specified pressure for about 5 minutes. Fuel pressure: 170kPa. Maintenance precautions: During maintenance: 1. Never impact the diaphragm element with high pressure gas; 2. Never clean it with aggressively corrosive liquid; 3. No distortion caused by external force. Easy measuring method: For the system with oil return, connect a pressure gauge for the fuel on the oil inlet pipe, start the engine, and run at idle speed. Now, the fuel pressure in the engine should be about 400KPa.
87
Engine—Fuel System—Fuel Pump Inspection
II.
Fuel Pump Inspection
1. Fuel pump (1) Check whether the resistance of the fuel pump is 0.2~3.0 ohm¸ at 20°C. If not, replace the fuel pump (see Figure 4-3). (2) Fuel pump running: Switch on the fuel pump with a battery and check. If the operation is unsatisfactory, replace the fuel pump or wires (see Figure 4-4). The test should be done within 10s to protect the coil from burning out. 2. Fuel injector assembly Fuel injecting quantity: 40~50cm3. Error of each injector: not more than 10 cm3. If the fuel injecting quantity can’t meet specification, replace the injector. Check leakage: Under above conditions, disconnect the wire from the battery, the fuel should not drip one per minute
Ohmmeter
Battery Fig. 4-3
Fig. 4-4
88
Engine—Fuel System—Fuel Pump Replacement
III. Fuel Pump Replacement Structure Fuel tank cap 油箱盖 Fuel vapor pipe
燃油蒸汽管
From filter hose
出滤清软管 Fuel hose 燃油软管
Fuel pump assy. 燃油泵总成
Seal ring 密封圈
1. Operations avoiding petrol overflowing. 2. Disconnect the fuel oil hose from the oil tank. 3. Disconnect the fuel hose. 4. Disconnect the fuel vapor hose 5. Remove the fuel pump assembly (see Figure 4-5) Loosen the fuel tank cap with a special tool. Take care not to bend the arm of the oil quantity sensor when taking the fuel pump out ★ Note: Bending float lever of fuel sensor may cause displaying oil level of instrument inaccurately.
Fig. 4-5
6. When mounting the fuel oil pump assembly, replace the sealing ring. Align the arrow on the oil pump with the arrow on the oil tank port; tighten the oil tank cap with special tool with tightening torque of 40~50 N.m 7. Mount the fuel oil hose 8. Mount the oil vapor pipe 9. Install outlet tube of the filter; ★ Note: when installing tubes, if you hear a click, it indicates it is installed in place
89
Engine—Fuel System—Fuel tank replacement
IV. Fuel tank replacement Structure diagram
Filler pipe assy.
加油管总成
Filler lid cap assy. 加油口盖总成
Filler hose 加油软管
Fuel filler 加油 vent hose
通气 软管
Fuel supply pipe 供油管 Vent pipe 通气管
Fuel tank assy. 燃油箱总成
配 3G10 3G10Engine 发动 For Canister control valve 碳罐控制阀安装支架 mounting bracket Canister碳罐控制阀 control valve
Canister
碳罐支架 bracket
Canister absorption 碳罐吸附软管 hose Metal
vent 金属通气管 tube Fuel tank 燃油箱总成 assy.
Canister 碳罐
Canister 碳罐脱附软管 desorption hose Control valve engine hose控制阀发动机软管
Fuel
pump
燃油泵总成 assy.
Fuel return 回油软管 hose
Metal fuel tube
金属燃油管 Metal return 金属回油管
Fuel filler hose
tube
加油软管
Fuel filler pipe 加油管
Fuel filler vent hose 加油通气软管
Seal 密封圈 ring Filler neck 加注口盖 cap
For 479Q Engine
1. Before replacing the fuel tank, engine must be shut down, and turn ignition switch to “OFF” position. 2. Prevent gasoline overflowing; 3. Remove the second section of exhaust pipeline; ★ Note: when removing exhaust pipe, the operation must be carried out until the exhaust pipe gets cold
90
Engine—Fuel System—Fuel tank replacement
to prevent being scalded by the exhaust pipe. 4. Disconnect nylon hose to the fuel tank; 5. Loose fixing clamps on the rubber tube connecting filler pipe with fuel tank with a slotted screwdriver, and then pull out rubber tube. ★ Note: when plugging out the rubber tube, please avoid liquid fuel splashing onto person body. 6. Place the jack under the fuel tank, and put the fuel tank on the jack slowly after removing fixing bolts; 7. Plug out electric connector of the fuel tank; ★ Note: when removing the fuel tank, pull apart electric connector harness of the fuel tank carefully; Replace filling pipe 1. Open the plate of fuel cap and screw out fuel cap slowly; ★ Note: when screwing out fuel cap, prevent gaseous fuel injecting. 2. Loose fixing clamps on the rubber tube connecting filling pipe with fuel tank with a slotted screwdriver, and then plug out rubber tube. 3. Lift up the vehicle and release retaining bolts on filling and vehicle body; 4. Pull out filling pipe;
91
Engine—Fuel System—Fuel Emission Control System
V.
Fuel Emission Control System
On-board Inspection 1、Check the operation of fuel supply cut off. (1) Warm the engine up to 2500r/min at least, and check the noise of the injector with a sound level meter (see Figure below). (2) When the throttle releases, the noise from the injector should stop immediately; repeat several times.
声级计
Sound level meter
2 Check the fuel vapor discharge control system (see Figure below). (1) After starting the engine, disconnect desorption tube of the canister;.
碳罐脱附软管 Canister desorption hose 碳罐控制阀 Canister control valve Air intake manifold Canister absorption hose 碳罐吸附软管
进气岐管
Canister
碳罐
(2) Select “Act Test" and "Canister Cleaning" based on the display on the trouble diagnosis instrument. (3) Make sure that there is vacuum present at the canister control valve (TEV) port. (4) After "Act Test", shut off the canister control valve operation instruction, then connect the Canister 92
Engine—Fuel System—Fuel Emission Control System
desorption hose. (5) Start up the vehicle after the engine warms up, use the diagnosis tester to “read data stream”; check the opening status of the canister control valve and make sure the TEV ON. 3. Check whether there is any distortion or damage on the filling cap and the washer
Washer
93
Engine—Fuel System—Carbon Canister Replacement
VI. Carbon Canister Replacement 1. Check and replace the canister. (1) Check for crack or damage on the canister visually. (2) Check the operation of the canister. Absorption port
a. Plug the discharge port (see Figure 4-6). b. Blow air (4.71KPa) into the absorption port when keeping the discharge port closed, and check the air should flow out from the exit port. If the operation is unsatisfactory, replace the canister.
Vent
Desorption port
c. Blow air into the absorption port, the air should flow from other ports without any resistance. If the operation is unsatisfactory, replace the canister. (3) Clean the canister: plug the desorption port, blow the air (4.71 kPa) into absorption port and flow out the vent port. 2. Canister control valve (TEV) (See Figure below)
Fig. 4-6
Mounting position: On the vacuum pipeline of the canister – air intake manifold. Troubles: poor idle speed, malfunction, etc. General cause: entry of foreign materials into inside of the valve results in corrosion and Poor tightness. Maintenance precautions: During maintenance: 1. Air flowing direction must conform to specifications; 2. If the control valve fails due to black particles in the valve body, and it is necessary to replace the control valve, please check the condition of the canister; 3. Avoid liquid such as water and oil entering into the valve during maintaining as possible; 4. It is recommended to mount the canister control valve on the hose hanging in the air or fasten with soft rubber to avoid transmission of solid borne noise
94
Engine—Fuel System—Carbon Canister Replacement
碳罐脱附软管
Canister desorption hose
碳罐控制阀 Canister control valve Air进气岐管 intake manifold
Canister absorption hose
碳罐吸附软管
Canister 碳罐
Easy measuring method: (disconnect the connector) Set the digital multi-meter to ohm position, with two leads connected to two pins of the canister control valve respectively, rated resistance 22-30Ωat 20°C 3. Vent valve (PCV) sub-assembly Air should flow through the cylinder cap side easily. Attention: ●
Do not suction air through the valve.
●
Never put anything into the valve. If the operation is unsatisfactory, replace PCV.
●
Blow air into from the suction side, and the air should be hard to flow through. If the operation is unsatisfactory, refer to Fig 4-7 to replace PCV.
Cylinder side
Air intake side
Purge pipe Easy
Difficult
Fig. 4-7
95
Chassis—Transmission Control—Introduction of Transmission Control
Chapter 3 Chassis Part 1 Transmission Control I.
Introduction of Transmission Control
1. Description on Transmission Control This model is equipped with flexible shaft type manual Transmission Controls device, respectively used for 3G10 1.0L and 479Q 1.3L engine. Their gears are: 5 forward gears + 1 reverse gear. 2. Symptom Table Use the table below to help you find the cause of the problem. The numbers indicate the priority of the likely cause of the problem. Check each part in order. If necessary, replace these parts. Symptom
Suspected Area 1. Transmission Control selector (position changing) flexible shaft (improperly assembled)
Transmission out of gear
2. Flexible shaft or gear shift lever (worn) 3. Flexible shaft assembly (incorrect) 4. Transmission (faulty) 1. Transmission control selector (position changing ) flexible shaft (improperly assembled)
Transmission shift difficult
2. Flexible shaft or gear shift lever (worn) 3. Flexible shaft assembly (incorrect) 4. Transmission (faulty)
96
Chassis—Transmission Control—Introduction of Transmission Control
Component view
Lock pin 锁销(Q50110)
Spring clip Gear shift lever 弹簧卡片 换档手柄球头 handle ball Bolt 螺栓(Q1400825)
Lock pin 锁销(Q50108)
Plain 平垫圈(Q40208) washer
Manual gear shift lever Flexible shaft for gear selection and shift
手动换档器
选换档软轴
Fixing bolt for thrust plate 选换档软轴压板固定 of flexible shaft for gear 螺栓(Q1400616) selection and shift (Q1400616)
Fixing bolt for bracket of 选换档软轴支架固 flexible shaft for gear 定螺母(Q32006) selection and shift (Q32006)
97
Chassis—Transmission Control—Flexible Shaft for Shifting Gear
II.
Flexible Shaft for Shifting Gear
Replacement 1. Remove the upper cover assembly in dashboard panel. 2. Remove the lower cover assembly in dashboard panel. 3. Remove the cup-holder in the middle console. 4. Loosen transmission control cover. 5. Remove the handle of the gear shift lever and boot. 6. Remove the middle console body. 7. Remove the flexible shaft assembly of the transmission (1) Remove the two lock pins and unfix the head of the flexible shafts of the transmission (see the right figure).
(2) Remove the flexible shafts assembly after loosening the connector of flexible shaft and gear shift lever.
(3) Remove the two lock pins and two washers, and then unfix the two flexible shafts from the manual transmission. (4) Remove the two spring clips and unfix the two flexible shafts from the bracket.
(5) Remove the bolt and unfix the flexible shafts.
(6) Remove the two bolts.
(7) Pull the flexible shafts out of the body. (8) Remove the fixing plate from the flexible shafts.
98
Chassis—Transmission Control—Flexible Shaft for Shifting Gear
8. Install the flexible shafts assembly of the transmission (1) Push the flexible shafts into the floor. (2) Install the flexible shafts assembly with two bolts. Torque: 5.0N·m
(3) Connect the flexible shafts assembly and fix the flexible shaft with bolts. Torque: 5.0N·m
(4) Connect the ends of the two flexible shafts, and then install two washers and two lock pins. (5) Install two new spring clips on the cable bracket.
(6) Connect the flexible shafts to gear shift lever. Note: Make sure the claws engage firmly. (7) Connect the ends of the flexible shafts to the gear shift lever selectively, and then install the lock pin. Note: ●
When connecting the flexible shafts, the tooth part of their ends shall be made upwards.
●
The lock pins are inserted in a direction as shown in the figure
(8) Connect the ends of the gear shift flexible shafts to the gear shift lever assembly. 9. Install the middle console body 10. Install the handle and boot of the gear shift lever 11. Install the cup-holder 12. Install the upper cover in dashboard panel 13. Install the lower cover in dashboard panel
99
Chassis—Transmission Control—Manual Transmission Shift Assembly
III. Manual Transmission Shift Assembly Replacement 1. Remove the upper cover in dashboard panel. 2. Remove the lower cover in dashboard panel. 3. Remove the cup-holder in the middle console 4. Loosen transmission control boot 5. Remove the handle of the gear shift lever and boot 6. Remove the middle console body. 7. Remove the flexible shafts assembly of the transmission (1) Remove the two lock pins and unfix the head of the flexible shafts of the transmission.
(2) Remove the spring clips and separate the flexible shafts from the bracket.
8. Remove the manual gear shift lever assembly Remove the four bolts and manual gear shift lever assembly
9. Install the manual gear shift lever assembly. Install the manual gear shift lever assembly with four bolts. Torque: 12N·m
10. Connect the flexible shafts assembly (1) Connect the flexible shafts to gear shift lever assembly.
100
Chassis—Transmission Control—Manual Transmission Shift Assembly
(2) Connect the ends of the flexible shafts to the manual gear shift lever assembly, and then install the lock pins. Note: ●
When connecting the ends, the serration shall be made upwards.
●
The lock pins are inserted in a direction as shown in the figure.
(3) Connect the flexible shaft to the gear shift lever assembly. 11. Install the middle console body. 12. Install the gift shift control lever handle. 13. Install the gift shift control lever boot. 14. Install the cup-holder 15. Install the lower cover in dashboard panel. 16. Install the upper cover in dashboard panel
101
Chassis—Accelerator Pedal Device—Introduction of Accelerator Pedal
Part 2 Accelerator Pedal Device I.
Introduction of Accelerator Pedal
Component View Bracket 支架 Throttle cable 油门拉线
Bracket 支架 Adjusting 调节螺母(Q360B08) nut Connecting 与节气门连接 with throttle
前围板 Front wall Mounting bolt 加速踏板安装螺栓 accelerator pedal
of
(Q1400620) Accelerator 加速踏板 pedal
Replacement 1. Disconnect the accelerator cables. Loosen the accelerator cables and the bolts on the accelerator cable fixing bracket of the engine, and then disconnect the accelerator cables from the throttle rocker arm.
2. Remove the accelerator pedal and throttle cable. (1) Remove the two fixing bolts that connect the accelerator pedal and the body.
(2) Disconnect the throttle cables and accelerator pedal. (3) Take off accelerator pedal (4) Disconnect throttle cable and dash panel (passing hole blocked)
(5) Disconnect throttle cable and the bracket (6) Take off throttle cable
102
Chassis—Accelerator Pedal Device—Introduction of Accelerator Pedal
3. Install the throttle cables and accelerator pedal assembly in a reverse order. Note: (1)The torque of fixing bolt of accelerator pedal assembly is: 22~29N.m (2)Adjust the fixing nut position of the accelerator cables properly to obtain a proper tension. (3)Check that the acceleration control runs freely and reliably.
103
Chassis—Clutch Assembly—Introduction of Clutch Control System
Part 3 Clutch Assembly I.
Introduction of Clutch Control System
1. Description The vehicle is equipped with 2 kinds of clutch control system: cable clutch control system for vehicle with engine displacement of 3G10 1.0L, and hydraulic clutch control system for vehicle with engine displacement iof 479Q 1.3L 2. Symptom Table The table below lists the common symptoms and possible causes of the failures. The number means the possible sequence of the causes. Check the parts, and replace the corresponding parts if necessary. Failure
Clutch slipping
Clutch can not be separated or can not be separated thoroughly Abnormal sound of clutch
Inspection part 1. Clutch pedal (free stroke maladjusted) 2. Control mechanism (seized) 3. Clutch plate (oil dirt or grind) 4. Diaphragm spring (damaged) 5. Pressure plate (deformed) 6. Flywheel (deformed) 1. Clutch pedal (free play maladjusted) 2. Clutch cable (installed or adjusted incorrectly) 1. Release bearing of clutch (wearing, dirty or damaged) 2. Torsional spring of clutch plate (damaged)
104
Chassis—Clutch Assembly—Clutch Components and Common Failure
II.
Clutch Components and Common Failure
I. Clutch components Generally, the clutch can be divided into pressure plate assembly and driven plate assembly. Clutch driven disc assy. 离合器从动盘总成
离合器压盘总成 Clutch press plate assy.
II. Clutch common failure and cause analysis (I) Clutch slipping 1. Symptom: when the vehicle starts driving, it can starts only when the clutch pedal is lifted very high; vehicle speed can not increase accordingly when accelerating during driving. They are all symptoms of clutch slipping 2. Causes and troubleshooting: (1) There is oil dirt on clutch disc, surface aging reduces friction coefficient and drive torque. Troubleshooting: clean oil dirt, grind pressure plate and flywheel friction surface as appropriate. (2) Positive pressure of diaphragm spring decreases due to lack of elasticity, deformation, burnt or damage due to long-term usage. Troubleshooting: replace clutch. (3) Excessive abrasion to the disc causes diaphragm spring extending excessively, resulting in decrease of positive pressure. Troubleshooting: replace clutch. (4) Improper adjustment of free stroke and effective stroke of the pedal affects effect of pressing force. Troubleshooting: re-adjust to specified range. (II) Clutch can not separate thoroughly, and it is hard to engage gear 1. Symptom: when the engine is running at idle speed, though clutch pedal is depressed to the extreme position, it is still difficult to engage gear, and transmission gear produces knocking sound. After engaging gear reluctantly, the vehicle has driven or flamed out with clutch pedal not released. Check: remove the bottom cover of clutch, and put the transmission into neutral gear, then depress clutch to the extreme position. After that, toggle the driven disc with screwdriver. If it can be toggled easily, it indicates that clutch can separate well; if not, it indicates that the clutch does not separate 105
Chassis—Clutch Assembly—Clutch Components and Common Failure
thoroughly. 2. Troubleshooting: (1) Check whether the free stroke of clutch pedal is too large, and adjust it. (2) Check whether releasing levers are of the same height or too low. Toggle the release fork under the vehicle to make the front end touching the inner end face of release lever lightly, then check it by rotating the clutch one turn, if the inner ends of release lever fails to touch the release levers simultaneously, it indicates that release levers are not of the same height, and they should be adjusted. If they are of the same height, but releasing is still not thorough, it is required to check lever height. Adjust release levers to the same height, if releasing is thorough, it indicates original adjustment is improper or wearing is too serious. After adjustment of release levers, free stroke of clutch pedal must be readjusted. (3) If the releasing is still not thorough after adjustment above, it is necessary to remove the clutch to check whether driven disc is installed reversely, axial movement is hard, pressure plate and driven disc are warping, release lever screws are loose or floating pin has fallen off. (4) For the clutch with newly-riveted frictional plate, check whether driven disc and the frictional plate are too thick. If so, add gasket between the clutch cover and the flywheel. (5) For hydraulically-driven clutch, in addition to inspection above, it is also required to check whether brake fluid is insufficient or pipe is leaking and exhausts the air in hydraulic system. (III) Clutch vibration when engaging 1. Symptom: when the clutch engages gently as normal operation, the vehicle starts intermittently instead of accelerating gradually and smoothly, and the vehicle even vibrates until the clutch engages completely. 2. Causes and troubleshooting:: (1) Pressure between driving and driven discs is not distributed evenly. The elasticity of pressure spring on engaging clutch is not even, release levers are not adjusted consistently or releasing end of diaphragm spring is not flat, all above may cause compacting time inconsistent, uneven force applied on pressure plate, even cause pressure plate sway, resulting in poor contact between driving and driven discs, thus clutch vibration. In this case, clutch pressure spring should be replaced and release levers should be adjusted. (2) Clutch torsion, elasticity reduction of damper spring and clutch pressure spring and cracks on diaphragm spring may all cause clutch vibration during engaging. In this case, springs should be replaced. III Removal and installation of clutch (I) Clutch removal Clutch assembly contains clutch pressure plate assembly and clutch driven disc assembly, removal procedure is as follow; 1. Remove the transmission from the engine 2. Insert special locating spindle into the spline of splined hub of clutch driven disc 3. Loose fixing bolts on clutch cover of the flywheel by 2-3 times diagonally 4. Since the clutch assembly rotates together with crank at high speed, excellent balance performance is required, before removing the pressure plate, it must be marked properly to facilitate precise positioning for reassembly. 5. Remove clutch pressure plate assembly and driven disc assembly 106
Chassis—Clutch Assembly—Clutch Components and Common Failure
(II) Clutch installation In principle, clutch is installed in reverse order to the removal 1. Assemble clutch pressure plate and driven disc assembly 2. Driven disc and pressure plate should be put into the flywheel housing together with the face of damper spring facing to the plate. 3. Insert the special locating spindle into frictional plate spline hole. 4. After aligning with the assembling mark made at disassembly, screw up fixing bolts of clutch pressure plate onto the flywheel manually. 5. Put the special locating spindle flat and insert its front end into the bearing inner race of supporting hole at rear of crank. 6. Screw up clutch fixing bolts by 2-3 times in diagonal direction and order。
107
Chassis—Clutch Assembly—Clutch Pedal
III. Clutch Pedal Component View
螺 Nut母
Bolt 螺栓
螺栓 Bolt
Clips with welding nut 带焊母卡片
Mounting nut 安装螺母
Clutch 离合拉线 cable
Clutch 离合制动 brake pedal
踏板
Clutch release 离合器分离 fork rocker 拨叉摇臂
2. Hydraulic type clutch control system (model 1.3L)
108
Chassis—Clutch Assembly—Clutch Pedal
Oil inlet of 总泵进油软 master cylinder
Clutch brake 离合及制动 pedal 踏板带支架with bracket 总成 assembly
管
Hydraulic hose 液压软管
Fixing bracket of 液压软管固 hydraulic tube 定支架
Oil 总泵出油管 outlet pipe 组件 components of Clutch 离合器总泵master the master cylinder 总成 cylinder assembly
Adjustment 1. Check and adjust the clutch pedal. (1) Lift the carpet on the floor. (2) Check the pedal’s height is proper. Pedal's height from oil felt: 110-120mm (3) Adjust the pedal's height. Loosen the lock nut, and turn the lock bolt till the correct pedal's height is reached, and then tighten the lock nut. Torque: 16N.m (4) Check whether the pedal’s free travel and push rod are proper a. Step the pedal down till a resistance appears. Pedal's free stroke: 5-15mm b. Step the pedal down lightly till the resistance increase a little. Push rod (on the pedals top) travel: 1.0-5.0mm (5) Adjust the pedal's free travel and push rod travel. ① Loosen the lock nut, and turn the push rod till the pedal's free travel and push rod travel are proper. ② Tighten the lock nut. Torque: 12N·m
109
Chassis—Clutch Assembly—Clutch Pedal
③ Check the pedal's height after adjusting the pedal's free travel. (6) Check the clutch's separating point. ① Tension the parking brake device and install a wheel stopper. ② Start the motor and make it run idle. ③ Don’t step the clutch pedal,and put the gear shift lever to the reverse gear slowly till the gears engage. ④ Step the clutch pedal down slowly,and measure the travel distance between the gear abnormal sound disappearing point (separating point) to the pedal travel end position. Standard distance: 25mm or above (pedal travel end position to separating point) If the distance doesn't meet standard, carry out the following steps. ●
Check the pedal's height.
●
Check the push rod stroke and pedal's free travel.
●
Discharge the air in the clutch fluid pipe.
●
Check the clutch cover and clutch disc.
●
Check the pedal's travel.
Pedal travel:85-95mm Replacement 1. Cable type clutch control system replacement (model 1.0L) 1. Remove the battery negative terminal. 2. Remove the upper cover in dashboard panel 3. Remove the lower cover in dashboard panel. 4. Remove the control panel 5. Disconnect the connecting of clutch cable and pedal
6. Remove the clutch pedal bracket. Remove 4 nuts and 2 bolts, and then remove the clutch pedal bracket
7. Remove the clutch pedal (1) Remove the clutch pedal shaft and nuts. (2) Remove the clutch pedal from the clutch pedal bracket.
Lubricating gasket Clutch pedal shaft Lubricating bushing
110
Chassis—Clutch Assembly—Clutch Pedal
8. Remove the clutch pedal boot
Clutch pedal gasket
9. Remove the clutch pedal buffer stopper. Remove buffer stopper from the clutch pedal.
Lubricating gasket
10. Remove the clutch pedal shaft bushing. Remove the two shaft bushings from the clutch pedal.
Clutch pedal shaft Lubricating bushing
Lubricating gasket
11. Install the clutch pedal shaft bushing
Clutch pedal shaft Lubricating bushing
(1) Apply multi-function grease on both sides of the two new shaft bushings. (2) Install the two shaft bushings on the clutch pedal.
12. Install buffer stopper on the clutch pedal. Put buffer stopper on the clutch pedal.
13. Install the clutch pedal Install the clutch pedal on the clutch pedal bracket with bolts and nuts. Torque: 37N·m Tips: Install the bolts from the right side.
Lubricating gasket Clutch pedal shaft Lubricating bushing
111
Chassis—Clutch Assembly—Clutch Pedal
14. Install the clutch pedal bracket. Install the clutch bracket with 4 nuts and 2 bolts. Torque: 12N·m
15. Connect the clutch cable and pedal
16. Check and adjust the clutch pedal. 17. Connect the battery negative terminal Note: (1) Adjust position of adjusting nuts on clutch cable properly to ensure that the tension of clutch cable is appropriate. (2) Check whether clutch operation is flexible and reliable. (3) Tightening torque for fixing bolts of clutch pedal: 20~25N.m (4) Check the clutch pedal for its installation height, working stroke and free play a. Installation height of clutch pedal: 10~120 mm b. Working stroke of clutch pedal: 85~95 mm c. Free stroke of clutch pedal: 5~15 mm
112
Chassis—Clutch Assembly—Clutch Pedal
2. Replacement of hydraulic type clutch operating system (model 1.3L): 1. Remove the battery negative terminal. 2. Remove the upper cover in dashboard panel 3. Remove the lower cover in dashboard panel. 4. Remove the panel of the control board 5. Disconnect the clutch master cylinder and pedal 6. Remove clutch brake pedal with bracket assembly Remove 5 nuts and 2 bolts, then take off clutch brake pedal with bracket assembly
7. Disassemble and assemble of clutch pedal (1) Remove the pedal shaft and nuts.
(2) Remove the clutch pedal from the clutch pedal bracket.
Clutch pedal gasket
(3) Remove the clutch pedal gasket
(4) Remove the clutch pedal buffer stopper. Remove buffer stopper from the clutch pedal.
113
Chassis—Clutch Assembly—Clutch Pedal
(5) Remove the clutch pedal lubricating shaft bushing. Remove the two lubricating shaft bushings from the clutch pedal. (6) Install shaft bushing of clutch pedal (a) Coat multi-functional lubricating grease on both sides of 2 new bushings. (b) Install 2 shaft bushings into clutch pedals. (7) Install the clutch pedal buffer stopper. Install buffer stopper from the clutch pedal.
(8) Install the clutch pedal arm Install the clutch pedal on the clutch pedal bracket with bolts and nuts. Torque: 37N·m Tips: Install the bolts from the left side.
8. Remove and install clutch master cylinder and its pipeline (1) Remove hydraulic hose of the clutch Loose 2 pipe bolts and plug out 2 spring clips, then take off hydraulic hose.
(2) Remove outlet pipe components of the master cylinder Loose pipe bolts connected to the clutch master cylinder, then take out outlet pipe components of the master cylinder.
(3) Remove oil inlet hose of the master cylinder. Remove 2 steel belt elastic clamps, then take out inlet hose of the master cylinder.
114
Chassis—Clutch Assembly—Clutch Pedal
(4) Remove clutch master cylinder assembly Unfix a nut of installing master cylinder (the other is a common nut shared with installing hole of clutch pedal bracket).
(5) Install clutch master cylinder assembly Put the master cylinder onto front wall assembly in correct direction and then tighten the nut.
(6) Install oil inlet hose of the master cylinder Install steel belt elastic clamp by inserting the oil inlet hose on oil inlet of the master cylinder and the oil tank of vacuum booster.
(7) Install oil outlet pipe components of the master cylinders Put the connecting end of outlet pipe master cylinder at oil outlet of the master cylinder, and then tighten pipe bolts.
(8) Install hydraulic hose of the clutch Connect hydraulic hose to oil outlet pipe components and hard pipe of cylinder, tighten pipe bolts, and install elastic clips.
115
Chassis—Clutch Assembly—Clutch Pedal
(9) Install bracket of clutch pedal Install clutch bracket with 5 nuts and 2 bolts. Torque: 12N·m
10. Connect the clutch master cylinder and pedal
11. Check and adjust the clutch pedal. 12. Connect the battery negative terminal Note: (1) Adjust retaining bolts on clutch pedal and adjusting nuts of the master cylinder to ensure that there is free stroke and no clearance in clutch control system (2) Check whether clutch control is flexible and reliable. (3) Tightening torque for fixing nuts of clutch pedal: 20~25N.m (4) Check the clutch pedal for its installation height, working stroke and free stroke a. Installation height of clutch pedal: 130~140 mm b. Working stroke of clutch pedal: 125~135 mm c. Free stroke of clutch pedal: 5~15 mm
116
Chassis—Manual Transmission Assembly (1.0L)
Part 4 Manual Transmission Assembly (1.0L) Component View Shift gear 换挡器 Release fork Clutch release shaft component 分离拨叉轴组件 bearing 离合器分离轴承 Clutch
Clutch housing 离合器壳体
Transmission body 变速箱体
离合器分离拨叉 release fork
Input assembly Output assembly
Differential assembly
shaft shaft
First, second and fifth reverse interlock pins
Fifth reverse shift fork assembly Third-and-fourth shift fork assembly 1st and 2nd gear shifting fork assembly
117
Chassis—Manual Transmission Assembly (1.0L)—Removal and Installation of Transmission
I.
Removal and Installation of Transmission
Ⅰ. Remove the transmission from the vehicle individually 1. Jack up the vehicle, make front and rear wheels suspended, and then remove two front wheels. 2. Remove the drain plug of transmission, and then reassemble it after draining up gear oil in the transmission. 3. Remove battery cable, filter and other pipes. 4. Remove the socket of reverse lamp switch and the flexible shaft of speedometer. 5. Remove fixing bolts on shift lever of transmission, and then remove the shift lever. 6. Remove connecting bolts on engine mudguard and engine exhaust pipe. 7. Remove engine fixing bolts and then remove the starter. 8. Release the connection with drive shaft and both sides of transmission, and then remove left and right drive shafts. 9. Remain engine at original position by special bracket, or lift the engine with crane. 10. Lift transmission assembly with crane, or jack up it with a special jack. 11. Remove fixing nuts on the bracket of transmission assembly, and then take off fixing bracket assembly. 12. Loose and take out transmission housing and engine connection bolts. 13. Separate the transmission and the engine, and then take off transmission assembly carefully. Ⅱ. Install the transmission on the vehicle. The order is reverse to the removal sequence, in addition, attention should be paid on following points: 1. A thin layer of high-quality lubricant of specified brand should be coated on input shaft of the transmission 2. During installation, ensure that installing position is correct, and tighten bolts and nuts as per the specification. 3. Install oil seal for upper left and upper right drive shafts, and then install upper left and upper right drive shafts. 4. Fill gear oil (2.05L). 5. After all installation is completed; check whether working condition of the transmission is normal.
118
Chassis—Manual Transmission Assembly (1.0L)—Removal and Installation of Transmission Assembly
II.
Removal and Installation of Transmission Assembly
Ⅰ. Transmission removal: 1. Loose 4 installing screws on the cover of shift control device, and rotate the shift rocker to neutral position, and then take off gear shift assembly. Roll pin of shift cover
Reverse lamp switch seat Shift guide shaft assembly
2 wire Tightening bolts clamps of shift cover
Flange nuts
2. Make the clutch housing of transmission assembly facing downwards, loose 12 connecting bolts on transmission housing, and then take off transmission housing.
3. Take out reverse intermediate wheel, loose fixing screws on the support of reverse swinging arm, and take out reverse swinging arm sub-assembly from clutch housing.
2 centering pins
Reverse swingingSet screws on bracket ofReverse arm sub-assembly reverse swinging arm intermediate shaft
4. Remove interlock pins of first & second and fifth & reverse gear. Take out output shaft assembly, input shaft assembly, shifter fork assembly of first and second gear, shifter fork assemblies of third and fourth gear and fifth reverse gear from the clutch housing at the same time, then remove shifter fork assemblies of third and fourth gear and fifth reverse gear from input shaft assembly, disassemble shifter fork assemblies of first and second gear from output shaft assembly, and finally take away differential assembly from the clutch housing.
119
Chassis—Manual Transmission Assembly (1.0L)—Removal and Installation of Transmission Assembly
Interlock cam spring of fifth/ reverse gear
Shift rocker sub-assembly
Ring A of fifth reverse shift f
Interlock cam ball of Shift guide shaft fifth/reverse gear boot Interlock cam pin of fifth/ reverse gear
Interlock cam of fifth reverse gear
Gear shift swinging lever
Ring B of shift guide shaft
Gear shift cover
Return spring B Nylon washer off Elastic shift guide shaft cylinder pin
Return spring Interlock A bracket of shift swing lever Vent plug sub-assembly
Gear shift rocker sub-assembly
Gasket of return spring A
Disassemble shift guide shaft sub-assembly
120
Chassis—Manual Transmission Assembly (1.0L)—Disassembly of Gear Shift Guide Shaft Sub-assembly
III. Disassembly of Gear Shift Guide Shaft Sub-assembly Screw out the vent plug from transmission housing directly, and remove return spring B, nylon washer of gear shift guide shaft, ring B of gear shift guide shaft, elastic cylinder pin, shift swing lever, interlock support of shift swing lever, return spring A, gasket of return spring A, clip A of shift guide shaft from the shift guide shaft orderly. Take out shift rocker sub-assembly and rotation rocker sub-assembly. Assemble gear shift guide shaft sub-assembly: 1. Put interlock cam of fifth reverse gear through interlock cam spring of fifth reverse gear, into interlock cam hole of fifth reverse gear on shift cover, insert one end of interlock cam spring into the hole on the interlock cam, install interlock cam pin and interlock cam ball of fifth reverse gear into the pin hole orderly, and align the pin with interlock cam groove by rotating interlock cam, then knock interlock cam ball to install it in place. 2. Install rotation rocker sub-assembly 3. Pass shift rocker sub-assembly through shift guide shaft guard and shift cover 4. Install ring A of shift guide shaft, gasket of return spring A, return spring A, interlock support of shift swing lever, shift swing lever, elastic cylinder pin, clip B of shift guide shaft, nylon washer of shift guide shaft and return spring B onto the shift guide shaft orderly. 5. Install the vent plug into transmission housing and tighten it, tightening torque is 10-13N.m.
121
Chassis—Manual Transmission Assembly (1.0L)—Disassembly of Differential Sub-assembly
IV. Disassembly of Differential Sub-assembly Planetary gear shaft Side gear
Side gear gasket
Planetary gear
Planetary gear gasket Front bearing of differential
Differential housing
Elastic cylinder pin
Differential ring gear
10 pieces
Drive gear of speedometer
Rear bearing of differential
Disassemble differential sub-assembly
Pull two bearings from the differential housing with a special tool. Install the ring gear hole side of differential with large chamfer into the differential housing, and then take out differential ring gear by loosing 10 bolts M12. Knock out the elastic cylinder pin from differential housing and planetary gear shaft. Remove differential housing, planetary gear gasket and planetary gear from planetary gear shaft. And then remove planetary gear gasket, planetary gear, side gear gasket and side gear from differential housing orderly. Assembly of differential sub-assembly: 1. Put side gear, planetary gear and side gear gasket, planetary gear gasket into differential housing, and then pass planetary gear shaft through differential housing, planetary gear gasket and planetary gear. 2. Knock elastic cylinder pin through differential housing and planetary gear shaft. 3. Install the ring gear hole side of differential with large chamfer into the differential housing, and tighten it with 10 bolts, tightening torque is 100~110N.m. 4. Press 2 bearings in place into differential housing individually with pressure of 1000kg. Requirements after assembly: bearing can rotate freely without seizing or abnormal sound; planetary gear and side gear rotate freely, engagement clearance should be 0.05-0.25mm, no seizing or abnormal sound; planetary shaft is aligned with the housing.
122
Chassis—Manual Transmission Assembly (1.0L)—Disassembly of Input Shaft Sub-assembly
V.
Disassembly of Input Shaft Sub-assembly Spacing ring of fifth needle Thrust washer ring of fourth gear roller bearing
Rear bearing input shaft Input synchronizer
Thrust washer of fourth gear
Input fourth gear Fourth gear ring
Locating steel ball for axial shim of fourth gear Fourth needle roller bearing
of
Spacing ring of fourth needle roller bearing Gear hub ring of synchronizer
fifth
Third-and-fifth synchronizer ring gear (2 pieces)
Input third/fourth synchronizer
Input third gear
Needle roller bearing of third gear
Input fifth gear Needle roller bearing of fifth gear
Input shaft
Front bearing of input shaft
Disassemble input shaft sub-assembly
Pull rear bearing from input shaft with a special tool, then remove fifth synchronizer, third-and-fifth synchronizer ring gear, input fifth gear, needle roller bearing of fifth gear, spacing ring of fifth needle roller bearing, thrust washer ring of fourth gear, thrust washer of fourth gear, locating steel ball for axial shim of fourth gear, fourth gear, third-and-fourth synchronizer ring gear, fourth needle roller bearing, spacing ring of fourth needle roller bearing, gear hub ring of synchronizer, third-and-fourth gear sleeve assembly, third-and-fourth synchronizer ring gear, third gear from the input shaft orderly, install needle roller bearing of third gear on input shaft, and do not scratch the surface of input shaft during disassembly. Measure wearing condition of input shaft with micrometer, minimum diameter of surface A is 33.975mm, and that of surface B is 30.975mm, if the diameter is out of the range, replace the input shaft.
Detect axial clearance of third gear with a feeler gauge Axial clearance of third input shaft: 0.15-0.30mm. Axial clearance of fourth gear: 0.13-0.34mm.
Third gear
Detect input shaft radial run-out by the method shown in the figure Maximum diameter run-out is 0.03mm
123
Chassis—Manual Transmission Assembly (1.0L)—Disassembly of Input Shaft Sub-assembly
Detect axial clearance of third gear with a feeler gauge, its standard value is 0.1~0.35mm
Third gear
Detect axial clearance of the fifth gear as shown in the figure,, its standard value is 0.1~0.50mm
Fifth gear
Detect radial clearance of fourth gear and fifth gear as shown in the figure: Standard value ≤ 0.058mm
Detect axial clearance of the fourth gear, its standard value is 0.1~0.55mm
Third gear
Measure wearing condition of input shaft with micrometer, minimum diameter of surface A is 33.975mm, and that of surface B is 30.975mm, if the diameter is out of the range,, replace the input shaft.
124
Chassis—Manual Transmission Assembly (1.0L)—Assembly of Input Shaft Sub-assembly
VI. Assembly of Input Shaft Sub-assembly 1. Smear the gear oil on input shaft, rotating and sliding parts. 2. Press front bearing of input shaft into the input shaft with the pressure of 500kg. 3. Install needle roller bearing of third gear, third gear, synchronizer ring gear of third-and-fourth gear, gear sleeve assembly of third-and-fourth gear, gear hub ring of synchronizer, spacing ring of fourth needle roller bearing, fourth needle roller bearing, third-and-fourth synchronizer ring gear, fourth gear, locating steel ball for axial shim of fourth gear, thrust washer of fourth gear, thrust washer ring of fourth gear, spacing ring of fifth needle roller bearing, needle roller bearing of fifth gear, input fifth gear, third-and-fifth synchronizer ring gear, input fifth synchronizer and rear bearing of input shaft onto the input shaft orderly. 4. Install the rear bearing in place by depressing with the pressure of 500kg. Disassembly of output shaft Locating bush third/fourth gear
of Input gear
third Second gear needle roller bearing
Ring of needle roller bearing Gear hub ring of synchronizer Output second gear assembly
Rear bearing of input shaft Fifth ring
First/second teeth sleeve assembly
gear
Output fifth gear Output fourth gear
Output shaft
Front bearing of output shaft
Triple-cone ring of first/second synchronizer
Output first gear Needle assembly bearing
roller
Disassemble output shaft sub-assembly
Pull rear bearing from the output shaft with a special tool. Remove fifth gear ring, output fifth gear, output fourth gear, locating bush of third-and-fourth gear, output third gear, output second gear assembly, second needle roller bearing, triple-cone ring of first-and-second synchronizer, clip of needle roller bearing, clutch hub clip of synchronizer, first-and-second teeth sleeve assembly, triple-cone ring of first-and-second synchronizer, output first gear assembly and needle roller bearing from the output shaft. Do not scratch output shaft surface during removal. Check wearing and damage condition of the output shaft. Check outer diameter dimension of needle roller bearing table with a micrometer, the minimum value is 33.975mm, when the actual is below this value, replace the output shaft.
125
Chassis—Manual Transmission Assembly (1.0L)—Assembly of Input Shaft Sub-assembly
Detect axial clearance from the back of synchronizing ring to end face of gear spline with a feeler gauge: the minimum clearance is 0.8mm, if it is lower than minimum value, the synchronizing ring should be replaced.
Check circle run-out as shown in the figure, allowable maximum run-out is 0.03, and the output shaft should be replaced if the value is exceeded
Check the clearance between fork groove of teeth sleeve and the fork with a feeler gauge, the maximum clearance value is 0.35mm, and the fork should be replaced if actual value is above this value
Check circle run-out as shown in the figure, allowable maximum run-out is 0.03, and the output shaft should be replaced if the value is exceeded
Measure axial clearance between first and second gears with a feeler gauge
First gear
Second gear
First gear: 0.15-0.32mm Second gear: 0.13-0.34mm.
Assemble output shaft: 1. Smear gear oil on output shaft, rotating and sliding parts. 2. Install needle roller bearing, output first gear assembly, triple-cone ring of first-and-second synchronizer, first-and-second teeth sleeve assembly, gear hub ring of synchronizer, ring of needle roller
126
Chassis—Manual Transmission Assembly (1.0L)—Assembly of Input Shaft Sub-assembly
bearing, triple-cone ring of first-and-second synchronizer, second needle roller bearing, output second gear assembly, output third gear, locating bush of third-and-fourth gear, output fourth gear, output fifth gear, fifth gear ring and rear bearing of output shaft onto output shaft.
Third/fourth shift fork assembly
Interlock pins of third, fourth and reverse gear
Fifth shift fork
Return
spring
3 rings shaft
Fifth/ reverse shift fork shaft
Elastic cylinder pin
Fifth gear shift guide block
of
fork
Reverse and shift block
Disassemble reverse and shift fork shaft sub-assembly
3. Install the rear bearing in place by depressing with the pressure of 500kg. Disassembly of reverse and shift fork shaft sub-assembly is as shown in the figure above. Assemble reverse and shift fork shaft sub-assembly: 1. Install fifth shift guide block into fifth reverse shift fork shaft, aligning with the cylinder pin hole, knock the elastic cylinder pin by hammer. 2. Install return spring and fifth shift fork into the fifth shift fork shaft, then install fork shaft ring to seize up the fifth shift fork. 3. Install reverse and shift block under third-and-fourth shift fork shaft, and install interlock pins of third, fourth and reverse gear from the hole at the side of reverse and shift block, then install the ring of fork shaft. 4. Install fifth reverse and shift fork shaft into fifth reverse hole of reverse and shift block mentioned in Step 3 (pay attention to the direction), then install the clip of fork shaft.
127
Chassis—Manual Transmission Assembly (1.0L)—Assembly of Input Shaft Sub-assembly Third/fourth shift fork
Third/fourth shift fork shaft
Ring of fork shaft
Lock bolts of shift fork
Disassemble third/fourth shift fork sub-assembly
Disassembly of third-and-fourth shift fork sub-assembly is as shown in the figure above. Assemble third-and-fourth shift fork sub-assembly: 1. Install third-and-fourth shift fork into its shaft, and tighten lock bolts of shift fork, the tightening torque is 7-10N.m. 2. Install fork shaft ring into its groove. Ring shaft
of
fork
Firs/second shift fork shaft
Elastic cylinder pin
Lock bolts shift fork
of
First/second shift fork block
First/second shift fork
Disassemble first/second shift fork sub-assembly
Disassembly of first-and-second shift fork sub-assembly is as shown in the figure above. Assemble first-and-second shift fork sub-assembly: 1. Install first-and-second shift fork into its shaft, and tighten lock bolts on the shift fork, the tightening 128
Chassis—Manual Transmission Assembly (1.0L)—Assembly of Input Shaft Sub-assembly
torque is 7-10N.m; 2. Install first-and-second shift fork guide block into first-and-second shift fork shaft, and punch elastic cylinder pin; 3. Install fork shaft r into its groove.
129
Chassis—Manual Transmission Assembly (1.0L)—Assembly of clutch housing accessories and clutch release mechanism
VII. Assembly of clutch housing accessories and clutch release mechanism Front bearing of inputt Oil seal of input shaft shaft (outer race) Dustproof pad Guide oil shim
Front bushing of Torsion release lever spring
Locking plate Lock bolts of release fork
Side gear oil seal of clutch
Rear bushing of release lever
Clutch housing
Cable bracket Cable bracket bolt Harness clamp of cable bracket
Clutch release lever
Release bearing
Release fork
Assembly of clutch housing and clutch release mechanism
Disassembly of clutch housing accessories and clutch release mechanism assembly is as shown in the figure above. 1. Press oil seal of input shaft soaked with oil into the hole on input shaft. 2. Put guide shim of output shaft into the hole on output shaft. 3. Press bearing outer race into the hole on output shaft. 4. Press oil seal of side shaft soaked with oil into the hole on differential. 5. Pass release lever through dustproof pad and front dustproof sleeve of release lever orderly, then through release lever hole on the housing, after that, install torsion spring, release fork and rear bushing of release lever on release lever. 6. Tighten release fork and release lever with tightening torque of 15-22N.m, then install release bearing. 7. Tighten cable bracket and its harness clamp with tightening torque of 15-22N. m.
130
Chassis—Manual Transmission Assembly (1.0L)—Installation of Transmission Assy.
VIII. Installation of Transmission Assembly 1. Press oil seal soaked with oil into the hole on differential; 2. Install intake/drain plug on the transmission housing by passing it through its gasket, and then tighten it with tightening torque of 25-30N.m; 3. Install the shaft of reverse intermediate gear into transmission housing, tighten its retaining bolts with tightening torque of 15-22N.m;
Oil intake/drain plug
2 sealing gaskets of intake/drain plug
Retaining bolts Oil seal of side Reverse shaft of intermediate of reverse transmission gear groove intermediate Transmission gear shaft housing
Gear shift stopper bolt assembly
4. Install shift lock bolt assembly into transmission with the screw at half way;
5. Install oil guide groove into transmission housing;
6. Install transmission assembly into clutch housing;
7. Install first-and-second shift fork assembly into output shaft assembly 8. Install third-and-fourth and fifth reverse shift fork assembly into output shaft assembly;
9. Install output shaft assembly, input shaft assembly, first-and-second shift fork assembly, third-and-fourth and fifth reverse and shift fork assembly into clutch housing at the same time; 10. Install interlock pins of first, second and fifth reverse gear;
Input shaft assembly Output shaft assembly
Differential assembly
Interlock pins of first, second and fifth gear
Fifth reverse gear shift fork assembly Third/fourth shift fork assembly First/second shift
131
Chassis—Manual Transmission Assembly (1.0L)—Installation of Transmission Assy.
11. Install reverse swinging arm sub-assembly into clutch, and tighten it with retaining screws of reverse swinging arm support, tightening torque is 15-22N.m; 12. Knock locating pin; 13. Put in magnetic body assembly; 14. Put in reverse intermediate wheel;
Reverse swingingSet screws on the Reverse
2 centering pins arm sub-assembly bracket of reverse intermediate swinging arm
shaft
15. Make glue circle on the clutch housing, and then connect block with end, no opening is permitted;
16. Put adjusting shims onto output shaft and input shaft;
17. Put transmission housing on the clutch housing;
Flange bolt
18. Tighten flange bolts on flange face, tightening torque is 16-22N.m (when tightening bolts, they must be tightened on the cross)
19. Install cable bracket I and cable bracket II onto clutch housing, and tighten them with tightening bolts of cable support, the torque should be 15-22N.m;
Cable bracket harness clamp
Cable bracket I
Cable bracket II
Tightening bolts of cable bracket
132
Chassis—Manual Transmission Assembly (1.0L)—Installation of Transmission Assy.
20. Install hollow locating pin of shift cover into locating pin hole of shift cover;
Hollow centering pin of shift cover Reverse lamp Shift guide switch seat shaft assembly
21. Install shift guide shaft assembly into transmission housing; 22. Install 2 tightening bolts of shift cover by passing them through wire clamp, 1 tightening bolt of shift cover through back-up lamp switch seat with tightening torque of 15-22N.m;
23. Install speedometer driven gear assembly, then put bolt M6×16 through the lock blade to install it into the screw hole on transmission housing, clip the lock blade into the slot of speedometer driven gear sleeve, and then tighten bolt M6×16 with torque of 7-10N.m.
Tightening bolts of speedometer
Shift lock bolt
Tightening bolts of shift cover
Tightening bolts of cable bracket
Speedometer driven gear sub-assembly Observe glass of speedometer bolts of driven gear Tightening speedometer driven sub-assembly gear sub-assembly
Torque for calibrating bolts of transmission assembly: Tightening bolts of jointing surface
2 wire Tightening bolts clamps of shift cover
Reverse switch
lamp
Filler/drain plug
Lock bolts of release fork
Assembly bolt distribution
1. Calibrate 13 bolts M8 on combination surface, torque is 15-22N.m; 2. Calibrate 4 bolts M8 on shift cover, torque is 15-22N.m; 3. Calibrate shift lock bolt M18, torque is 25-30N.m; 4. Calibrate bolts M18 on filler/drain plug, torque is 25-30N.m; 5. Calibrate lock bolts of release fork, torque is 15-22N.m; 6. Calibrate bolts M18 on back-up lamp switch, torque is 30-50N.m; 7. Calibrate 4 bolts M8 on the support of clutch cable, torque is 15-22N.m; 8. Calibrate speedometer tightening bolt M8, torque is 7-10N.m
133
Chassis – Manual Transmission Assembly (1.3L) – Assembly Disassembling
Part 5 Manual Transmission Assembly (1.3L) I.
Assembly Disassembling Connecting bolts of end cover
End cover
Tightening bolts of shift cover
Bearing thrust spring of output shaft Rear bearing output shaft
gland
of
Connecting bolt
Release connecting bolts on the end cover first, take out end cover and bearing thrust spring of output shaft, then put a special spanner whose end face has 4 cylinder projections into the 4 holes on rear bearing gland of output shaft for screwing it out; release tightening bolts of shift cover to take out shift cover assembly; then take off transmission housing by releasing connecting bolts of transmission.
Take out interlock pin with magnetic stick
Take out fork shaft clip as shown in the figure
134
Chassis – Manual Transmission Assembly (1.3L) – Assembly Disassembling
As shown in the figure, clamp the upper part of fork shaft protected by something like cloth with pliers to pull it out.
Take out reverse gear and its shaft
As shown in the figure, remove 2 bolts and the support of reverse swinging arm
Remove interlock pin with magnetic stick, and pull out fork shaft and fork
Remove bolt and fork shaft as shown in the figure
Remove clip in the manner shown in the figure
Remove clip and then take out fork
135
Chassis – Manual Transmission Assembly (1.3L) – Assembly Disassembling
Remove lubricant oil pipe
Take out bushing in the manner shown in the figure
Take out oil seal
As the figure shows, take out bearing outer race with a special tool
Remove end cover of oil guide
Detect axial clearance of third gear with a feeler gauge, its standard value is 0.1~0.35mm
Third gear
136
Chassis – Manual Transmission Assembly (1.3L) – Assembly Disassembling
As shown in the figure, detect axial clearance of the fifth gear, its standard value is 0.1~0.50mm Fifth gear
Detect radial clearance of fourth gear and fifth gear as shown in the figure: Standard value ≤ 0.058mm
Locate input shaft assembly with pressure machine as shown in the figure, meanwhile; hold the input shaft lower by hand to remove teeth sleeve, teeth hub and fifth gear
Detect axial clearance of the fourth gear, its standard value is 0.1~ 0.55mm
Third gear
Take off shaft clip with clip pliers Note: do not scratch shaft surface
Take out locking ball with magnetic stick, and take off gear and third-and-fourth synchronizer ring gear
137
Chassis – Manual Transmission Assembly (1.3L) – Assembly Disassembling
Take off clip with clip pliers Note: do not scratch surface
Locate synchronizer assembly, synchronizing ring and third gear with pressure machine as shown in the figure Note: Hold shaft lower part by hand to prevent it falling
Take off radial ball bearing with press machine. Hold shaft lower part by hand to prevent it falling
Disassemble synchronizer assembly as the figure shows
As shown in the figure, take out elastic cylinder pin from shift swinging arm with pin remover and hand hammer
138
Chassis – Manual Transmission Assembly (1.3L) – Assembly Disassembling
Remove clip in the manner shown in the figure
Disassemble interlock support, shift swinging lever, spring and gasket A in the manner shown in the figure
Remove shift swinging lever and connecting bolts
Remove the clip and disassemble it as shown in the figure
Remove shift guide shaft and dust cover from shift cover, and take off gaskets as shown in the figure.
Take out oil seal of shift cover with a screwdriver as shown in the figure
139
Chassis – Manual Transmission Assembly (1.3L) – Assembly Disassembling
Take out the other oil seal on shift cover in the same way
Take off tapered bearing from differential housing in the manner shown in the figure Note: locate end face of bearing cone reliably
Take off cylinder bearing at the drive gear side of speedometer as shown in the figure
Take off drive gear of speedometer
Remove tightening bolts of differential
Take out elastic cylinder pin with pin remover, and then take out 1 planetary gears and gaskets, 2 side gears and gaskets, and planetary gear shaft orderly Detect input shaft run-out by the method shown in the figure. The maximum diameter is 0.03mm
140
Chassis – Manual Transmission Assembly (1.3L) – Assembly Disassembling
Detect distance between the back of synchronic ring and the end face of gear with a feeler gauge The minimum value is 0.8mm, or else synchronic ring should be replaced
Detect distance between teeth sleeve and shift fork with a feeler gauge The maximum value is 0.35mm, or else teeth sleeve and shift fork should be replaced
Measure wearing condition of input shaft with micrometer, minimum diameter of surface A is 33.985mm, and that of surface B is 30.985mm, if it is out of the range, replace the input shaft.
Measure axial clearance between first and second gears with a feeler gauge
First gear
Second gear
First gear: 0.1~0.35mm Second gear: 0.1~0.35mm
Measure run-out of first and second gears as shown in the figure, the maximum run-out is 0.056mm
Take off tapered bearing in the manner shown in the figure Note: 1. Hold shaft lower part to prevent it falling 2. Clamp bearing cone reliably
Remove tapered bearing at the other side in the same way
141
Chassis – Manual Transmission Assembly (1.3L) – Assembly Disassembling
Remove spring snap ring from output shaft in the manner shown in the figure
Take off fourth and fifth gear with pressure machine Note: hold shaft lower part to prevent it falling
Move first-and-second teeth sleeve to first gear
Remove third gear with pressure machine. Hold shaft lower part to prevent it falling. And remove needle roller bearing, synchronic ring and second gear.
Remove clip with clip pliers, do not scratch bearing surface of the shaft
Check circle run-out as shown in the figure, allowable maximum run-out is 0.03, and the output shaft should be replaced if the value is exceeded.
142
Chassis – Manual Transmission Assembly (1.3L) – Assembly Disassembling
Detect axial clearance from the back of synchronic ring to end face of gear spline with a feeler gauge: the minimum clearance is 0.8mm, if it is lower than the minimum value, the synchronic ring should be replaced.
Check the clearance between teeth sleeve fork groove and the fork with a feeler gauge, the maximum clearance value is 0.35mm, and the fork should be replaced if actual value is larger than this value
Check wearing and damage condition of the output shaft, check outer diameter dimension of bearing table with a micrometer, the minimum value is 33.985mm, when the actual is below this value, replace the output shaft.
Install first gear and synchronic ring in the direction shown in the figure
Press first-and-second synchronizer assembly into input shaft with pressure machine, the direction is as shown in the figure
Replace bulged shaft clip with a new one Note: do not scratch shaft surface
143
Chassis – Manual Transmission Assembly (1.3L) – Assembly Disassembling
Install synchronic ring, needle roller bearing and second gear
Press third gear into output shaft with pressure machine as the figure shows, and the direction is as shown in the figure
Press fourth gear and fifth gear into output shaft with pressure machine in the manner shown in the figure, and the direction is as shown in the figure
Press bearing shaft into input shaft with pressure machine in the way shown in the figure Note: adjust the bearing cone to locate reliably
As shown in the figure, install needle roller bearing, third gear and third synchronic ring, and install synchronizer assembly in the direction shown in the figure
Install a new clip onto the input shaft
144
Chassis – Manual Transmission Assembly (1.3L) – Assembly Disassembling
Install needle roller bearing, then install third-and-fourth synchronizer assembly in the direction the figure shows, and install fourth gear onto input shaft
Install locating ball as the figure shows, and pass the fifth thrust pad through the ball and install it into input shaft
Install clip in the same way as mentioned before
As shown in the figure, install needle roller bearing, fifth gear and fifth synchronic ring
Install synchronizer assembly with pressure machine in the direction the figure shows
145
Chassis – Manual Transmission Assembly (1.3L) – Assembly Disassembling
Press radial ball bearing with pressure machine
Knock a new clip into input shaft in the direction shown in the figure
Press front tapered bearing into output shaft in the way shown in the figure Note: bearing cone must be located reliably
Press rear tapered bearing into output shaft in the way mentioned above Note: bearing cone must be located reliably
Knock in oil seal of shift cover in the way shown in the figure, after that, the distance from end face of rear oil seal to end face of oil seal hole should be 2.0~2.5mm
Knock in the other oil seal as the figure shows, after that the distance from end face of rear oil seal to end face of oil seal hole should be 0~ 0.5mm
146
Chassis – Manual Transmission Assembly (1.3L) – Assembly Disassembling
Install gasket onto shift guide shaft, and install dust cover into shift guide shaft, then install both onto shift cover together.
Knock a new clip onto shift reverse shaft in the direction shown in the figure.
Install two new fork shaft clips, and install interlock pin to the position shown in the figure
Install 2 new fork shaft clip as the figure shows
Install first-and-second shift fork to fork shaft, and put fork corner into first-and-second teeth sleeve, install first-and-second guide block and tighten bolts with torque of 16N.m
Knock elastic cylinder pin into guide block as the figure shows
Install lubricant oil pipe as the figure shows
147
Chassis – Manual Transmission Assembly (1.3L) – Assembly Disassembling
Knock a new fork shaft clip into third-and-fourth fork shaft in the way shown in the figure
Install reverse block and fork shaft clip as shown in the figure
Install third-and-fourth fork shaft into clutch housing, and install third-and-fourth shift fork into teeth sleeve groove, and then tighten it. Bolt: torque is 16N·m
Install interlock pin into reverse block as shown in the figure
As the figure shows, install reverse swinging arm support by connecting two bolts, torque is 17N·m, and then place the head of reverse block into corresponding hole on the support of reverse swinging arm.
As shown in the figure, place the head of reverse swinging arm into the interaxle groove of reverse gear
As the figure shown, install reverse fork, spring and fifth reverse guide block onto fifth gear fork shaft, and then place fifth reverse fork into fifth teeth sleeve, finally install them into clutch housing together.
148
Chassis – Manual Transmission Assembly (1.3L) – Assembly Disassembling
Coat the bolt with sealant, then connect rotation swinging lever and its shaft into rotation cover with bolts; the torque is 16N·m
Install gasket A, spring, interlock support and shift swinging lever onto shift reverse shaft in the order and direction shown in the figure, then knock elastic cylinder pin into the hole of shift swinging lever, after that the distance from its end face to the hole should be 0~0.5mm
Knock a new clip as shown in the figure
Take out oil seal in the manner shown in figure, then install a new oil seal into transmission housing
Install 2 side gears and gaskets into differential housing orderly, screw 2 planetary gears and gaskets into differential housing, and then put in planetary gear shaft and install a new elastic cylinder pin as the figure shows
Install differential ring gear in the direction shown in the figure, then tighten connecting bolts of differential
Install drive gear of speedometer in the direction shown in figure
149
Chassis – Manual Transmission Assembly (1.3L) – Assembly Disassembling
Install adjusting gasket choosed previously into transmission housing
Coat housing jointing surface with sealant as shown in figure
Tighten corresponding bolts as shown in figure with torque of 29Nm
Coat connecting bolts of reverse shaft with lock adhesive glue, and install a new gasket to the bolt, then tighten reverse shaft onto transmission housing, the torque should be 29N·m.
Install shift positioning assembly to transmission housing, and the torque should be 37N·m
150
Chassis—Manual Transmission Assembly(1.3L)—Assembly Assembling
II.
Assembly Assembling Connecting bolts of end cover Bearing thrust spring of output shaft End cover Rear bearing gland of output shaft
Screw rear bearing gland of output shaft into transmission housing with a spanner until screwing torque reaches 40N·m, put bearing thrust spring of output shaft into rear bearing gland of output shaft in the direction shown in figure, then press the end cover and tighten its connecting bolts with tightening torque of 12N·m.
151
Chassis—Drive shaft/Driveshaft—Drive shaft, Driveshaft and Transaxle
Part 6 Drive shaft/Driveshaft I.
Drive shaft, Driveshaft and Transaxle
A. Symptom Table The table below can help you find the causes of the troubles. The numbers indicate the priority of the causes of the problem. Replace the parts if necessary. Symptom
Inspection Area 1. Wheel 2. Front wheel alignment 3. Rear wheel alignment
Deviation
4. Front wheel hub bearing (worn) 5. Rear wheel hub bearing (worn) 6. Front shock absorber with coil spring 7. Steering linkage (loose or damaged) 8. Stabilizer bar 1. Wheel balance
Front wheel vibration
2. Wheel hub bearing (worn) 3. Front shock absorber with coil spring
Noise (drive shaft)
1. Outer joint (worn) 2. Inner joint (worn)
B. On-board Inspection 1. Check front wheel hub bearing (1) Remove front wheel. (2) Remove front brake caliper assembly. (3) Remove front brake disc. (4) Check the bearing clearance. Set a dial measuring gauge near the front wheel hub center to check the clearance. Maximum: 0.05mm If the clearance exceeds the maximum value, replace the front wheel hub bearing. (5) Check the front wheel hub deviation. Using a dial measuring gauge, check the deviation of the surface of the wheel hub outside the hub bolt. Maximum: 0.07mm If the clearance exceeds the maximum value, replace the front wheel hub subassembly. (6) Install front brake disc. 152
Chassis—Drive shaft/Driveshaft—Drive shaft, Driveshaft and Transaxle
(7) Install front brake caliper assembly (8) Install font wheel. Torque: 103N.m 2. Check rear wheel hub bearing (1) Remove rear wheel. (2) Remove rear brake drum subassembly. (3) Check bearing clearance. Set a dial measuring gauge near the rear wheel hub center to check the clearance. Maximum: 0.05mm If the clearance exceeds the maximum value, replace the rear wheel hub and bearing assembly (4)Check rear wheel hub deviation Using a dial measuring gauge, check the deviation of the surface of the rear wheel hub inside the hub bolt. Maximum: 0.07mm If the clearance exceeds the maximum value, replace the rear wheel hub and bearing assembly. (5) Install rear brake subassembly (6) Install rear wheel Torque: 103N.m
153
Chassis—Drive shaft/Driveshaft—Front Constant-velocity Drive Shaft
II.
Front Constant-velocity Drive Shaft
Component View I
Right constant velocity drive shaft assembly
Left constant velocity drive shaft assembly
Nut Stabilizer retainer
link
gasket
Stabilizer link gasket Stabilizer Slotted nut Latch Stabilizer link gasket Stabilizer link gasket retainer
Cotter pin
Slotted nut
Front auxiliary frame lower swinging arm Fixing nut
Steering tie rod ball joint
154
Chassis—Drive shaft/Driveshaft—Front Constant-velocity Drive Shaft
Component View II
Outer rzeppa
Dust cover Large clamp of outer rzeppa
Small clamp of inner rzeppa
Small clamp of inner rzeppa Dust cover of inner rzeppa Small clamp of inner rzeppa Tripod Snap ring
Inner rzeppa
Spring ring
155
Chassis—Drive shaft/Driveshaft—Front Constant-velocity Drive Shaft
Inspection 1. Drain manual transmission oil (M/T transmission) Torque: 39N.m 2. Remove front wheel 3. Remove engine bottom shield assembly 4. Remove front axle wheel hub left fixing bolt (1) Using a hammer and a drive shaft nut chisel, release the staked part of the left wheel hub nut. (2) While stepping the brake pedal, remove the left wheel hub nut. Notice: the staked part of the nut should be fully released, otherwise it may damage the thread of the drive shaft. 5. Remove left front vehicle speed sensor (with ABS) (1) Remove the bolt and clip, remove vehicle speed sensor and brake hose from left front shock absorber assembly
(2)Remove the bolt, separate the left front vehicle speed sensor from steering knuckle.
6. Remove front stabilizer bar (1) Use a 10mm wrench to hold the bolt, remove the nut (2) Remove two retainers, No.1 and No.2 gaskets, remove front stabilizer bar
7. Separate left lower swing arm assembly (1) Remove cotter pin and slotted nut (2) On steering knuckle, remove the left lower swing arm assembly with ball joint puller
156
Chassis—Drive shaft/Driveshaft—Front Constant-velocity Drive Shaft
8. Separate steering gear with tie rod assembly (1) Remove cotter pin and slotted nut (2) On steering knuckle, remove the steering gear with tie rod assembly with ball joint puller
9. Separate left front steering knuckle assembly Using a plastic hammer, separate left front drive shaft assembly from left front steering knuckle assembly. Notice ●
Do not damage the dust cover
●
With ABS: Be careful not to damage the vehicle speed sensor rotor.
10. Remove left constant velocity drive shaft assembly Using a differential side gear shaft remover, remove the left constant velocity drive shaft assembly. Notice ●
Do not damage the dust cover and oil seal.
●
Be careful not to drop the drive shaft assembly
11. Remove right constant velocity drive shaft assembly Using a brass bar and a hammer, remove the right constant velocity drive shaft assembly. Notice ●
Do not damage the boot and oil seal.
●
Be careful not to drop the drive shaft assembly
12. Install left front steering knuckle assembly Notice: The hub bearing could be damaged if it is subjected to the vehicle weight, such as when moving the vehicle with the drive shaft bearing removed. Therefore if it is absolutely necessary to place the vehicle weight on the hub bearing, first support it with the special service tool for front hub bearing 13. Check left constant velocity drive shaft assembly (1) Check the universal joint of fix end for apparent looseness. (2) Check that the inboard joint slide smoothly. (3) Check the inboard joint for radial looseness. (4) Check the dust cover for damage. Notice: Place the drive shaft assembly on level during the inspection 157
Chassis—Drive shaft/Driveshaft—Front Constant-velocity Drive Shaft
14. Remove inboard joint big clamp Using a screw driver, loosen the inboard joint big clamp
15. Remove left flexible end small clamp Using a screw driver, loosen the small clamp
16. Separate flexible end dust cover
Mark
Separate the fixed end dust cover from the left Rzeppa joint assembly.
17. Remove left tripod joint assembly (1) Wipe off the old grease from the tripod joint assembly. (2) Place the marks between the tripod joint assembly and the fixed end joint. Notice: Do not punch the marks (3) Remove the tripod joint assembly from the Rzeppa joint assembly. (4) Using a snap ring plier, remove the left drive shaft inner snap ring.
Mark
(5) Place marks on the tripod joint assembly and outboard Rzeppa joint assembly. Notice: Do not punch the marks. (6) Using a brass bar and a hammer, remove the tripod joint from the outboard Rzeppa joint assembly. Notice: Do not tap the roller (7)Remove the inboard joint cover clamp, dust cover, inner cover and left cover small clamp
18. Remove left constant velocity fixed end joint cover big clamp Using a screwdriver, loosen the left constant velocity drive shaft outboard joint cover big clamp
158
Chassis—Drive shaft/Driveshaft—Front Constant-velocity Drive Shaft
19. Remove left fixed end joint cover small clamp Using a screw driver, loosen the fixed end joint cover small clamp
20. Remove fixed end joint cover (1) Remove the fixed end joint cover from the outboard Rzeppa joint assembly. (2) Wipe off the old grease from the Rzeppa joint assembly 21. Remove left front drive shaft tripod joint spring retainer Using a screw driver, loosen the left front drive shaft tripod joint retainer 22. Install left front drive shaft tripod universal joint spring retainer Install a new tripod universal joint spring retainer 23. Install fixed end joint dust cover (1) Wrap vinyl tape around the spline of the Rzeppa joint to prevent damaging the covers. (2) Install the new parts on the tripod joint in the following sequence. a. Left fixing end dust cover big clamp b. Left fixing end dust cover c. Left fixing end dust cover small clamp (3) Coat the left Rzeppa joint assembly with grease. Grease amount: 69-79g (4) Install the fixed end joint cover on the Rzeppa joint assembly 24. Install outboard joint boot small clamp As shown in the figure, use a screwdriver to install the outboard joint boot clamp
25. Install left fixing end joint cover big clamp As shown in the figure, use a screwdriver to install the left fixed end joint cover big clamp.
159
Chassis—Drive shaft/Driveshaft—Front Constant-velocity Drive Shaft
26. Install tripod joint assembly Tip: Before installing the cover, wrap vinyl tape around the spline of the Rzeppa joint to prevent damaging the covers. (1) Install the new parts on the tripod joint in the following sequence. a. Inboard joint cover small clamp b. Inboard joint cover c. Inboard joint cover big clamp
(2) Align the marks, install the tripod assembly on the tripod joint outer shaft assembly. (3) Using a brass bar and a hammer, install the tripod assembly. Notice ●
Do not knock the roller.
●
Make sure the tripod is correctly installed
(4) Using a snap ring plier, install the new retainer.
Mark
(5) Coat the tripod joint assembly with grease. Grease amount: 99-109g (6) Align the marks, install the left intermediate shaft assembly on the tripod joint assembly 27. Install inboard joint cover Install the inboard joint cover on the intermediate shaft and tripod joint outer shaft. 28. Install inboard joint cover small clamp As shown in the figure, use a screwdriver to install the inboard joint cover small clamp
29. Install inboard joint big clamp As shown in the figure, use a screwdriver to install the inboard joint big clamp
30. Check front drive shaft (1) Check the fixed end joint for apparent looseness. (2) Check that the inboard joint slide smoothly. (3) Check the inboard joint for radial looseness. (4) Check the dust cover for damage. Notice: Place the drive shaft assembly on level surface during the inspection
160
Chassis—Drive shaft/Driveshaft—Front Constant-velocity Drive Shaft
Tips: Please refer to the following table for dimension (A). LH
mm
RH
mm
JL-5LE136
574
778
JL-S160G
503.8
851.3
31. Install left constant velocity drive shaft assembly (1) Coat the spline of the tripod joint assembly with gear oil. (2) Align the spline teeth, use a brass bar and hammer to install the left drive shaft assembly. Notice: Face the retainer open end downward. Be careful not to damage the cover and oil seal. Tip: You can find out whether the tripod joint shaft contacts the pinion shaft by rotating the shaft assembly, listening to the sound and feeling. 32. Install right constant velocity drive shaft assembly Tip: The installation of the right side is the same as that of the left side. Notice: Install the retainer with its open end facing downward. Be careful not to damage the dust cover and oil seal 33. Install left steering knuckle assembly Install the left constant velocity drive shaft assembly on the left steering knuckle assembly. Notice: Be careful not to damage the fixed end joint boot. With ABS: Be careful not to damage the vehicle speed sensor rotor 34. Install left steering gear with tie rod assembly (1) Install the steering gear with tie rod assembly on the steering knuckle assembly with nuts. Torque: 33N.m (2) Install the new cotter pins. Notice: If the pin holes are not aligned, further tighten the nut by 60°
161
Chassis—Drive shaft/Driveshaft—Front Constant-velocity Drive Shaft
35. Install left lower swing arm assembly (1) Install the left lower swing arm assembly on the steering knuckle assembly with nuts. Torque: 98N.m (2) Install the new cotter pins. Notice: If the pin holes are not aligned, further tighten the nut by 60° 36. Install front stabilizer bar (1) As shown in the figure, install the stabilizer bar with two 1# retainers and two gaskets and nuts. Notice: Make sure the gaskets and collars are correctly installed (2)Tighten the nut with a 10mm wrench. Torque: 18N.m
37. Install left front vehicle speed sensor (with ABS) (1) Install the left front vehicle speed sensor and brake hose on the front shock absorber with bolts and clips. Torque: 29N.m (2)Install the vehicle speed sensor on the steering knuckle with bolts. Torque: 8.0N.m Notice: Be careful not to damage the wheel speed sensor. Keep the vehicle speed sensor clean. When installing the sensor, do not twist the sensor wire harness 38. Install left steering knuckle wheel hub nut (1) Install new left steering knuckle hub nuts Torque: 216N. m (2) Using a chisel and hammer, stake the hub locking nut 39. Install engine bottom plate 40. Install front wheel Torque: 103 N. m 41. Fill the manual transmission fluid 42. Check and adjust the automatic transmission fluid 43. Check and adjust front wheel alignment 44. Check ABS vehicle speed signal (with ABS)
162
Chassis—Brake System—Introduction to Brake System
Part 7 Brake System I.
Introduction to Brake System
Brake system diagram
1. Precaution 1. It's very important to keep the parts and area clean when repairing the brake system. 2. Care must be taken to replace each part properly as it could affect the performance of the brake system and result in a driving hazard. 3. Do not let brake fluid remain on a painted surface when repairing any parts. Otherwise wash it off immediately. 4. If any work is done on the brake system or air in the brake pipelines is suspected, bleed the system of air. 5. Check the brake system for leakage after repairing the brake system. 6. Use specified brake fluid. Do not mix with other brand of brake fluid 2. Symptom table Use the table below to help you find the cause of the problem. The numbers indicate the priority of the likely cause of the problem. Check each part in order. If necessary, replace these parts. Symptom
Low brake pedal or recoil foot
Suspected Area 1 Brake system fluid leaking 2 Air in the hydraulic brake system 3 Piston Cup in wheel cylinder (worn or damaged) 4 Rear brake shoe clearance (misadjustment) 5 Master brake cylinder (trouble) 6 Booster push rod length (misadjustment) 7 Brake shoe or lining (oil dirt) 8 Brake disc/drum (scratched)
163
Chassis—Brake System—Introduction to Brake System
Symptom
Suspected Area
Brake Drag
1. Brake pedal free stroke (too small) 2. Parking brake lever stroke (misadjustment) 3. Parking brake cable (stuck) 4. Rear brake shoe clearance (misadjustment) 5. Brake pad or lining (damaged) 6. Wheel cylinder piston (stuck or frozen) 7. Return spring (trouble) 8. Vacuum booster (trouble) 9. Brake master cylinder (trouble)
Brake Deviation
1. Wheel cylinder piston (stuck) 2. Brake shoe lining (oil dirt) 3. Brake disc (scratched) 4. Brake shoes or lining (damaged) 5. Wheel hub bearing (worn or damaged) 6. Tire pressure (not as specified)
Noise from brake
1. Brake shoe lining (damaged) 2. Installation bolt (loose) 3. Brake disc (scratched) 4. Brake shoe (poor quality) 5. Brake shoes or lining (oily) 6. Sound isolating shim (damaged) 7. Retaining spring of brake shoe (damage)
164
Chassis—Brake System—Brake Fluid
II.
Brake Fluid
1. Bleeding 1. Fill brake reservoir with brake fluid Brake fluid: DOT4 complying with GB12981-2003 2. Brake pipeline system bleed (1) Connect the plastic pipe to the wheel cylinder bleeder screw discharge port
(2) Depress the brake pedal several times, and then loosen the bleeder screw with the pedal held down.
(3) Tighten the bleeder screw when fluid flows, and then release the brake pedal. (4) Repeat (2) and (3) until all the air in the fluid has been bled out. (5) Repeat the above steps to bleed the brake pipeline of the air for each wheel cylinder. Notice: Fill brake fluid into the reservoir all the time when bleeding. 3. Check fluid level in reservoir Check the fluid level and fill fluid if necessary. Tips: Do not mix and use with other brand of brake fluid
165
Chassis—Brake System—Brake Pedal
III. Brake Pedal Component View
Clutch assembly
Nut
cable Bushing
Brake signal lamp switch assembly
Clutch brake pedal assembly
Brake signal switch gasket
lamp
Lubricating bushing Clutch pedal shaft
Lubricating bushing
Latch Lubricating bushing
Brake pedal shaft
Connecting pin
Connecting joint fork of booster
Lubricating bushing
Clutch pedal drive lever
Specified torque
Clutch pad
One-off parts Lithium soap based glycol grease
Brake pedal drive lever
pedal Brake pad
pedal
166
Chassis—Brake System—Brake Pedal
1. Adjustment 1. Check and adjust the height of brake pedal. a. Check the height of brake pedal to the floor: 135.8~145.8mm b. Adjust the height of brake pedal. ① Remove the lower cover of the console. ② Remove the coupler from the brake lamp switch. ③ Loosen the lock nut of the brake lamp switch, and remove the brake lamp switch. ④ Loosen the lock nut of the U-connector. ⑤ Turn the pedal push rod and adjust the height of brake pedal. ⑥ Tighten the lock nut of the push bar. Torque: 20~25N·m ⑦ Install the brake lamp switch. ⑧ Insert the connector of the brake lamp switch ⑨ Push the brake pedal (1.5~2.5mm), and turn the brake lamp switch till it goes out. Lock the nut in this position ⑩After installation, step down the brake pedal (1.5~2.5mm), and check the brake lamp is on. Check the pedal free stroke. (1) Shut down the motor, and step on the brake pedal repeatedly till the there is no vacuum in the booster. (2) Step down the pedal till resistance appears, and measure the distance as shown in the figure. Pedal free travel: 1-6mm If the clearance does not meet the requirement, check the clearance of the brake lamp switch. Clearance: 0.5-2.4mm If the clearance is correct, make diagnosis on the braking system. (3) Check the pedal reserved distance. a. Loosen the parking brak e extension rod. b. When the motor is running, step down the pedal, andeasure m the pedal reserved distance as shown in the figure. c. When stepping on the pedal with force of 490N, the reserved distance from the asphalt floor is larger than 79mm If the distance doesn't meet the requirement, make diagnosis on the braking system 2. Removal and assembling 1. Remove the combination instrument component. 2. Unfix the brake master cylinder push rod U-connector.
167
Chassis—Brake System—Brake Pedal
Remove the lock pin and connecting pin, and unfix the master cylinder push rod from the brake pedal. 3. Remove the brake pedal bracket. (1) Remove the bolt from the brake pedal bracket (see right figure). (2) Unfix the brake lamp coupler. (3) Remove the four nuts and brake pedal bracket (see right figure) 4. Remove the brake pedal sub-assembly. (1) Remove the bolt and nut from the brake pedal bracket. (2) Remove the brake pedal and the two shaft bushings. 5. Remove the brake lamp switch component. (1) Loosen the lock nut of the brake lamp switch. (2) Remove the brake lamp switch from the brake pedal bracket. 6. Remove the brake pedal pad. Remove the brake pedal pad from the brake pedal 7. Install the brake pedal pad. Install the brake pedal pad on the brake pedal 8. Install the brake lamp switch component. Install the brake lamp switch on the brake pedal bracket. 9. Install the brake pedal. (1) Apply lithium soap-base glycol lube on the end surface and side surface of the two new shaft bushings. (2) Install the brake pedal and the two shaft bushings on the brake pedal bracket with bolts and nuts. Torque: 23~28N·m 10. Install the brake pedal bracket. (1) Install the brake pedal bracket with four nuts. Torque: 20~25N·m (2) Connect the connector of the brake lamp switch. (3) Install the bolt on the brake pedal bracket (see figure 3). Torque: 20~25N·m 11. Connect and install the brake cylinder push rod U-connector. (1) Apply the lithium soap-base glycol lube on the handspike pin. (2) Connect the master cylinder handspike with connecting pin and lock pin 12. Install the combination instrument components. 13. Check and adjust the brake pedal height. 14. Check the brake pedal's free stroke. 15. Check the brake pedal's reserved distance 168
Chassis—Brake System—Brake Master Pump
IV. Brake Master Pump Component View 1
Brake master cylinder sub-assembly
Vacuum booster Vacuum hose
Without ABS
Manual transmission: Clutch 1 reservoir pipe
Switch connector of oil lever warning lamp
Specified torque One-off parts Lithium soap based glycol grease
169
Chassis—Brake System—Brake Master Pump
Component View 2 With ABS
Reservoir cover Reservoir Strainer O ring
pin
Snap ring
Hole connector
Straight pin
Cup Gasket
Hole connector
Piston 1 and spring
Brake master cylinder Without ABS
Piston guide block
Piston 2
Spring Reservoir cover Strainer
Pin
O ring Snap ring Gasket Hole connector
Cup
Hole connector
Brake master cylinder
Piston 1 and spring Piston 2 and spring
Gasket Piston stopper bolt
Piston guide block
Specified torque One-off parts Lithium soap based glycol grease
170
Chassis—Brake System—Brake Master Pump
Repair 1. Discharge the brake fluid. Note: Never spray the brake fluid on the paint surface, otherwise wash it immediately
With ABS
2. Remove the brake master cylinder. (1) Pull out the connector of the level alarm light switch. (2) Slide the fixing clip, and pull out #1 clutch reservoir oil pipe (manual transaxle).
Without ABS
(3) Remove the two brake oil pipes from the brake master cylinder with special tool.(with ABS) (4) Remove the three brake oil pipes from the brake master pump accessory with special tool. (Without ABS)
(5) Remove the two retaining nuts, and pull out the brake master cylinder
3. Remove the reservoir. (1) Put the brake master cylinder on the plyer. (2) Remove the pin from the brake master cylinder block with special tool and hammer. (3) Pull out the Brake fluid reservoir. (4) Remove the cover and strainer from the reservoir. (5) Remove the reservoir and the two hole connectors 4. Remove the brake master cylinder. (1) Put the brake master cylinder on the plyer. (2) Remove the O-ring. (3) Push the piston with hand, and remove the snap ring with snap ring pliers
171
Chassis—Brake System—Brake Master Pump
(4) Push the piston with hand, and turn the cylinder block to remove the straight pin. (with ABS)
(5) Push the piston with hand, and remove the piston stopper bolt and washer. (without ABS)
(6) Pull out #1 piston, piston guide block, spring, cup and washer straightly. Note: If angle appears in the pulling process, it may cause damage to the cylinder wall. (7) Put two blocks and cloth on the work bench. Put the flange of the master cylinder against the block edge and knock it till #2 piston and spring get out of the cylinder. Tips: Make sure the distance (A) between the working cloth and the block's top is at least 100mm. Note: If angle appears in the pulling process, it may cause damage to the cylinder wall 5. Check the brake master cylinder. (1) Check the cylinder wall whether there is any rust or scratch. (2) Check the cylinder wall whether there is any abrasion or damage. Note: If necessary, clean or replace the brake master cylinder. Tips: Clean the assembled parts with compressed air. 6. Install the brake master cylinder. (1) Fix the brake master cylinder on the plyer. (2) Apply the lithium soap-base glycol lube on the rubber parts with arrow. (3) Install # 2 and # 1 pistons, spring, piston guide block, cup and washer. Note: If angle appears in the installation process, it may cause damage to the cylinder wall. Be careful not to damage the edge of the cup on the piston (4) Push the piston, and install the straight pin on the cylinder body. (with ABS)
172
Chassis—Brake System—Brake Master Pump
(5) Push the piston, and install the new washer and piston stopper bolt. Torque: 12~15N·m
(6) Push the piston, and install the snap ring with snap ring pliers. (7) Install the O-ring on the brake master cylinder.
7. Install the Brake fluid reservoir. (1) Apply the lithium soap-base glycol lube on the Brake fluid reservoir connector, and install it on the brake master pump. (2) Install the pin on the brake master pump with punch and hammer
8. Check and adjust the vacuum booster push rod. (1) Install a brake boost push rod gauge on the brake master cylinder, and lower the top of brake boost push rod gauge till it touches the piston. (2) Mark the top surface of the brake boost push rod gauge with chalk. (3) Overturn the brake boost push rod, and leave a clearance between the brake boost push rod and the vacuum booster. Tips: If there is clearance between the special tool main body and the booster housing, it means that the clearance is standard value. If there is no chalk trace on the booster push rod, it means that the clearance exceeds the standard value. (4) Adjust the length of the vacuum booster push rod with the brake push rod till the push rod touches the top rod
9. Install the brake master cylinder. (1) Install the brake master cylinder on the booster with two bolts. Torque: 12~15N·m
173
Chassis—Brake System—Brake Master Pump
(2) Connect the two brake oil pipes to the brake master cylinder with a special tool. (with ABS)
With ABS
Torque: 15~20N·m (3) Connect the three brake oil pipes to the brake master cylinder with a special tool. (without ABS) Torque: 14~18N·m (4) Insert the brake fluid level alarm switch connector.
Without ABS
10 Add the brake fluid to the Brake fluid reservoir. 11. Discharge the air in the brake master cylinder. 12. Discharge the air in the brake pipeline. 13. Check the level height of the Brake fluid reservoir. 14. Check the brake fluid whether there is any leakage
174
Chassis—Brake System—Vacuum Booster
V.
Vacuum Booster
Component View Connecting hose of vacuum booster Brake hard pipe of brake master cylinder 2
Grommet
Brake hard tube of brake master cylinder 1 Level controller
warning
Booster Booster installing pad
Retaining bolt for lever Clamp
Brake master cylinder
O ring
Specified torque One-off parts Lithium soap based glycol grease
Connecting joint fork
175
Chassis—Brake System—Vacuum Booster
Check 1. Check the vacuum booster.
Good
Poor
(1) Air tightness check a. Start the motor, and shut it down after one or two minutes, then step on the pedal several times slowly. Tips: If the pedal goes down greatly at the first step, but it gradually goes up after the second and third steps, it means the air tightness is good.
3rd
1st
2
nd
b. When the engine is running, step down the brake pedal, and then shut down the engine. Tips: If the reserved distance does not change thirty seconds after the pedal is stepped down, it means the air tightness is good (2) Operation check a. When the ignition switch stays in OFF position, step on the pedal several times, and then check that the reserved distance should not change. b. Step down the pedal, and start the engine. Tips: If the pedal goes down a little, it means the operation is normal.
Vented
Not vented
2. Check the vacuum one-way check valve. a. Slide the clip to unfix the vacuum hose. b. Remove the vacuum one-way check valve. c. Check the booster is ventilated to the engine. d. In case of any failure, replace the vacuum one-way check valve Replacement 1. Discharge the brake fluid. Note: Never spray the brake fluid on the paint surface, otherwise wash it immediately. 2. Unfix the fluid outlet pipe component of master cylinder. 3. Remove the brake master cylinder. 4. Remove the vacuum booster. (1) Unfix the vacuum hose from the brake booster. (2) Remove the return spring, lock pin and connecting pin. (3) Remove the four nuts and U-clip. (4) Pull out the vacuum booster and installation washer 5. Install the vacuum booster. (1) Install the vacuum booster and new washer. (2) Install and fasten the vacuum booster nut.
176
Chassis—Brake System—Vacuum Booster
Torque: 28~32N·m (3) Install the return spring, lock pin and connecting pin 6. Install the vacuum booster push rod. 7. Install the vacuum booster 8. Install the brake master cylinder. 9. Connect the fluid outlet pipe component of master cylinder. 10. Add the brake fluid to the reservoir. 11. Discharge the air in the brake master cylinder. 12. Discharge the air in the brake pipeline. 13. Check and adjust the height of the brake pedal. 14. Check the free stroke of the pedal 15. Check the reserved distance of the pedal. 16. Discharge the air in the clut ch oil pipe (manual transmission). 17. Check and adjust the clutch pedal (manual transmission). 18. Check the level height in the brake reservoir. 19. Check the brake fluid w hether there is any leakage. 20. Check the clutch fluid whether there is an y leakage (manual transmission with hydraulic control device clutch)
177
Chassis—Brake System—Front Brake
VI. Front Brake Component View
Copper washer Front brake hose
Brake disc
Bleeding screw Guide pillar
Guide bush Dust cover bleeding screw
of Piston sealing ring
Piston dust cover
Overall caliper assembly
Guide piece
Piston Column Guide pillar bushing Guide bush
Disc
Guide piece
Caliper bracket Disc
Specified torque One-off parts Lithium soap based glycol grease
178
Chassis—Brake System—Front Brake
1. Repair (1) Remove the front wheel. Take off wheels by screwing down their bolts on them. Torque: 100~105N·m (2) Screw down dust cover of bleeding screw and bleeding screw; Note: Never spray the brake fluid on the paint surface, otherwise wash it immediately. (3) Remove front brake hose; Screw down bolts and washers fixing front brake hose from caliper.
(4) Remove front caliper body; a. Remove 2 retaining bolts and washers shown in right figure from front disc brake caliper; b Fasten the front guide pillar, and remove the two bolts
(5) Remove the front brake plate kit. a. Remove the two brake plat es with muffle washers. b. Remove muffle and heat isolati on washers from the brake plates.
(6) Remove the friction plate of the front disc brake.
(7) Remove the two guide pillar of front disc brake. Guide pillar
Guide pillar
179
Chassis—Brake System—Front Brake
(8) Remove the dust cover of front disc guide pin. Remove the two dust cover of front disc guide pin from front disc brake caliper bracket. Guide bush
Guide pillar
(9) Remove bushing between guide pillar and guide bush;
(10) Remove 2 retaining bolts from the support of front caliper body;
(11) Remove the front brake caliper. a Put a piece of cloth or equival ent between the brake cylinder and the piston. b Blow the piston out of the brak e cylinder with compressed air. Warning: In the blowing process, the finger shall not be placed before the piston. Note: Don't spray the brake fluid Tool
c. Remove the piston dust cover from brake caliper with awl.
d. Remove the piston seal ring from brake caliper with awl. e. Take out the piston
(12) Check the brake pump wall and piston whether there is rust or scar (13) Check the lining thickness of the brake plate. Measure the lining thickness with ruler. Standard thickness: 11.0mm Minimum thickness: 1.0mm Standard Thickness: 10.0mm Minimum Thickness:1.0mm
180
Chassis—Brake System—Front Brake
(14) Check the abrasion indicator steel strap of the front brake. Make sure the abrasion indicator steel strap has adequate flexibility and has no deformation, crack or damage. All rust, dirt and other impurities shall be cleaned. (15) Check the thickness of the brake disc. Measure the thickness of the brake disc with screw micrometer. Standard Thickness: 20.0mm Minimum Thickness: 18.0mm (16) Remove the front brake disc. a. Make mark on the brake disc and wheel hub. b. Remove the brake disc. (17) Install the brake disc. Tips: Install the disc at the minimum swing position (18) Check the swing of the brake disc. a. Fasten the brake disc temporarily. Torque: 103N.m b. Measure the swing of the brake disc at the 10mm from the disc edge with a dial measuring gauge. Maximum Swing: 0.05 mm c.If the swing of the brake disc reaches or exce eds the limit, check the bearing's axial clearance and the wheel hub's swing. If the bearing and wheel hub run normally, adjust the swing of the brake disc, or finish it with onboard finishing machine. (19) Tighten the brake discharge bolt temporarily. Tighten the brake discharge screw plug on the front brake cylinder temporarily. (20) Install the piston oil seal. a. Apply the lithium s oap-base glycol lube on the new piston oil seal. b. Install the new piston oil seal on the brake cylinder (21) Install the brake piston. a. Apply the lithium soap-base glycol lube on the brake piston. b.Install the piston on the front disc brake cylinder. Note: Don't tighten the piston into the brake cylinder forcefully (22) Install the dust cover of the brake wheel cylinder. a. Apply the lithium soap-bas e glycol lube on the dust cover of the new brake wheel cylinder, and install it on the brake cylinder. Tips: Install the dust cover in the groove of the brake wheel cylinder and piston reliably. b. Install the set ring with screwdriver. Note: Be careful not to damage to the dust cover of the brake wheel cylinder
181
Chassis—Brake System—Front Brake
(23) Install the left front disc brake wheel cylinder support. Fasten the front disc brake wheel cylinder support with two blots. Torque: 88~92N·m (24) Install the dust cover of the front disc guide pin. Apply the lithium soap-base glycol lube on the surface of the two new dust covers. Install the two dust covers on the front disc brake cylinder support. (25) Install the guide pin of the front disc brake cylinder. Apply the lithium soap-base glycol lube on the surface of the two sliding parts of guide pin and oil seal. Install the two guide pins on the front disc brake cylinder support (26) Install the frictional plate of the front brake. Install the two removed frictional plate into front brake caliper (27) Install the brake lining block component. Note: When replace the abrasion brake lining block, replace the muffle pad simultaneously. a. Apply the disc brake lube on both sides of all muffle pads b. Install muffle pads on all brake lining blocks. c. The abrasion indicator faces upwards. Install a inner brake lining block, then install a outer lining block. Note: Don't apply the oil or lube on the friction surface of the brake pad and brake disc. (28) Install the front disc brake. a. Install the front disc brake caliper with two bolts. Torque: 32~36N·m b. Install the new washer and hose with joint bolt. Torque: 28~32N·m Tips: Fasten the hose in the lock hole of the brake wheel cylinder reliably. (29) Add the brake fluid to the reservoir. (30) Discharge the air in the brake cylinder. (31) Discharge the air in the brake pipeline. (32) Check the level height in the reservoir. (33) Check the brake fluid whether there is any leakage. (34) Install the front wheel. Torque: 100~105N·m
182
Chassis—Brake System—Front Hub and Bearing Assembly
VII. Front Wheel Hub and Bearing Assembly Component View
Steering knuckle Dust cover
Elastic ring for hole Bearing
Wheel hub bolt Wheel hub
Specified torque One-off parts Lithium soap based glycol grease
183
Chassis—Brake System—Front Hub and Bearing Assembly
1. Repair (1) Remove left front wheel; (2) Remove fixing nuts on left front drive shaft;
Special tool
a. Pry dented part of fixing nuts with special tool and hammer; b. Remove fixing nuts.
(3) Remove left front wheel speed sensor assembly (with ABS); a. Remove bolts, and remove sensor harness and brake hose from shock absorber;
b. Remove wheel speed senor from steering knuckle by removing bolts.
(4) Remove left front brake caliper assembly; Disassemble brake caliper support by removing 2 bolts. (5) Remove left front brake assembly;
Special tool
(6) Remove left tie rod assembly; a. Remove cotter pin and nut; b. Remove tie rod assembly from steering knuckle with special tool.
184
Chassis—Brake System—Front Hub and Bearing Assembly
(7) Remove left lower control arm assembly; Remove 2 nuts, then remove lower control arm from lower ball joint.
(8) Remove left front shaft hub assembly; a. Remove drive shaft from shaft hub with plastic hammer; Note: do not damage dust cover and ABS speed sensor rotor. b. Remove steering knuckle with shaft hub assembly by removing 2 bolts and nuts. Special tool
(9) Remove ball joint assembly of left front lower control arm; a. Remove cotter pin and nut; b. Remove ball joint with special tool.
(10) Remove the snap ring in left front bossing hole; Remove snap ring with snap ring pliers
(11) Remove left front shaft hub assembly;
Special tool
a. Remove shaft hub with special tool;
b. Remove inner race (outer) from shaft hub with special tool. 185
Chassis—Brake System—Front Hub and Bearing Assembly
(12) Remove left front brake dust cover; Take off brake dust cover after removing 3 bolts.
Special tool
(13) Remove left front wheel hub bearing; Special tool
a. Place inner race (outer) on the bearing; b. Remove bearing from steering knuckle with special tool and press machine.
Special tool
(14) Install left front wheel hub bearing; Install new bearing at steering knuckle with special tool and press machine.
Special tool
(15) Install left front brake dust cover; Install the dust cover with 3 bolts.
(16) Install left front shaft hub assembly; Install shaft hub with special tool and press machine.
(17) Install snap ring of left front shaft hub hole;
Special tool
Special tool
Install snap ring with snap ring pliers. (18) Install ball joint assembly of left front lower control arm; a. Install lower ball joint and locking nuts; Torque: 103±10N·m b. Install new cotter pin. If position of cotter pin hole can not be at one line, then tighten nuts by 60° additionally.
186
Chassis—Brake System—Front Hub and Bearing Assembly
(19) Install left front shaft hub assembly; a. Install 2 bolts and nuts, and install shaft hub assembly to shock absorber; Torque: 153±10N·m Note: when it is required to use bolts and nuts repeatedly, coat nut threads with engine oil. b. Push front shaft hub assembly to vehicle outer, then install drive shaft assembly into teeth groove of front shaft hub assembly. Note: ●
Do not push front shaft hub assembly to outer side excessively.
●
Pay attention not to damage dust cover of outer joint of drive shaft.
●
Pay attention not to damage wheel speed sensor rotor.
(20) Install left lower control arm assembly; Install lower control arm and ball joint with 2 nuts and bolts. Torque: 142±10N·m (21) Install left tie rod assembly; a. Connect tie rod to steering knuckle; b. Install nuts and new cotter pin. Torque: 49±5N·m (22) Install left front brake assembly; (23) Install front brake caliper assembly; Install brake caliper assembly to steering knuckle with 2 bolts. Torque: 106±10N·m
(24) Install fixing nuts on left front drive shaft; Install new fixing nuts with torque wrench. (25) Remove left front wheel cylinder assembly; (26) Remove left front brake assembly; (27) Check axial clearance of bearing; Check axial clearance of shaft hub center with dial measuring gauge. Maximum value: 0.05mm If axial clearance exceeds maximum value, the bearing should be changed. (28) Check run out of shaft hub end face; Check run out of outer surface of shaft hub with dial measuring gauge. Maximum value: 0.05mm If the run out exceeds maximum value, the measuring gauge should be replaced.
187
Chassis—Brake System—Front Hub and Bearing Assembly
(29) Install left front brake assembly; (30) Install left front brake caliper assembly; Install brake caliper assembly to steering knuckle with 2 bolts. Torque: 106±10N·m
(31) Install left front wheel speed sensor assembly a. Install wheel speed sensor harness and brake hose to shock absorber with bolts; Torque: 29N·m
b. Install wheel speed sensor to steering knuckle with bolts. Torque: 8~10N·m Note: ●
Pay attention not to damage wheel speed sensor.
●
Avoid attaching with foreign matter.
When installing sensor, sensor harness should not be twisted. (32) Install fixing nuts on left front drive shaft; a. Install new fixing nuts; Torque: 216±15N·m b. Fix fixing nuts with chisel and hammer. (33) Install front wheels; Torque: 103±10N·m (34) Check and adjust front wheel alignment; (35) Check signal from ABS wheel sensor (with ABS). Tip: repair procedure for right side is the same as that for left side.
188
Chassis—Brake System—Rear Brake Drum
VIII. Rear Brake Drum Component View Rear brake hard tube Pin
Dust cover of bleeding screw Wheel cylinder assembly
Bleeding screw Chassis hole plug
Stopper spring
Brake shoe
Retaining spring guard for shoe
Pin Shoe spring
Parking brake cable
retaining
Shoe return spring
Automatic adjusting lever Brake shoe
Shoe spring
retaining
Shoe spring
stopper Brake drum
Retaining spring cover for shoe
Specified torque One-off parts Lithium soap based glycol grease
189
Chassis—Brake System—Rear Brake Drum
1. Repair (1) Remove the rear wheel (2) Discharge the brake fluid. Note: Never spray the brake fluid on the paint surface, otherwise wash it immediately (3) Remove the rear brake drum. a. Loosen the parking brake cable rod, and remove the brake drum. b. Take off brake drum after loosing screws with hose caliper.
(4) Remove stop spring;
(5) Remove shoe return spring;
(6) Remove shoe stop spring;
(7) Remove left retaining spring cover of brake shoe, left retaining spring of brake shoe, screws and left brake shoe by plier. (8) Remove automatic adjusting lever assembly; Note; do not damage or bend automatic adjusting lever assembly.
(9) Remove right retaining spring cover of brake shoe, right retaining spring of brake shoe, screws and right brake shoe in the same way as (7);
(10) Remove parking brake cable from brake shoe;
190
Chassis—Brake System—Rear Brake Drum
(11) Remove rear wheel cylinder assembly; a. Loose bolts on rear brake hard hose with tools, and then collect brake fluid flown out with a container after removal; b. Loose bolts fixing rear wheel cylinder and take off wheel cylinder; c. Disassemble dust cover of bleeding screw and bleeding screw from wheel cylinder. (12) Check wheel cylinder; Check that there is any rust or scratch on cylinder wall and piston. (13) Check inner diameter of brake drum; Measure inner diameter of drum with brake drum gauge or equivalent: Standard inner diameter: 200.0mm Maximum inner diameter: 201.0mm (14) Check the thickness of brake shoe lining Check the thickness of brake shoe lining with ruler: Standard thickness: 4.5mm Minimum thickness: 1.0mm Note: if the lining thickness is equal to or smaller than minimum, or there is serious and uneven worn, replace the brake shoe assembly. (15) Check whether the brake drum contacts brake shoe lining normally. Smear the chalk in the brake drum, and stick the brake shoe to the drum surface to grind. If the brake drum connects with lining poorly, use grinding brake shoe or replace brake shoe. (16) Install bleeding screw and its dust cover to wheel cylinder; (17) Install wheel cylinder of rear brake: a. Install fixing bolts of wheel cylinder; Torque: 8~12N·m b. Connect rear brake hard hose with special tool. Torque: 14~18N·m (18) Coat with high-temperature-resistant grease; Coat contact surface of brake bottom plate and brake shoe with high-temperature-resistant grease.
(19) Install right rear brake shoe assembly: a. Connect parking brake cable to brake shoe with special tool;
191
Chassis—Brake System—Rear Brake Drum
b. Install right brake shoe, screws, retaining spring of right brake shoe and its cover to brake with special tool.
(20) Install automatic adjusting lever assembly: a. Coat adjusting bolts with high-temperature-resistant grease.
b. Install left regulator assembly as shown in right figure.
Bottom plate
Left adjuster assembly
(21) Install left rear brake shoe assembly: a. Install left brake shoe, screws, retaining spring of left brake shoe and its cover to brake with special tool;
b. Position shoe stopspring to the brake and install in place;
c. Install shoe return spring;
d. Install stop spring.
192
Chassis—Brake System—Rear Brake Drum
(22) Check installation condition of brake drum: a. Check that all parts are installed correctly; Left rear
Right rear
Front
Front
b. Measure inner diameter of brake drum and diameter of brake shoe, check that the clearance between them is allowable. Brake shoe clearance: 0.6mm Note: it is forbidden to stick oil dirt or lubricating grease on the surface of brake shoe liner and brake drum
(23) Adjust the shoe clearance of the brake shoe. a. Install two wheel hub nuts temporarily. b. Turn around eight teeth of the regulator. c. Install the hole plug. (24) Install the rear brake drum assembly (25) Add the brake fluid to the reservoir (26) Discharge the air in the master cylinder.
Extend
(27) Discharge the air in the brake pipeline. (28) Check the level height in the reservoir. (29) Check the brake fluid whether there is any leakage. (30) Install the rear wheel. Torque: 100~105N·m (31) Check the stroke of the parking brake pull rod. (32) Adjust the stroke of the parking brake pull rod 193
Chassis—Brake System—Rear Hub and Bearing Assembly
IX. Rear Wheel Hub and Bearing Assembly Component View
Wheel speed sensor harness With ABS
Wheel hub bolt Brake drum
Specified torque One-off parts Lithium soap based glycol grease
Rear wheel hub unit
194
Chassis—Brake System—Rear Hub and Bearing Assembly
1. Maintenance (1) Remove left rear wheel (2) Remove rear wheel brake drum assembly (3) Remove wheel speed sensor wire harness (with ABS) (4) Remove left rear axle wheel hub and bearing assembly Remove 4 bolts, left wheel hub and bearing assembly (5) Install left rear axle wheel hub and bearing assembly Install left wheel hub and bearing assembly with 4 bolts Torque: 63N·m (6) Connect ABS wheel speed sensor wire harness (with ABS) Notice: Do not twist the sensor wire harness during connection (7) Check bearing clearance (8) Check left rear axle wheel hub deviation (9) Install left rear wheel brake drum assembly (10) Install left rear wheel Torque: 103N·m (11) Check ABS wheel speed sensor signal (with ABS) Tip: service procedure for right side is the same as that for left side.
195
Chassis—Brake System—Parking Brake System
X.
Parking Brake System
Component View Rear wheel speed sensor Balance block
Parking brake cable assembly
Specified torque One-off parts Lithium soap based glycol grease
196
Chassis—Brake System—Parking Brake System
1. Malfunction table The table below can help you find out the possible failure reasons. The number means the possible sequence of the reasons. Check the parts, and replace the corresponding parts if necessary. Symptom
Suspected location
Brake is blocked.
1. The stroke of the parking brake extension rod is misadjusted. 2. The parking brake cable is trapped. 3. The clearance of the parking brake shoe is misadjusted. 4. The parking brake lining is cracked or deformed. 5. The return or tension spring is damaged.
2. Adjustment 1. Remove the rear wheel. 2. Adjust the clearance of the brake shoe. 3. Install the rear wheel Torque: 100~105N·m 4. Check the stroke of the parking brake pull rod. Pull the parking brake pull rod, and count the number of sound. Parking Brake Pull Rod Stroke: Pull with 196N force till 6-9 clicks 5. Adjust the stroke of the parking brake pull rod. (1) Remove the parking cover plate. (2) Turn #1 adjustment nut cable till the stroke is ok. (3) Install the parking cover plate 3. Replace parking brake control lever assembly 1. Remove the accessories of the console. 2. Remove the auxiliary console. 3. Remove #1 adjustment nut wire.
Cable of adjusting nut 1
4. Remove the accessories of the parking brake control lever. (1) Remove the connector of the parking brake control lever switch. (2) Remove the two bolts, and remove the parking brake control lever assembly 5. Remove the screw and parking brake switch component 6. Install the parking brake switch component. 7. Install the parking brake control lever assembly. (1) Install the pull rod on the parking brake cable, and install #1 adjustment nut wire. (2) Fasten the parking brake control lever with two bolts. Torque: 13~16N·m (3) Connect the connector of the parking brake switch. 8. Install the auxiliary console assembly.
197
Chassis—Brake System—Parking Brake System
9. Install the accessories console. 10. Check the stroke of the parking brake pull rod. 11. Adjust the stroke of the parking brake pull rod 4. Replace parking brake cable (1) Remove the accessories of the console (2) Remove the auxiliary console (3) Remove the cable adjusting nut (4) Remove the front floor pull rod. Remove the two bolts to take out the front floor pull rod. (5) Remove the front exhaust pipe component. (6) Remove the two bolts to take out the front floor heat insulating pad (7) Remove parking brake cable component: (a) Remove the four bolts to remove parking brake cable from the body. (b) Remove left parking brake cable component from the parking brake balancer, and remove the component.
cable
8. Remove the rear wheel. 9. Remove the accessories of the brake drum. 10. Remove the left brake shoe. 11. Remove the automatic adjustment pull rod. 12. Remove the right brake shoe assembly. 13 Remove left parking brake cable assembly; Disengage left parking brake cable assembly from bottom plate after removing bolts. 14 Install left parking brake cable assembly: a. Install left parking brake cable assembly to parking brake cable balancer. b. Secure left parking brake cable with 4 bolts. Torque: 6~10N·m
198
Chassis—Brake System—Parking Brake System
15 Install left parking brake cable assembly Fix the left parking brake cable assembly on the bottom plate with bolts and smear some lubricating grease. Torque: 6~10 N·m 16 Install right brake shoe assembly 17 Install the return spring of the brake shoe. 18 Install the automatic adjustment pull rod. 19 Install the left brake shoe assembly 20 Install the brake drum. 21 Check the installation of the brake drum. 22 Install the accessories of the brake drum. 23 Adjust brake shoe clearance 24 Install the rear wheel. Torque : 100~105N·m 25.Fasten adjustment nut wire temporarily. 26 Fasten front floor heat insulating pad with two bolts. Torque: 6~10N·m 27 Install the front exhaust pipe component. 28. Install the front floor pull rod. 29. Check the stroke of the parking brake pull rod. 30. Adjust the stroke of the parking brake pull rod Tip: apply the same procedure to right parking brake cable assembly as the left.
199
Chassis—Wheel—ABS system
XI. ABS system Component View I Right front brake hard pipe Left front brake hard pipe
Brake hard pipe for brake master cylinder 1
Brake hard pipe for brake master cylinder 2 Right rear brake hard pipe 1
Left rear brake hard pipe 1 HECU controller assembly
Harness
Specified torque One-off parts Lithium soap based glycol grease
HECU controller bracket
200
Chassis—Wheel—ABS system
Component View II
Front wheel speed sensor assembly
Specified torque One-off parts Lithium soap based glycol grease
201
Chassis—Wheel—ABS system
Component View III
Harness pipe clamp
Rear wheel speed sensor assembly
Specified torque One-off parts Lithium soap based glycol grease
202
Chassis—Wheel—ABS system
ABS system layout diagram (sketch) Wheel cylinder Wheel speed sensor
Wheel speed sensor
Wheel cylinder
Wheel speed sensor
Wheel cylinder
Warning lamp
Brake lamp switch Brake pedal/master cylinder/booster Wheel cylinder
Wheel speed sensor
1. ABS working principle When ABS system realizes ABS and EBD functions, it is used to prevent wheel locking during brake and to keep it within ideal working range of slip rate, thus ensure that the vehicle has sufficient direction stability and steering capability, and obtains optimum ground brake force at the same time. ECU of ABS system determines dynamic movement condition of current wheel and vehicle by obtaining wheel speed signal according to wheel speed sensor, and prevents wheels locking by implementing a series of control circulation of brake pressure during brake, meanwhile, remain vehicle wheels in ideal movement condition, thus obtain optimum ground brake force. E.g.: ●
When wheels will lock, control motion of corresponding valves and pumps to reduce brake pressure of wheel cylinder, thus prevent wheel locking;
●
When wheel speed rises, control corresponding valve motion to keep brake pressure of wheel cylinder, thus prevent wheel speed rising too fast;
●
When wheel speed is too high, control corresponding valve motion to increase brake pressure of wheel cylinder, thus prevent ground brake force reducing.
All above constitutes basic pressure adjustment circulation of ABS operation.
203
Chassis—Wheel—ABS system
Low-pressure accumulator
Master cylinder Booster
Suction valve
Pressure valve
Hydraulic pump
Normally open valve
Normally close valve
Wheel brake
2. ABS trouble diagnosis (1) Diagnosis process: During vehicle usage, if ABS warning lamp is on constantly or is off completely at ignition, it indicates ABS is faulty; diagnosis can be carried out according to the following process: Start Connect fault diagnosis tester in power-off condition
Refer to trouble check list (with trouble code) to repair
Turn key switch to “ON” position
Clear trouble code
Communicate with ABS with diagnosis tester
Switch off key switch, and then remove fault diagnosis tester
Perform inspection by referring No to trouble check list (without trouble code)
Driving inspection Can communicate or not
Yes
Diagnoses with diagnosis tester
Normal or not
No
Yes
Record trouble code
End
(2) Using method of diagnosis tester: a. Plug connector D of the diagnosis tester to diagnostic socket under power-off condition; b. Switch on ignition switch; c. Press “OK” button on the diagnosis tester, and then enter function interface of the diagnosis tester after establishing communication with ABS;
204
Chassis—Wheel—ABS system
d. Read trouble code and trouble description, or perform functions supported by other diagnosis testers; e. Switch off after usage and remove the diagnosis tester. (3) Fill fluid and exhaust for ABS system with the diagnosis tester: Fill oil and exhaust air for brake system normally
Depress brake pedal and hold
Connect with diagnosis tester and enter filling and exhausting function
Release pedal and front caliper bleeding bolts according to hint
Operate according to hints from diagnosis tester
Depress brake pedal 10 times repeatedly
Filling and exhausting is completed
Tighten bleeding bolts of brake caliper
Repeat procedure 7 times on left and right front calipers
(4) Notices during trouble diagnosis: ABS applies electronic hydraulic control, therefore, if phenomena listed in following table appears during normal operation of ABS system, it is normal instead of fault. Phenomena Self-check sound of system
Description the
Sound produced when ABS is operating ABS is operating, but brake distance is long
After starting the engine, sound like knocking may produce from engine compartment sometimes, it is due to self-check of ABS system and is normal. 1. Motor sound in ABS hydraulic unit. 2. Sound produced together with vibration of brake pedal. 3. When ABS is working, suspension hitting sound due to braking or rattling sound due to contact of tire and ground. On snowy road or sandstone road, brake distance of the vehicle equipped with ABS may be longer than that of the vehicle without ABS. Therefore, driver must be alerted that be careful when driving on roads mentioned above.
3. HECU Controller assembly (1) Open the cover of engine compartment; (2) Exhaust brake fluid; Note: do not splash brake fluid on painting surface, or else, please rinse it immediately. (3). Remove HECU controller assembly:
205
Chassis—Wheel—ABS system
a. Disengage the harness connector connecting HECU controller interface; b. Loose 6 brake hard pipe bolts connecting to HECU controller with special tool; c. Stick corresponding labels on 6 brake hard pipe disengaged to distinguish them:
To hard tube 2 of master cylinder To left rear hard tube
To right front hard tube
To right rear hard tube
To left front To hard tube 1 of hard tube master cylinder
d. Loose bolts fixing HECU controller support and vehicle body.
(4) Loose bolts connecting HECU controller assembly and support, then take off HECU controller;
(5) Install support and HECU controller assembly; Install HECU controller assembly to the support with bolts. Torque: 6~10N·m
(6) Install HECU controller and support: a. Install HECU controller and support to vehicle body with bolts; Torque: 18~22N·m
b. As shown in right figure, install brake hard pipe to the hole of HECU controller assembly correctly with special tool; Torque: 15~20N·m c. Connect the harness connector with HECU controller interface;
To hard tube 2 of master cylinder To left rear hard tube
(7) Fill brake fluid to reservoir; (8) Drain up air in master cylinder; (9) Drain up air in brake pipeline; (10) Check brake fluid level;
To right front hard tube
To right rear hard tube
To left front To hard tube 1 of hard tube master cylinder
206
Chassis—Wheel—ABS system
(11) Check that brake fluid is leaking; (12) Check HECU controller assembly with hand-held tester. 4. Front wheel speed sensor (1) Remove left front wheel; (2) Remove left front fender gasket; (3) Remove left front wheel speed sensor: a. Remove resin clamp and wheel speed sensor harness from retaining clamp of vehicle body; b. Remove sensor connector; c. Remove bolts on retaining clamp of sensor harness from vehicle body and shock absorber, see right figure for position;
d. Remove bolts and left front wheel speed sensor. Note: no foreign matter is allowed to attach on the top of sensor. (4) Install left front wheel speed sensor a. Install left front sensor with bolts; Torque: 8~12N·m b. Install retaining clamps of sensor harness to vehicle body and shock absorber with blots; Torque: 15~20N·m c. Connect wheel speed sensor connector; d. Connect resin clamps and wheel speed sensor harness to vehicle body and retaining clamps. (5) Install left front wheel fender gasket; (6) Install left front wheels; Torque: 100~105N·m (7) Check signal from ABS wheel sensor. Tip: Replacement process for right front wheel speed sensor is the same as that for the left one. 5. Rear wheel speed sensor (1) Remove left rear wheel; (2) Remove rear wheel speed sensor: a. Remove resin clamp and wheel speed sensor harness from retaining clamp of vehicle body;
207
Chassis—Wheel—ABS system
b. Remove sensor connector; c. Remove bolts on retaining clamp of sensor harness from vehicle body and shock absorber, see right figure for position; d. Release buckle and pull wheel speed sensor harness from vehicle body; e. Pull out clamps shown in right figure;
f. Remove bolts and left rear wheel speed sensor. Note: no foreign matter is allowed to attach on the top of sensor.
(3) Install left rear wheel speed sensor: a. Install left rear sensor with bolts; Torque: 8~12N·m
b. Install clamps;
c. Position wheel speed sensor harness to vehicle body and connect with buckle; (4) Install left rear wheels; Torque: 100~105N·m (5) Check and adjust rear wheel alignment; (6) Check signal from ABS wheel sensor. Tip: Replacement process for right rear wheel speed sensor is the same as that for the left one.
208
Chassis—Wheel—Tire Inspection and Wheel Replacement
Part 8 Wheel I.
Tire Inspection and Wheel Replacement
Check 1. Check tire (1) Check appearance of tire and its pressure Cool tire pressure Model HQ7131 HQ7101/HQ7101B1
Tire dimension
Front(kPa)
Rear(kPa)
165/60 R14 75H
230
210
(2) Check the run out of tire by dial measuring gauge. Run out of tire: ≤1.5mm
Front
2. Tire replacement Notes: As showed in graphic, replacement position of every tire including and not including the spare tire
3. Check tire dynamic balance (1) Check and adjust wheel on the off-car balancing machine. (2) Check and adjust wheel use the on-vehicle balancing machine if necessary. Balance deviation after adjustment: less than 8.0g 4. Check bearing clearance 5. Check hub terminal deviation 6. Check that front suspension is loose; 7. Check that steering pull rod is loose; 8. Check that shaft joint is loose; 9. Check that shock absorber is working normally: (1) Check that there is any oil leakage; (2) Check that bushing seat is wearing; (3) Shake front and rear of the vehicle.
209
Chassis—Power Steering System—Power Steering System
Part 9 Power Steering System I.
Power Steering System
1. Power Steering System Description Power steering system consists of the steering wheel, steering drive device, power steering fixed device and steering pipelines. The steering gear is rack and pinion type. 2. Major parameters for steering system Item
Parameter
Steering wheel rotation
3.3±0.1
Front wheel max turning angle
Left: inner/outer
32.38°±2°
Right: inner/outer
36.92°~40.92°
Min turning diameter
≤9.5m
3. Precaution: (1) Precaution for steering system Make sure of the correct replacement of parts, incorrect replacement might affect the performance of the steering system and lead to driving accidents. (2) Precaution for SRS System This vehicle is equipped with SRS (Supplemental Restraint System), driver side air bag and front passenger side air bag. Failure to carry out service operations in the correct sequence could cause the unexpected deployment of the air bag during servicing, possibly leading to a serious accident 4. Symptom Table The table below is helpful to find the cause of the problem. The numbers indicate the priority of the likely cause of the problem. Check each part in order. Repair or replace these parts or assemblies if necessary. Symptom
Possible cause
Heavy steering
1. Tire (improperly inflated) 2. Power assisted steering column assembly 3. Front wheel alignment (incorrect) 4. Steering knuckle (worn) 5. Suspension arm ball joint (worn) 6. Steering column (bent or binding)
Poor return
1. Tire (improperly inflated)
2. Front wheel alignment (incorrect)
3. Steering column (bent or binding)
4. Manual steering gear assembly
1. Steering knuckle (worn)
2. Suspension arm ball joint (worn)
Too large windage
3. Intermediate shaft, sliding fork (worn) 4. Front wheel bearing (worn) 5.Manual steering gear assembly (worn)
210
Chassis—Power Steering System—Power Steering System
Abnormal noise
1. Power assisted steering column assembly (damaged) 2. Steering system connecting ball joint (worn) 3. Manual steering gear assembly (damaged)
5. On-vehicle inspection 1 Check steering wheel free stroke (1) Stop vehicle and keep the tires straight ahead. (2) Rotate the steering wheel slightly, check the steering wheel free stroke. Maximum free stroke: 30 mm Max free stroke
211
Chassis—Power Steering System—Steering Drive Mechanism
II.
Steering Drive Mechanism
Component View 1 Horn button assembly Steering wheel assembly
Spiral plate
Combination switch assembly
Steering column assembly
Steering lower shaft assembly
Hole cover plate of steering column
212
Chassis—Power Steering System—Steering Drive Mechanism
Replacement 1. Precaution (refer to the steering system precaution) 2. Confirm that the wheel stays at a straight line running status. 3. Unfix the storage battery cathode terminal. 4. Remove the airbag assembly. (1) Align the front wheel to the front by rotating the steering wheel (2) Remove the two screws on both sides, and pull out the harness connector. (3) Disconnect the horn connector Note: When removing the airbag assembly, never pull the airbag harness. Caution: ¡ When put down the airbag assembly, make sure its top surface stays upward. ¡ Never disassemble the airbag assembly.
Using sleeve 使用套筒
5. Remove the steering wheel assembly. (1)Unfix the connector. (2)Remove the fixing bolts of the steering wheel. (3)Make a fit mark on the steering wheel assembly and main shaft assembly. (4)Remove the steering wheel with special tool. 6. Remove steering column cover (1) Remove 2 screws (2) Remove upper and lower covers of steering column.
213
Chassis—Power Steering System—Steering Drive Mechanism
7. Remove tachometer (1) Release the connection (2) Remove screws and tachometer 8. Remove clock spring assembly. (1) Release button connection (2) As the figure shows, release the air bag connection: Note: when removing air bag assembly, do not drag air bag harness! (3) Remove spiral plate
9. Remove instrument assembly (1) Remove 2 screws (2) Release the connection and remove instrument assembly
10. Remove the combination switch assembly. (1) Release connections at 3 places (2) Remove combination switch assembly as shown in figure.
214
Chassis—Power Steering System—Steering Drive Mechanism
11. Remove interior instruments and ECU
12. Remove the splined dust cover
13 Detach steering lower shaft 215
Chassis—Power Steering System—Steering Drive Mechanism
(1) Make a fit mark between slide fork and countershaft. (2) Loosen bolts A and B 14. Remove the splined dust boot 15. Detach steering lower shaft (1) Make a mark on the fit between slide fork and countershaft.
Making marks
(2) Loosen bolts A and B 16. Remove the steering column pipe assembly. (1) Release connections at 2 places (2) Remove 3 clamps and cut off power supply (3) Remove 3 screws and steering column assembly
17. Remove lower steering shaft assembly (1) Mark as shown in figure (2) Remove steering screws and lower steering shaft assembly from steering column assembly 18. After checking or replacing the steering column pipe assembly, install all parts in a reverse order. Note: (1) After installing the ignition switch lock core, check the operation of the steering locking function: when pulling out the key, the steering device is locked; when the key is inserted and turned to ACC position, the steering device is unlocked. (2) Tighten the bolts of steering column.
216
Chassis—Power Steering System—Steering Drive Mechanism
(3) Make sure all cables are connected reliably. (4) After adjusting the combination switch as well as the top housing and bottom housing of the steering pipe cap, fasten the three screws connecting the combination switch and the steering column assembly. (5) The universal joint fork and the steering gear assembly lock bolt with a torque of 35 N. m. (6) Install dust cover and its press plate. (7) When installing the steering wheel assembly, align the steering wheel assembly and the fit mark of the steering main shaft assembly. Tighten the special quincunx bolt with a torque of 50 N. m. (8) Check the airbag. It is not allowed to use a airbag part removed from another vehicle. (9) Check the SRS warning lamp
217
Chassis—Front Suspension System—Mechanical Steering Gear Fixing Device
III. Mechanical Steering Gear Fixing Device Component View I
Cotter pin
Dust cover of steering gear
Manual steering gear with tie rod assembly
Front suspension bracket member sub-assembly
218
Chassis—Front Suspension System—Mechanical Steering Gear Fixing Device
Replacement 1. Adjust wheel positions to align wheels to the front 2. Disengage cathode terminal of battery 3. Remove engine hood
4. Plug out intake pipe (1) Release clamping screws (2) Remove clamps with screwdriver and pliers (3) Remove air pipe
Clamp
5. Remove front window wiper
6. Remove upper seal of engine hood
7. Remove ventilation equipment
219
Chassis—Front Suspension System—Mechanical Steering Gear Fixing Device
8. Remove the panel of ventilation ceiling
9. Remove dust cover of steering column spline dust cover
10. Disassemble lower steering shaft assembly (1) Tie steering disc with seat belt to prevent steering disc rotating resulting in damage to spiral plate (2) Mark on sliding fork and intermediate shaft for match (3) Release bolt A and B 11. Disassemble dust cover of steering gear Remove clamp A and dust cover of steering gear
Clamp A Clamp B
Note: do not damage clamp B
12. Disassemble steering tie rod and tie rod arm (1) Remove screws and nuts (2) Remove steering knuckle
13. Remove front stabilizer link (1) Hold screws with wrench, and remove nuts (2) Remove gasket retainer and gasket, and then remove stabilizer link.
220
Chassis—Front Suspension System—Mechanical Steering Gear Fixing Device
14. Remove swinging arm assembly (1) Remove screws and nuts (2) Remove swinging arm sub assembly at steering knuckle
15. Remove oxygen sensor
16. Remove front exhaust pipe assembly (1) Remove screws and clamps (2) Remove 2 screws, compression spring and gaskets (3) Remove exhaust pipe support and exhaust pipe assembly
17. Lift up engine
Engine hook 1
Engine hook 2
221
Chassis—Front Suspension System—Mechanical Steering Gear Fixing Device
18. Remove sub-assembly
front
suspension
support
member
(1) Remove 3 screws, and then remove engine mounting
(2) Remove screws, and then separate control lever from engine control support
(3) Support front suspension support member sub-assembly with jack.
(4) Remove screws and front suspension support member sub-assembly
19. Remove steering drive device assembly (1) Remove the cover of steering column hole from steering drive device. (2) Remove 2 screws, 2 nuts and steering drive device assembly from suspension member
20. After completion of repair, install them in reverse order
222
Chassis—Front Suspension System—Power Assistant Steering System
IV. Power Assisted Steering System 1. General Power assisted steering system consists of electronic control module, speed sensor, engine speed sensor, and parts such as torque sensor and motor installed steering column. System control module determines power and its direction and drives motor to assisted steering operation according to signals transmitted from torque sensor and speed sensor. 2. Control process diagram Engine speed
Battery
Vehicle speed sensor
Torque sensor
Control module △Control motor according to input signal △Control clutch operation △Form automatical
Driving current of motor
fault diagnosis
Clutch closing/separating
Output diagnosis trouble code
3. Circuit diagram and various connector functions (with diagram) 4. Control module Control module is a kind of controller including microcomputer, A/D (analog/digital) conversion, I/O (input/output) devices etc, it can control power steering and its direction, as well as hold the functions of on-board diagnostics system (self-diagnosis function) and safety protection function. 5. Self-diagnosis function: When ignition switch is at ON position and engine starts, control module can diagnose faults occurred on following parts and show fault result by means of fault indicator. 1. Torque sensor 2. Speed sensor 3. Engine speed sensor 4. Motor 5. Clutch 6. Control module Operate the control module and fault indicator as shown below When ignition switch is at ON position, engine is in starting state and diagnosis wire connector is not grounded, if no fault occurs on parts mentioned above, the indicator is off after illuminating for 2s, it means checking indicator bulb and system circuit. When control module detects fault inside parts above, indicator illuminates to alert driver to fault, and trouble code is stored in backup memory of control module. When diagnosis switch is grounded, indicate trouble code by mean of indicator flashing by fault indicator
223
Chassis—Front Suspension System—Power Assistant Steering System
that control module controls. When checking fault, engine must run. 6. Safety protection function, when abnormal DTC appears, control module will switch off motor and clutch. 7. VSS (vehicle speed sensor) VSS produces proportional signal according to speed (some sensor signals can be input into module directly), speedometer converts these signals into corresponding speed reading, meanwhile they are also converted into square wave signals with double cycle which are then input into control module. 8. Engine speed signal Ignition signal from ignition coil can be used as engine speed signal, and it is converted into digital signal through ECU, and it is sent to instrument on one end, and input into control module on the other end. 9. Diagnosis (with trouble code table) Notices during trouble diagnosis 1. When two or more faults occur, diagnostic trouble code is always displayed from the smallest one orderly. 2. When electric ignition switch turns on and engine fails in starting, DTC22 (engine speed signal) is displayed, but when engine starts, if display changes normally, it indicates normal condition. 3. Because DTC (diagnostic trouble code) is stored in backup memory of control module, after repair, codes in the memory must be cleared, clearing method is to ground trouble diagnostic wire and then to display trouble code 3 times. 4. Refer to trouble code diagnosis table, and record trouble code displayed, then handle these troubles. 5. DTC (diagnostic trouble code) display (1) Find trouble diagnosis wire “A2” (2) Connect trouble diagnosis wire “A2” to ground (3) Start engine (if engine does not start, it will display DCT22) (4) When two or more faults occur, diagnostic trouble code (DTC) is always displayed from the smallest one orderly. 10. Inspection of “EPS” marking lamp circuit (when ignition switch turns on, “EPS” indicator is off) 1. Battery 2. Main fuse 3. Ignition switch 4. Circuit fuse (15A) 5. Control module 6. EPS lamp 7. Main fuse 8. Socket of control box 9. Connector
224
Chassis—Front Suspension System—Power Assistant Steering System
Step
Operation
Yes
No
1
Main fuse and circuit fuse are good or not?
Go to Step 2
Main fuse and circuit fuse are broken
Go to Step 3
“B/W” wire is disconnected or shorted
Go to Step 4
“B/R” wire is disconnected or shorted
Go to Step 5
Bulb is burnt or “V/G” wire is disconnected
Terminal “A6”, “A7”, “A3” or “A8” contacts poorly, control module box is grounding poorly, “B” wire +12V is disconnected
Poor connection
1. Turn on ignition switch 2
2. Check voltage between terminal “A6” and module box grounding 3. Is it battery voltage or not?
3
1. Check voltage between terminal “A8” and module box grounding 2. Battery voltage or not? 1. Turn off ignition switch, disconnect connector “8” from control module
4
2. Disconnect vehicle body grounding terminal “A3” on connector “8” 3. Turn on ignition switch again, “EPS” lamp is on or not
5
1. Connection between connector “8” and control module is secure or not
Inspection of “EPS” indicator circuit (“EPS” indicator is off or jumper connection between diagnosis switch terminal and grounding terminal is always on) Step
Operation
Yes
No
1
1. Connector “9” and terminal " A2" is connected to control module in good condition
Go to Step 2
Poor contact
1. With connector and control module connected together, ground “A2” terminal with wire
1. Repair wire is disconnected
2. Turn on ignition switch, “EPS” lamp is flashing or not
2. “B/W” circuit is disconnected or “B” wire is grounding poorly
2
Recheck after replacing good control module
225
Chassis—Front Suspension System—Power Assistant Steering System
11. DTC11 Main circuit of torque sensor (main circuit is disconnected or shorted) Step
1
2
Operation
Yes
1. Remove protective cover of steering column hole
1. “W” wire disconnected
is
2. Turn on ignition switch, face steering wheel to the front of vehicle, check that voltage of “B5” wire terminal in the center of torque sensor lever seat is about 2.5V
2. Terminal “B5” connected poorly
is
1. Turn off main switch, and disconnect torque sensor lever head
1. “W” wire is shorted to battery or is grounding
2. Check resistance between torque sensor terminal “B2” and " B5"
2. Poor contact between torque sensor connector and line
3. Is it about 0.96KΩ or not
No
Go to Step 2
3. If both items above are normal, replace a new control module and check again
Torque sensor is defective
DTC13 torque sensor (output between main line and auxiliary line of torque sensor is totally different) Step
Operation
Yes
No
1. Remove protective cover of steering column hole 2, Turn off ignition switch and disconnect torque sensor 3. Check resistance between connector terminals of torque sensor under following condition
“R—B”
About 0.96 KΩ
Face steering wheel to the front
About 0.48 KΩ
Turn steering wheel utmost right
About 1.02 KΩ
Turn steering wheel utmost left
About 0.96 KΩ
Face steering wheel to the front
About 1.02 KΩ
Turn steering wheel utmost right
About 0.48 KΩ
Turn steering wheel utmost left
1
“R—W”
1. Poor “W” or “B” circuit 2. Terminal “B5” connected poorly
or
“”B4
is
3. If both items above are normal, replace a new control module and check again
Torque sensor trouble
226
Chassis—Front Suspension System—Power Assistant Steering System
DTC14 torque sensor (power voltage of torque sensor too high or too low) Step
Operation
Yes
No
Recheck after changing good control module
Go to Step 2
1. Remove protective cover of steering column hole 1
2. Turn on ignition switch, and check voltage between “R” line of torque sensor connector and grounding terminal 3. About 5V?
2
1, Turn off ignition switch and disconnect torque sensor connector
1) Terminal “B2” or “”B3 is connected poorly
2. Check voltage between “R” line of torque sensor connector and grounding terminal
2) Poor contact between torque sensor connector harness
3. Is it about 1.09 KΩ?
3) “R” or “G” line is disconnected
Torque sensor trouble
4) “R” or “G” line is shorted to ground and battery DTC15 Auxiliary line of torque sensor (auxiliary circuit is open or shorted) Step
1
Operation
Yes
1. Remove protective cover of steering column hole
1. “B” wire is disconnected
2. Turn on ignition switch, steering wheel should be at the place where make vehicle moving forwards, check line “B” terminal voltage of torque sensor connector
No
2. Terminal “B4” is connected poorly 3. If both items above are normal, replace a new control module and check again
Go to Step 2
3. Is it about 5V?
2
1, Turn off ignition switch and disconnect torque sensor insert
1. Line “B” is shorted to ground or battery
2. Check voltage between line “R” and “W” or line “R” and “B” of torque sensor connector
2. Poor contact between torque sensor connector and harness
Torque sensor trouble
3. Is it about 0.96 KΩ?
227
Chassis—Front Suspension System—Power Assistant Steering System
12. DTC22 engine speed signal (no engine signal input) Step
1
Operation
Yes
Tachometer shows engine speed signal or not? 0-1V
Go to Step 2
No 1. Connector is connected poorly or line is open 2. There is no speed signal output from ECU
1. When ignition switch is OFF, remove control module and connect control module connector. 2
2. Ignition switch is ON, check voltage between terminal “A4” of control module and ground. 2. Check voltage between “R” circuit of torque sensor connector and grounding terminal
Poor connection of “A4”, if connection is normal, please replace it with a good control module.
Circuit “B” is open
3. Is it 8-12V or not? 13. DTC21 Vss circuit DTC21 Vss circuit (engine is running at 2500 rpm or higher (engine is running at 4000rpm or higher once it starts) and there is no high speed signal input for 60s continuously) DTC23 Vss circuit (engine is running at 2500 rpm or higher (engine is running at 4000rpm or higher once it starts) and there is no high speed signal input for 60s continuously) DTC24 Vss circuit (there is no vehicle speed input continuously for 5s after engine deceleration exceeds standard level) DTC14 torque sensor (power voltage of torque sensor too high or too low) Step
1
Operation
Tachometer shows speed signal or not?
Yes 1. Connection of “A5” and “V” harness is poor 2. If connection is good, replace control module and check again
No Replace vehicle sensor
good speed
14. DTC41 motor DTC41 motor (motor voltage too high or too low) DTC43 motor (motor current too high) DTC42 motor (current displayed by control module is different from actual current flowing to the motor) DTC44 motor (control module has output signals, but motor does not start) DTC45 motor (actual current flowing to motor is lower than the current output from control module) DTC14 torque sensor (power voltage of torque sensor too high or too low)
228
Chassis—Front Suspension System—Power Assistant Steering System
Step
Operation
Yes
No
1
With DTC or not?
Motor trouble
Go to Step 2
Go to Step 3
Motor trouble
1. Remove steering column hole cover
2
2. When ignition switch is OFF, disconnect motor and clutch connector 3. Check conduction among motor terminals 4. Is it conductive?
1. “R” or “B1” disconnected
3
1. Check resistance between motor and clutch and vehicle body grounding
circuit
is
2. “R” or “B1” circuit is shorted to the ground 3. Connector contacts poorly
2. Is it infinite?
Motor trouble
4. If items above are normal, replace a good control module and check again 15. DTC51 clutch circuit (clutch circuit is open or shorted) Step
Operation
Yes
No
Go to Step 2
Clutch trouble
1. Remove steering column hole cover
1
2. When ignition switch is OFF, disconnect motor and connector 3. Check conductivity among clutch connector terminals 4. Is it conductive?
1. “B/B1” or “B/R” circuit is disconnected
2
1. Check resistance between motor & clutch connector terminal and power supply. 2. Is it infinite?
2. “B/B1” or “B/R” circuit is shorted to ground 3. Poor contact of motor and clutch connector
Clutch trouble
4. Poor contact of terminal “A9” and “A10” 5. If items above are normal, replace a good control module and check again
229
Chassis—Front Suspension System—Power Assistant Steering System
16. Power circuit of DTC54 control module (battery voltage low) Step
1
Operation
Yes
1. When ignition switch is OFF, remove control module and connect control module connector.
1. Terminal “A7” contacts poorly
2. When ignition switch is ON, check voltage between terminal “A7” of control module and ground.
No
2. If items above are normal, replace a good control module and check again
Battery trouble
3. 10-14V or not? 17. DTC52, DTC55 control module (control module fault) Replace with a good control module and then check control module and its circuit again, they can be checked by measuring voltage and resistance of module inserts, it is prohibited to measure control module with multimeter at its ohm scale when it is not connected with module connector. 18. Voltage inspection 1. When ignition switch is OFF, remove control module from body 2. Connect control module connector to control module 3. Refer to following table to check voltage of connector terminals 4. When ignition switch is ON, confirm that battery is 11V or higher Terminal No.
Circuit
A6
Control module ignition switch
A5
Vss
voltage
of
Normal voltage
Fault phenomena
10-14V
Engine is at idle speed
0-1V and 4-6V
When ignition switch is ON, rotation range of front left tire under the condition of locking front wheel
B2
Power supply of torque sensor
About 5V
When ignition switch is ON, check voltage between terminal “B2” and “B3”
B1
Blank
——
——
A3
“EPS” fault indicator
0-2V, 10-14V
With engine at idle speed, “EPS” lamp is ON or OFF
A9
Clutch positive
10-14
With engine at idle speed, steering wheel fixes the vehicle at straight forward position
A4
Engine signal
——
——
B3
Torque sensor (GND)
0V
B4
Torque sensor is positive
About 2.5V
With engine at idle speed and vehicle driving forward, voltage between terminal “B4” and “B3”
B5
Torque sensor is negative
About 2.5V
With engine at idle speed and vehicle
230
Chassis—Front Suspension System—Power Assistant Steering System
driving forward, voltage terminal “B4” and “B3”
between
A10
Clutch is negative
0V
——
A2
Disconnect to terminal
5V
Ignition switch is ON
A11
Motor output is positive
5-7V
With engine at idle speed, steering wheel fixes the vehicle at straight forward position
A12
Motor output is negative
5-7V
With engine at idle speed, steering wheel fixes the vehicle at straight forward position
A7
Power is positive
10-14V
Engine idle speed
A8
Power is negative
0V
——
A1
Blank
——
——
19. Mechanical assembly 1. Steering column assembly can not be assembled, if any defect is found on any part, the whole assembly should be replaced. 2. When replacing steering column assembly, attention must be paid not to cause impact Plug-in function diagram
1
3
B1 B2 B3 B4 B5 ● ● ● ● ●
5 A7
A8
A1 A2 A3 A4 A5 A6 ● ● ● ● ● ●
A11
A12
A9
A10
A11
A9
A12
A10
A8 to power grounding line
A7 to continuous power supply 12V
A6 to switch power supply 12V
A2
A4 to instrument and engine speed signal
2
A5 to instrument vehicle speed signal
4
A3 to instrument fault lamp
● ● ● ● ● B1 B2 B3 B4 B5
A1 is blank
Blank
6
Note: both A4 and A5 are digital signal input 1 control module connector 2. torque sensor connector of steering column 3 control module connector 4. Diagnosis switch connector
231
Chassis—Front Suspension System—Power Assistant Steering System
5 control module connector 6 motor clutch connector of steering column No.
Circuit No.
Name
Loading
Color
Circuit diameter
1
B1
Blank
—
—
—
2
B2
+5V
5~10mA
R
0.5mm2
3
B3
GND
5~10mA
G
0.5mm2
4
B4
Torque signal 1