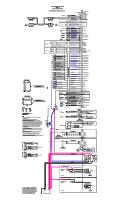
2800 Series Wiring Synchronization 16.10.2006 PDF [PDF]
2800 Series synchronization without the aid of Perkins electronic tooling Machine Wiring Schematic, All Options This Wi
28 0 416KB
Papiere empfehlen
![2800 Series Wiring Synchronization 16.10.2006 PDF [PDF]](https://vdoc.tips/img/200x200/2800-series-wiring-synchronization-16102006-pdf.jpg)
- Author / Uploaded
- علوي الهاشمي
Datei wird geladen, bitte warten...
Zitiervorschau
2800 Series synchronization without the aid of Perkins electronic tooling
Machine Wiring Schematic, All Options This Wiring Supplied By OEM Notes: Outputs may be used to drive lamps or relays.
C
Customer Interface J3 P3 Connector
Crank Terminate (Engine Running Signal)
T
Crank Terminate should be a relay used to disconnect the starter motor in OEM panel start circuit.
11
Shutdown (ECM latched out)
Diagnostic lamp lights when active system fault registered
G
5
Warning
U
4
Diagnostics
P
3
Low Oil Pressure
Overspeed
K
8
High Coolant Temp
O
17
N
9
Off - Disabled - Stop Injection Disable
K
16
Action Alert
For full details of inputs/ outputs, refer to Installation Manual
A
34
On - Enabled - Run
ECM
U
J1/13
Crank Terminate Output
J1/10
Shutdown lamp Output
J1/19
Action Alert Lamp Output
J1/20
Warning Lamp Output
J1/31
Diagnostics Lamp Output
J1/28
Oil Pressure Lamp Output
J1/29
Coolant Temperature Lamp Output
J1/30
Overspeed Lamp Output
J1/62
Injection Disable
J1/64
Shutdown Emergency Override
J1/56
1500/1800 rpm Select
J1/46
Droop/Isochronous
J1/41
Fault Reset
J1/49
Digital Speed Control Enable
J1/59
Lower Speed
On
35
Off Critical Override (Disables Oil & Water shutdowns when on) 1500
25
1500/1800 1800 rpm Select
Isoch
Droop/ Droop Isochronous
On the OEM machine interface wiring, make a link wire between PIN 2 and PIN 12
Fault Reset
Enable
Digital Speed Control Disable Digital Speed Control
If you are using a 5k ohm potentiometer for synchronization the following PINS are used: PIN 20, PIN 24, & PIN 19
Ground PWM +8V 680R
2
B
38
40 15 33 1 Off
Starter Motor
Start Button
Key On Switch J1939 Data Link
Perkins Data Link
Y
23 20 19
Emergency Stop Button
Circuit Breaker (16A)
P
B B B W R
39
POS
G
27 22 36 21
24
Charging Alternator GRD
A
18
12
680R
If you are using a digital speed controller, then you only need to connect to PIN 24 Analogue Speed Input and possibly PIN 20 Analogue Ground depending on your interface device
26
28
Raise Speed
5K Analogue Speed Setting Potentiometer or Input from Load Sharer/Synchroniser
N
29
Lower Speed
PWM Speed Control
K O
10 31 32 7 6
B W R B B B R R R Y Y G G N R B
-
Battery 24V DC
+ J H C G F D E A B
J1/7
Raise Speed
J1/18 J1/67 J1/5
Digital Ground
J1/66 J1/4
PWM Input +8V
J1/3
Analogue Ground
Unswitched Battery Negative Ground
J1/17
Analogue Speed Input
J1/2
+5V
J1/61
Unswitched Battery Negative
J1/63
Unswitched Battery Negative
J1/65
Unswitched Battery Negative
J1/48
Unswitched Battery Positive
J1/52
Unswitched Battery Positive
J1/53
Unswitched Battery Positive
J1/70
Switched Battery Positive
J1/50
J1939 Data Link +
J1/34
J1939 Data Link -
J1/42
J1939 Screen
J1/8
Perkins Data Link +
J1/9
Perkins Data Link -
J1/55
Unswitched Battery Positive
J1/69
Unswitched Battery Negative
P1 J1 9 Pin Perkins Data Link Connector
Main Battery Feed (Direct from starter/ battery)
Power Supply to Service Tool


